Display Mode
Use Display Mode to choose how much desktop space a display gives you and how that desktop is rendered. Each row is a complete display setup, so you can compare the available choices before switching. Filters help you find the modes you want, and favorites let you return to useful choices without searching the list again.
Where to find it: App Menu > display > Display Mode. For a virtual screen the same interface is named Virtual Screen Mode. Expand the device’s more-options chevron if needed.
The display must be connected. If it is a mirror target, enable Allow resolution change for mirror target displays in Resolution Slider and Display Mode Menu to change its mode here.
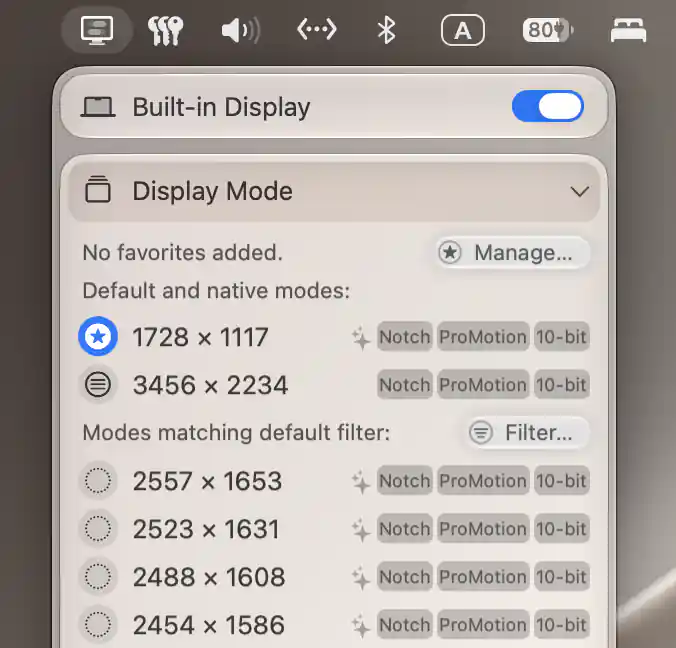
Built-in Display’s active default and native resolutions appear above the filtered HiDPI choices.
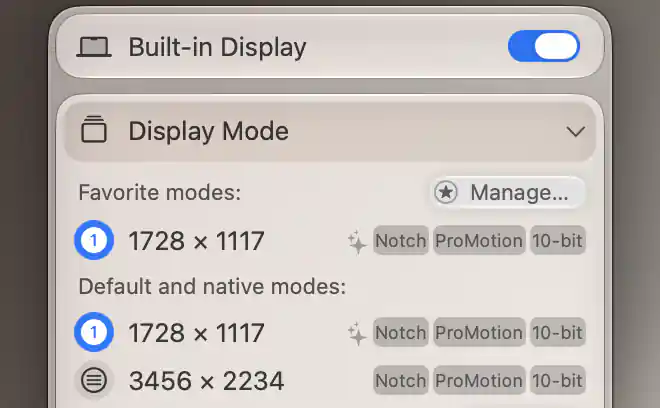
A saved favorite appears above the default and native mode list.
Read and select a mode
Start with the width × height at the beginning of a row. This is the logical resolution: the desktop space macOS uses to arrange windows and interface elements. The tags beside it describe the rest of the mode. They show the aspect ratio—the relationship between width and height—or Notch, followed by the refresh rate and bit depth. Refresh rate describes how often the image can update; bit depth describes the precision used for color components.
A sparkle identifies HiDPI rendering, which uses more pixels to draw interface elements at a given logical size. Modes without that sparkle use LoDPI rendering. These details explain why you may see the same width and height more than once: two rows can offer the same desktop space but different refresh rates, rendering scales or color precision. Selecting a row chooses that whole combination.
For the rendering background, see how macOS scaling, HiDPI and LoDPI work.
The current mode is highlighted. The icons also help you recognize favorites, the default resolution and native mapping; unsafe or invalid modes have their own markers. Near the top, Default and native modes: provides shortcuts that remain available independently of the main filter. One mode can serve both roles, so this section does not always contain two rows.
Select the row you want to use. The display changes immediately: there is no separate Apply step or confirmation countdown in this menu. If the desktop size changes, an attached App Menu temporarily closes while the system reconfigures, then reopens. Picture in Picture and streams are updated for the new mode, and any applicable group layout protection is reapplied.
When the display belongs to a group
A group can use UI scale matching to keep interface elements similarly sized across its displays. If your display belongs to such a group, choosing a mode here can also adjust the other group displays. Keep that interaction in mind when you want to change the size of text or windows on just one screen.
What the app remembers
When Configuration Protection is enabled, a mode change updates the resolution and refresh-rate values it holds. The selection is also sent to macOS as a persistent display configuration. It can still change after reconnection, through another app or because of system behavior, so persistence does not mean the mode is locked against every later change.
Five favorite slots
Favorites are useful when you regularly move between a few setups. You might have one available mode you like for everyday work and another for a different amount of desktop space. Each display has its own five favorite slots, and their assignments are remembered. Select a saved favorite row to apply it.
To save the mode you are currently using, open Manage…. Under Assign current resolution to favorite:, select one of the five numbered slots. A filled circle means that slot is already occupied; selecting it replaces its previous assignment with the current mode. The small × beneath an occupied slot removes the assignment without changing the mode you are using.
If a favorite becomes unavailable
The modes a display offers can change. When BetterDisplay cannot match a favorite to a currently available mode, its row keeps the saved dimensions and shows Unavailable. You cannot switch to it in that state, but you can still remove it through its context menu.
When matching a saved favorite, BetterDisplay looks for its size, HiDPI class and refresh rate. A fallback can use a different available bit depth or refresh-rate representation. Check the row’s current tags before applying it: a remembered favorite is a convenient way back to a mode, but does not guarantee an identical signal in every future configuration.
Filter the list
Filters help you compare a manageable set of modes without changing the display itself. Open Filter… to see colored tags for aspect ratio or notch, refresh rate, bit depth, and HiDPI/LoDPI. The default filter follows the current aspect ratio, refresh rate and bit depth. Its HiDPI/LoDPI selection also follows the menu preference.
Click a tag to choose that value within its category. The list then shows modes that match a selected value in every category. For example, if your display offers both 60 Hz and 120 Hz, selecting the 120 Hz tag lets you compare desktop sizes available at that rate while keeping the other categories’ choices. It does not switch the display to 120 Hz; selecting a mode row makes the change.
If you want to return to the ordinary view, select Reset Default. It clears custom filtering, Show All and the custom-scaled-only selection, then rebuilds the filter around the current mode. Your favorites and the mode in use stay unchanged.
Show all modes or custom scaled sizes
Show All bypasses the tag selections and includes modes marked unsafe or invalid. It is useful for inspecting the wider list, but it cannot reveal modes the app has not received. Modes below 720 pixels high also remain omitted unless the separate global low-resolution option is enabled.
Show Custom Scaled Resolutions appears when custom scaled sizes have been configured. Use it to focus on those sizes, including their rotated versions. Refresh-rate, bit-depth and HiDPI filters still apply. This option and Show All are mutually exclusive: enabling either turns the other off.
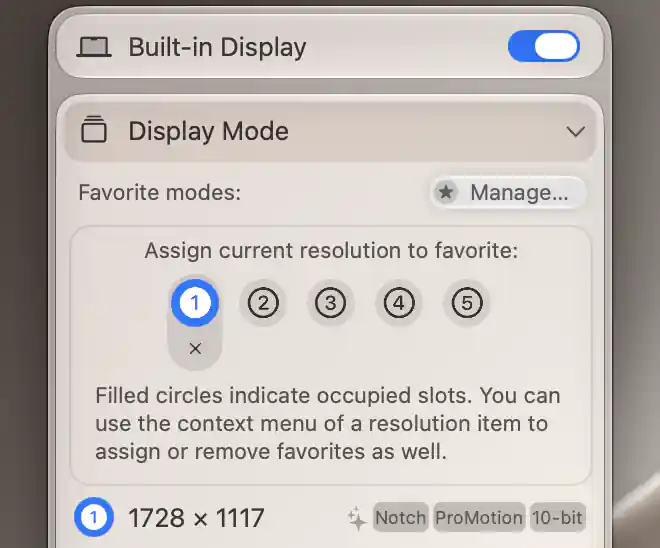
Manage lets you assign the current mode to a favorite slot or remove an existing assignment.
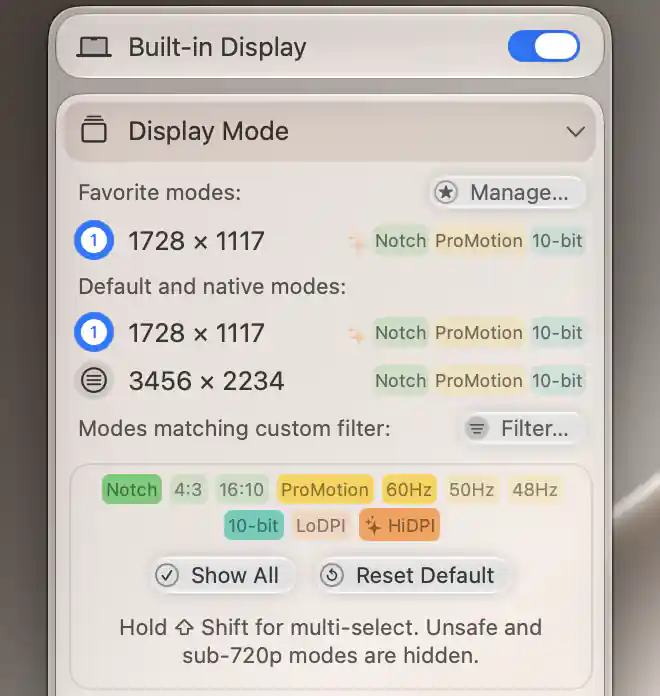
Hold Shift to include more than one refresh rate in the mode filter.
Additional information
This section explains which features require Pro and how availability differs between Mac platforms.
Features requiring Pro license
- Saving and applying display-mode favorites.
- Group UI scale matching and layout protection when changing modes.
- Configuration Protection for resolution and refresh rate.
Ordinary mode selection and filtering remain available without Pro.
Platform compatibility
All features described on this page are available on both Apple silicon and Intel Macs. The actual modes, refresh rates and bit depths offered still depend on the display, connection and macOS.