Match brightness across different monitors
Make two different monitors follow a similar brightness level through synchronization of their calculated luminance in nits. First compare how they follow the same position within their brightness ranges, then give each display reliable luminance anchors and switch to nits matching. Equal percentages can look different because the panels have different ranges.
Before you begin
Use two connected physical displays whose brightness sliders already work independently in BetterDisplay. Each needs a usable brightness controller; a display appearing in a group does not establish that its brightness can be adjusted. If you rely on DDC, use a connection that already supports working brightness adjustments. Resolve an unresponsive slider before attempting synchronization.
Choose one display as the source: the screen whose slider you will normally adjust. The other is the target, which receives its changes. Keep each display’s picture mode unchanged and use stable viewing conditions throughout the comparison. Start with SDR content and leave HDR and brightness upscaling out of this first comparison. Temporarily pause automatic brightness or other brightness automation if it would keep changing the levels during your test.
Record each display’s current brightness, monitor picture mode, HDR state, any software dimming or upscaling, and automatic-brightness settings. Also record the group’s membership, activation and brightness synchronization settings before editing them. Check other active groups for brightness rules involving these displays; pause those rules during the comparison so each adjustment has one predictable route.
Keep a record of any saved manual nits overrides, including which fields have no override. The values shown in the nits sheet can be automatic fallbacks, so the visible number alone does not tell you whether it was saved manually. If you are unsure, preserve a settings backup with Settings > Application > Advanced Settings & Privacy… > Manage App Settings > Export… before editing. See backing up app settings. Keep the backup private and use it as your restoration record.
Choose one source and its receivers
- Open Settings > Groups and select Default Group, or an existing display group that contains both displays. Confirm that both are members and that its Activation section reports Display group is currently active. If it is inactive, resolve its membership or activation rules using Individual group.
- Open Synchronization Settings. If a Brightness entry already exists, open it and switch Synchronize Brightness off while you set it up. Otherwise choose Add New Synchronization… > Brightness, then switch it off during setup. Choose the general Brightness entry; the separate hardware, software and combined entries do not offer the nits option used here.
- Switch Any group member can be a sync source off. Leave Source member must be an external display, Source member must be an Apple display and Source member must be set as the main display off. Enable Source must be on the list of specified members, then select only your chosen source under Sync source group member displays. Enabled source filters are combined, so an extra filter could reject the screen you selected.
- Switch All group members are sync targets off. Under Sync target group member displays, select only the intended receiving display or displays; leave the source and unrelated displays unselected. This explicit target list stands on its own. The automatic target mode’s HDR and virtual-screen exclusions do not apply to it, so select physical SDR receivers for this comparison.
- Leave Synchronize changes triggered externally off for now. Switch Synchronize brightness nits off, switch Delta syncing off, and leave Consider range differences on. Turn Synchronize Brightness on. Use the back arrow to return to the list and turn Enable synchronization for this display group on.
The rules are saved without an Apply button or restart. Let the settings settle, then make a fresh adjustment with the source display’s Brightness slider in the App Menu. Do not hold Shift: it bypasses synchronization for that adjustment. This first configuration sends an absolute position within the source’s range to the corresponding position within each target’s range.
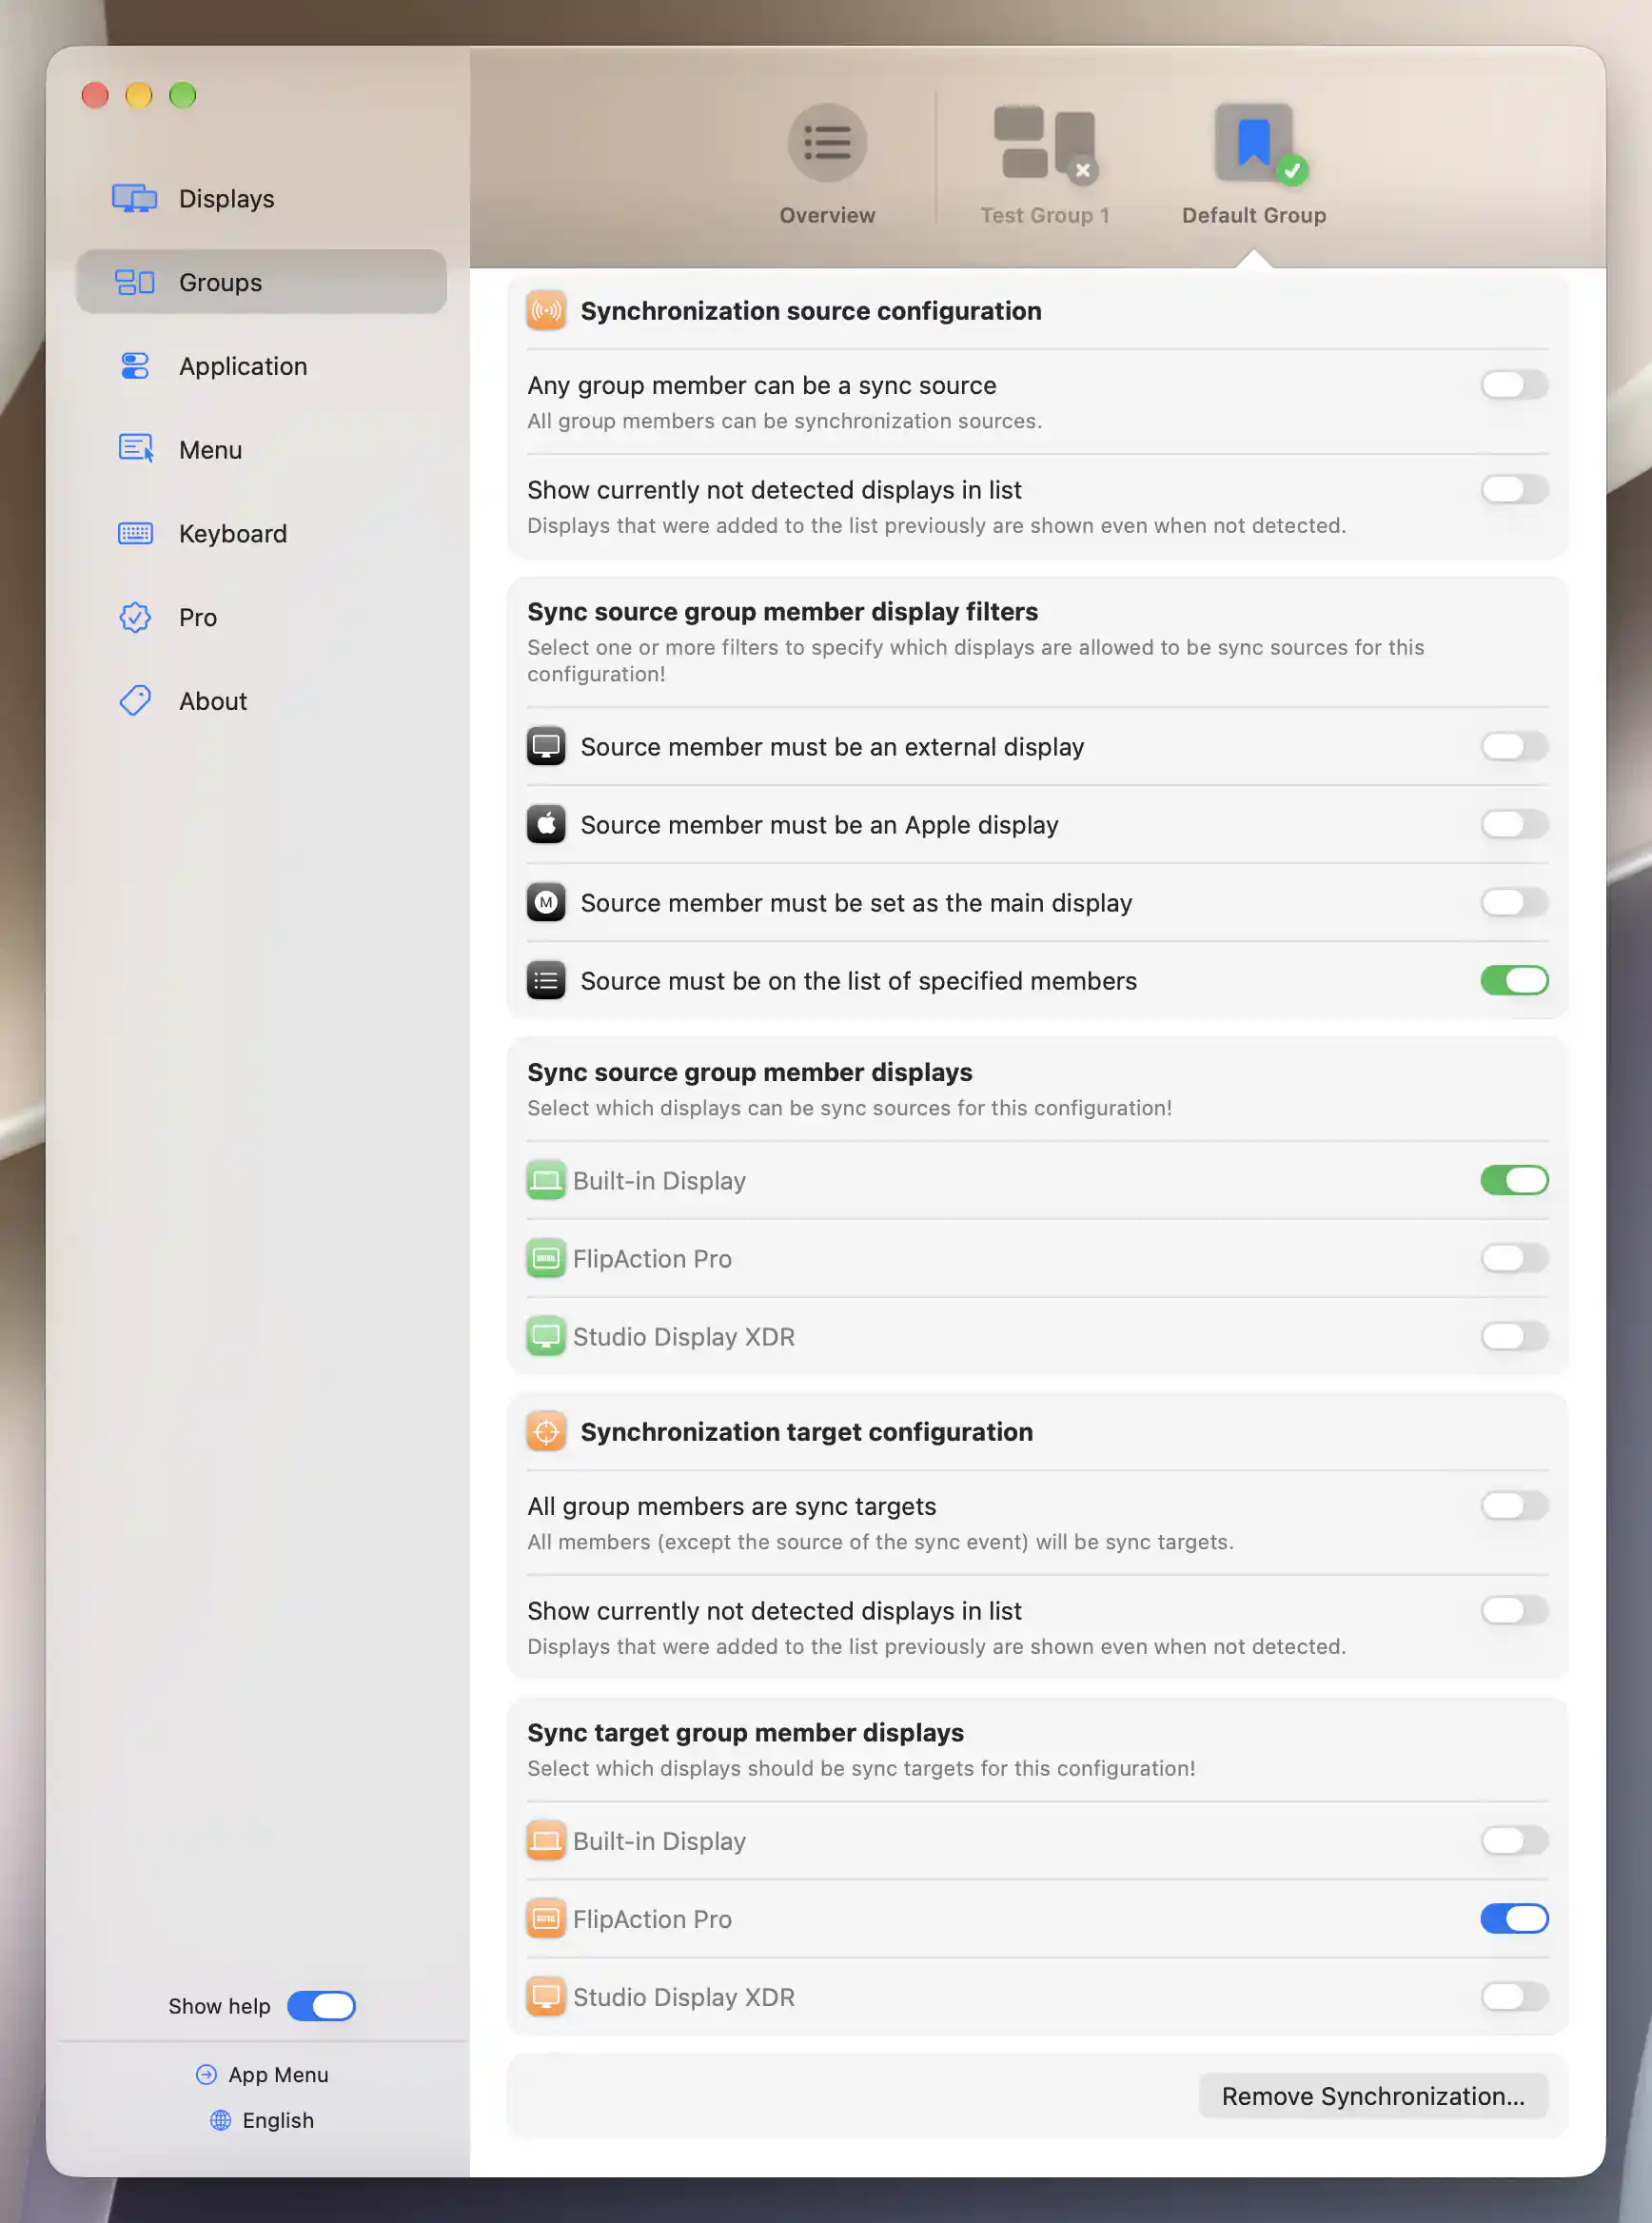
Route brightness from Built-in Display to FlipAction Pro with explicit source and receiver lists.
Compare comfortable low, middle and high positions without pushing either display to an uncomfortable level. Note how the receiving screen follows the source, and whether the pair still looks noticeably different. With different configured ranges, their displayed percentages need not be identical; the comparison is their relative position within those ranges. Delta syncing is normally on for a new entry, but would preserve an initial difference rather than give you this absolute comparison.
Give each display reliable luminance anchors
The nits match is only as useful as the information behind each display’s calculated brightness. Use reliable specifications for the relevant operating mode, or measurements taken at the brightness endpoints in the picture mode you will actually use. An advertised small-area HDR peak is not automatically the maximum for your SDR desktop, and the automatic fallback values are not measurements of your monitor.
- Switch Synchronize Brightness off while reviewing the anchors. Open Settings > Displays > [display] > General Settings > Configure Brightness Nits Ranges… for the source.
- Review Hardware control - minimum and Hardware control - maximum. They describe estimated luminance at the hardware brightness endpoints. When hardware brightness is unavailable or disabled, the maximum also provides the brightness basis for software adjustment. If the automatic basis is appropriate, leave its fields unchanged.
- If you have credible replacement endpoints, enable Manual nits range configuration and enter only those verified values. Keep the minimum below the maximum. Press Return or leave each field to commit it, then recheck both fields: entering an endpoint beyond the other can adjust the other endpoint too. Clearing a field removes its override; Escape discards an uncommitted edit.
- If present, leave HDR mode - peak SDR brightness and HDR mode - peak HDR brightness unchanged for this SDR comparison. They describe separate HDR-related anchors, not substitute SDR hardware endpoints. Close the sheet with Done and repeat the review for every target.
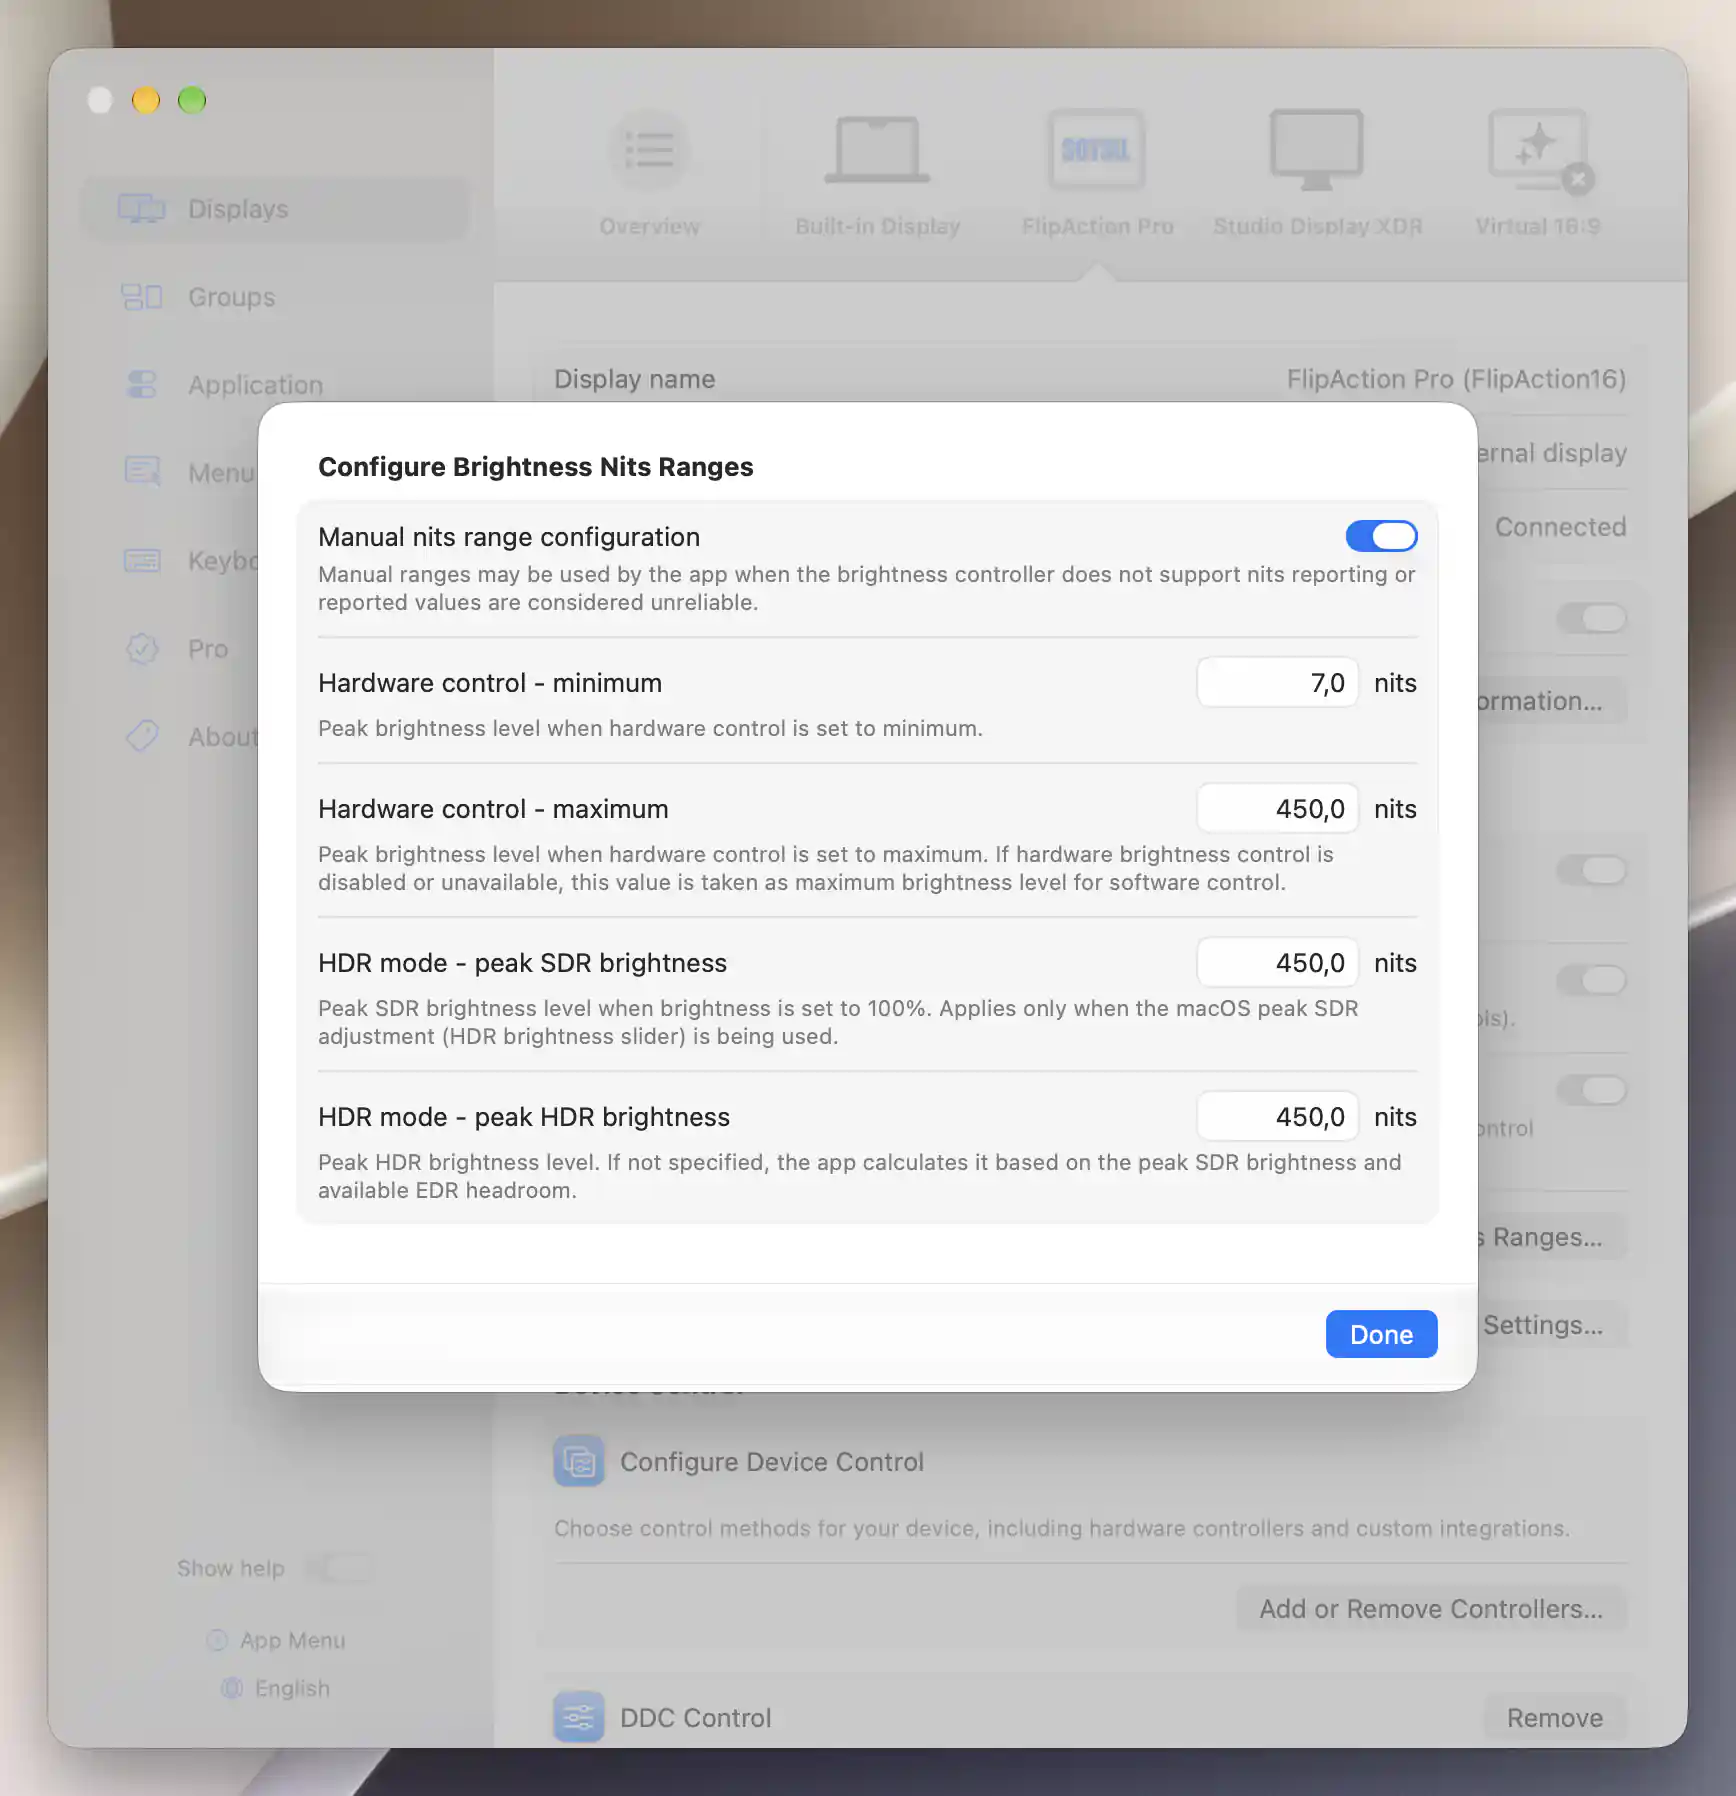
FlipAction Pro’s existing 7–450 nit range is unmeasured. This sheet shows where to enter verified endpoints for the active picture mode.
These changes save directly; closing the sheet does not cancel committed edits. Turning Manual nits range configuration off ignores saved overrides without deleting them. You can therefore return to the automatic basis and later re-enable your saved values. See the brightness-anchor reference for the automatic estimates and conditional HDR fields.
Switch to calculated nits matching
- Return to Settings > Groups > [group] > Synchronization Settings > Brightness. Keep the same source and target selections, enable Synchronize brightness nits, and enable Synchronize Brightness.
- Confirm that the delta and range options disappear while nits mode is active. The target now receives the source’s calculated nits value instead of its percentage position.
- To compare the displayed estimates, open Settings > Menu > Menu Appearance & Behavior, enable Show slider labels and values, then enable Show brightness slider nits values. In each participating display’s General Settings, also enable Show brightness nits. Supported brightness sliders can then show nits alongside their percentages.
- Let the setup settle and make a fresh source-menu slider adjustment. Repeat the low, middle and high comparisons you made earlier. Keep the content and picture modes unchanged so you are comparing the two synchronization methods under the same conditions.
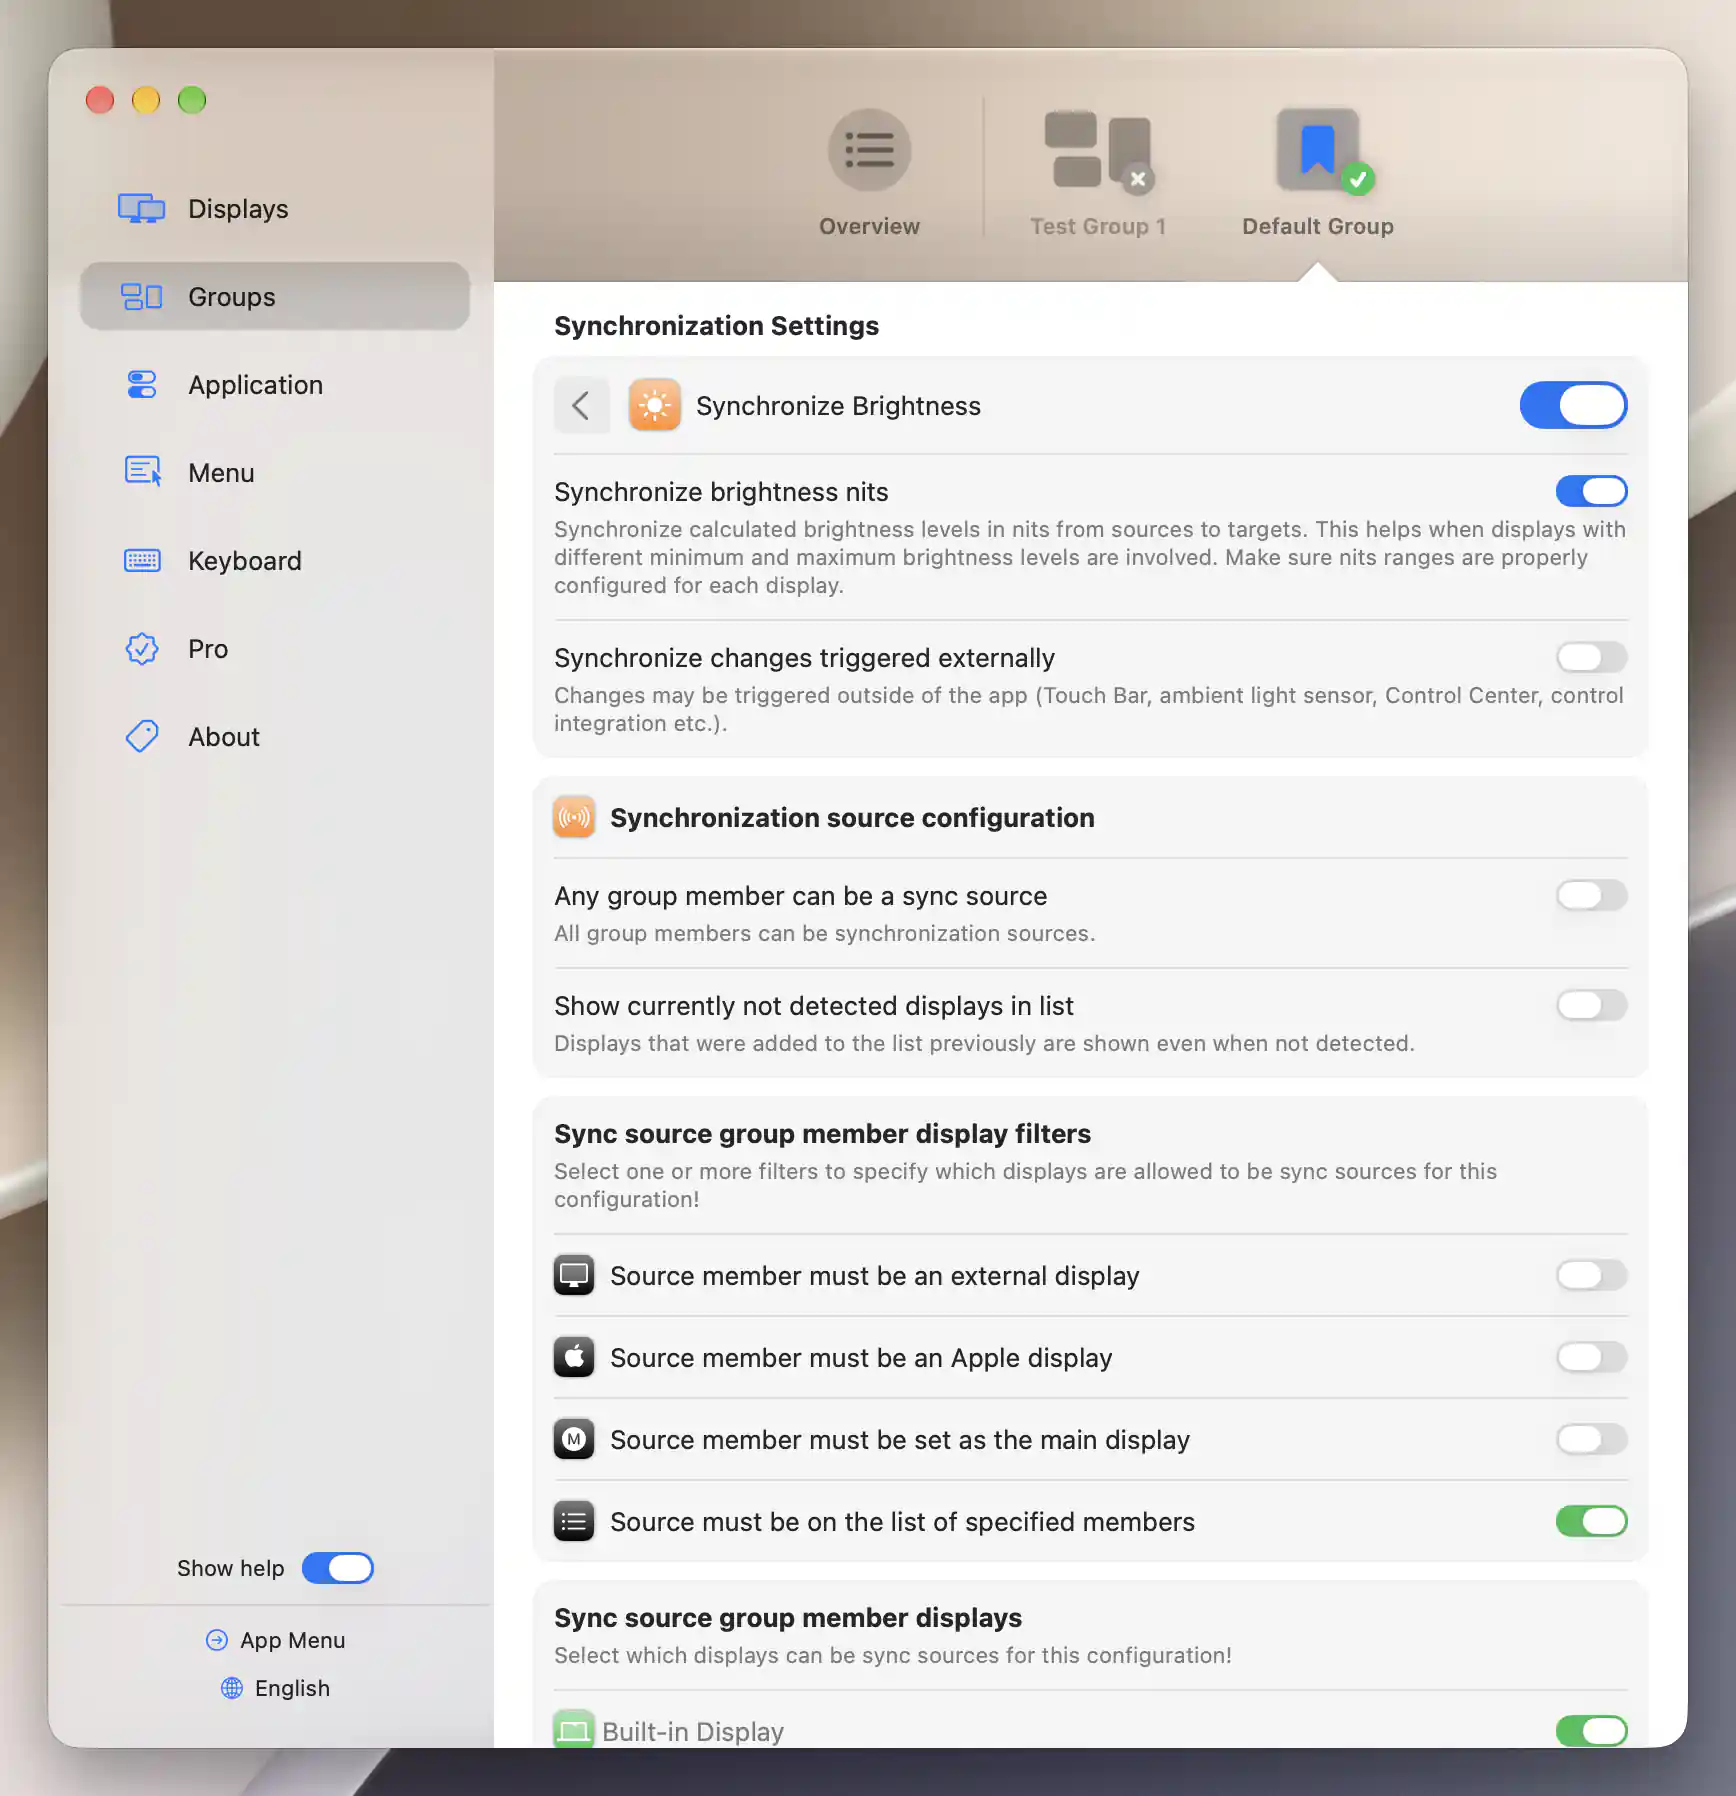
Enable calculated-nits synchronization after configuring credible ranges. The current unmeasured estimates do not verify equal panel luminance.
Check the result
The selected receivers should follow a new source adjustment, while unrelated displays stay unchanged. The two percentages may differ because each display converts the same calculated luminance into its own brightness setting. Matching nits estimates are useful feedback about that calculation; they do not prove equal measured light output or an exact perceptual match.
Compare several levels within the displays’ common usable range. If the source requests a level that a target’s active brightness path cannot reproduce, that target reaches its available limit instead of continuing to match. A hardware-only path clamps to its hardware endpoints; a combined path can also use available software dimming or upscaling. Do not diagnose every low-end mismatch as a hardware minimum, or assume software adjustment can reproduce an arbitrarily high level.
If the screens track more usefully across the range, keep the nits rule. If they only agree at one level, revisit the endpoint evidence and picture settings. White balance, contrast, HDR behavior and the content itself can still make two screens look different. This is brightness matching, not color calibration.
Optionally follow detected external changes
After the source-slider test succeeds, enable Synchronize changes triggered externally if you want detected changes from automatic brightness, Touch Bar or Control Center to drive the receivers too. Leave Synchronize external changes only off to keep your ordinary app adjustments working as sources. Both options start off for a new entry.
The source controller must detect the outside change; the switch does not add that capability. Check that the source’s value changes in BetterDisplay, then that the receivers follow. Applicable rules can also reconcile brightness after a display configuration change using an eligible Apple display with automatic brightness. See automatic external brightness for the detection requirements.
Troubleshooting
- The source changes but the target does not: check that the group is active, both synchronization switches are on, the chosen source passes every enabled filter, and the connected target is selected. Confirm that the target’s own slider still works. If only app changes fail, turn Synchronize external changes only off. See Synchronization Settings.
- Brightness keys produce a different result: keyboard targeting set to All suitable screens adjusts those displays directly and bypasses group brightness synchronization for that operation. Use the chosen source’s App Menu slider to test this rule. A Shift-adjustment also bypasses synchronization; it does not save a learned matching curve.
- The nits option is missing or unavailable: use the general Brightness entry, and check the Pro requirements below. An entry for Brightness (Hardware), Brightness (Software) or Brightness (Combined) is a different choice.
- The displayed nits match but the panels look different: verify the saved anchors, active brightness controllers and unchanged picture modes. Recheck any automatic brightness, software dimming, HDR or upscaling that returned during testing. See why nits estimates differ from expectations; do not correct uncertain measurements by inventing a larger anchor.
- A target stops following near one end: compare within the overlap of the active brightness paths’ usable ranges. Changing an anchor does not overcome a panel or controller limit. If behavior changed after enabling HDR or selecting an Apple reference preset, repeat the comparison in the original mode before deciding whether different anchors are justified.
Undo the matching setup
- Switch Synchronize Brightness off before restoring either screen. If you added the entry solely for this test, choose Remove Synchronization… > Remove to delete that entry and its settings. If it existed before, restore its recorded settings rather than removing it.
- Restore each display’s saved nits overrides and the original Manual nits range configuration state. Clear only fields that originally had no override. Restore both endpoints after any automatic clamping, plus any HDR anchors you changed.
- Restore the original brightness, software dimming/upscaling, HDR, picture modes and automatic-brightness or other automation settings. Stopping synchronization does not return the displays to their earlier brightness.
- Restore the group-wide synchronization switch, membership, activation rules and the original source/target lists, filters, exclusions, nits/delta/range and external-change switches. Restore any other rules you paused, and the nits-display preferences if you changed them. Re-enable the original brightness rule last.
Use the backup as a record when checking exact saved values. Importing it would replace the app’s whole configuration and require a restart, so the backup reference explains that separate recovery action.
Related pages
- How can I keep two displays at similar brightness?
- Why does BetterDisplay’s nits value differ from the brightness I expect?
- Synchronization Settings
- Brightness nits ranges
Additional information
This section explains the license and platform requirements for the matching workflow.
Features requiring Pro license
Synchronize brightness nits and editing individual source/target selections require Pro or an active trial. Custom-group synchronization also requires Pro. Basic general Brightness synchronization in the Default Group does not require Pro; manual nits-range configuration and nits-display preferences do not independently require Pro.
Platform compatibility
This workflow is available on Apple silicon and Intel Macs, with usable brightness controllers on the participating displays. The documented BetterDisplay build requires macOS 26.3 or later. Controller and connection support determine hardware brightness and external-change detection; software adjustment, HDR and Apple preset behavior depend on the display and its active configuration. No Screen Recording permission is required for this group-matching procedure.