Build a floating dashboard from several live screen regions
Keep two or three useful parts of a dashboard visible while you work elsewhere. Create a separate Picture in Picture (PIP) window for each crop of one source desktop, then arrange those live views on your working display. Each view has its own framing and window preferences; the source application keeps its original layout.
Before you begin
- Use an already connected source display and a separate physical display for viewing the dashboard. They should show separate desktops, rather than mirror each other. Keep an accessible physical desktop available throughout. On a MacBook, keep its lid open if the built-in display is your working desktop.
- Put a harmless status page or reference application on the source desktop, with two or three distinct regions already visible. Record the source resolution, interface size, orientation, window position and size, and any document scroll position. Keep those stable while choosing the crops. Avoid private notifications, accounts and protected media.
- BetterDisplay must be running, and macOS Screen Recording access must allow it to capture the source. Follow the actual macOS request. If access is denied, check System Settings > Privacy & Security > Screen & System Audio Recording; audio-only access is insufficient. See Apple’s screen-recording permission instructions and complete any requested relaunch.
- Record existing PIP configurations, their source, crop, active/paused/hidden state, automatic-start setting, window geometry and preferences before changing anything. Use fresh additional configurations below so the original PIP can stay as it is. Preserve saved absence separately from a displayed default.
A connected virtual screen can be the source instead of a physical display. Prepare that desktop first using the dedicated desktop tutorial, then keep the viewing windows on a physical desktop. PIP does not create or connect its source.
Create the first cropped view
- Open App Menu > [source display] > Picture in Picture. Expand the source display’s more-options chevron if needed. Find its original, unnumbered PIP entry and scroll to Add PIP Configuration. Choose it once, then wait for the menu to close and the new numbered entry to appear. Additional entries offer Remove PIP Configuration instead; their actual numbers depend on existing configurations.
- Open that new entry and leave Start Automatically off, its default. Turn on Enable Picture in Picture Window. Move the new viewing window onto your separate working display immediately. If it opened on the source, put the pointer on the working display and use the active entry’s Bring to Screen With Mouse, then drag it into a convenient position. Keep it outside the source desktop.
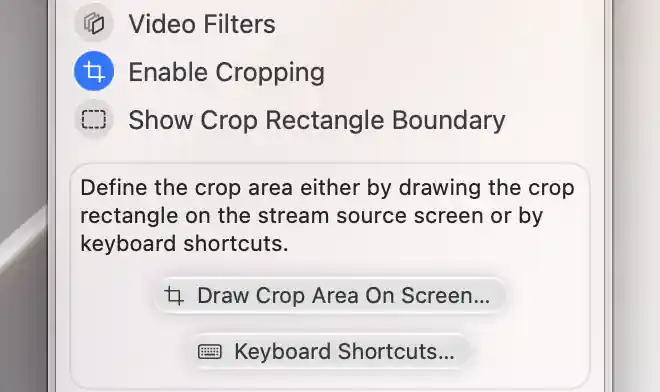
- In the new entry, turn on Enable Cropping and choose Draw Crop Area On Screen…. The selector opens on the source display, not on the display holding the PIP window.
- Drag the selector’s body onto the first useful status region and resize its edges to include the whole region. The corner labels show source coordinates and the size label shows logical dimensions. The selector normally has a minimum size of 150 × 100 logical points, constrained to the source screen. If the useful item is smaller, include surrounding context rather than assuming you can select a smaller rectangle.
- Choose the checkmark icon to accept. The cross icon cancels without replacing the saved crop; the expand-to-screen icon selects the whole source screen, which you can then accept. After acceptance, check that this PIP shows the intended region. Leave Show Crop Rectangle Boundary off unless you need the optional outline on the source.
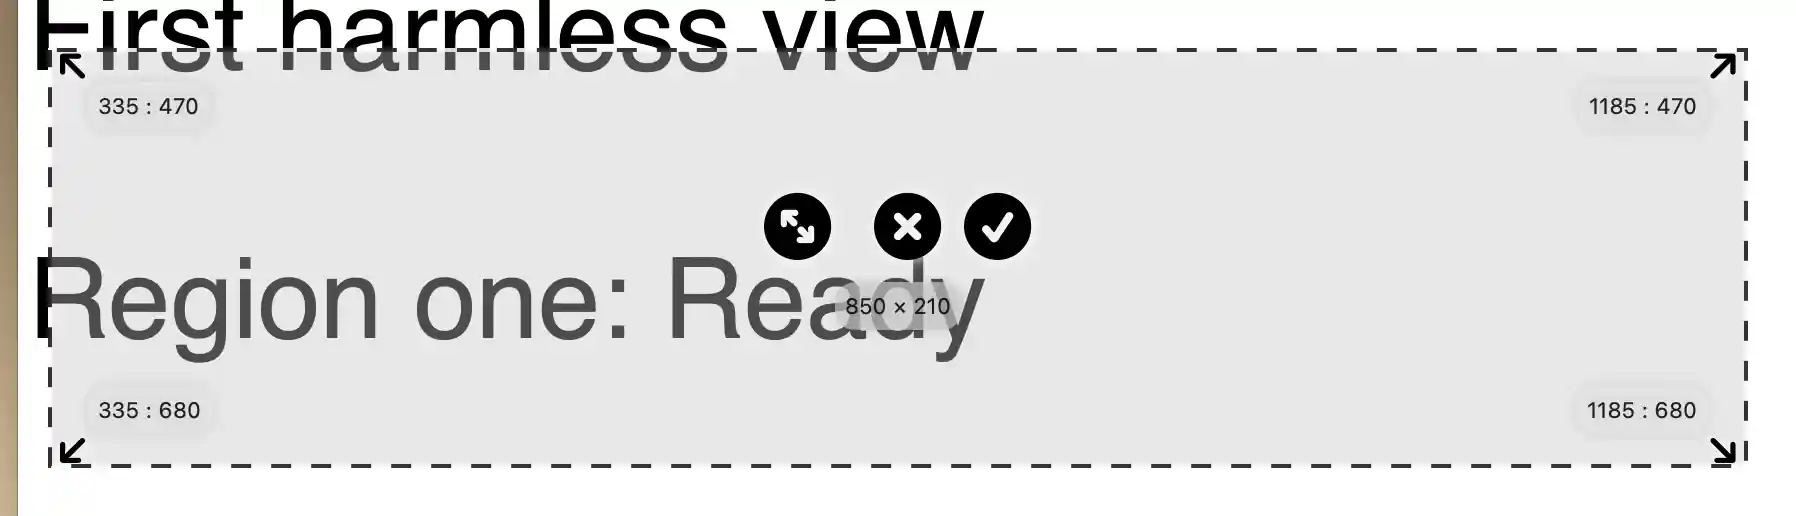
Draw each crop on the source desktop; the separate PIP window displays the accepted region.
The saved rectangle is a proportion of the source screen. It does not follow a window, scroll a document, or reflow text into columns. Moving the original application can move its content out of the crop. Accepting a new crop or changing crop settings resumes a paused PIP, so stop the view before working with private source content.
Add another region and arrange the dashboard
- Return to the source’s original, unnumbered Picture in Picture entry and choose Add PIP Configuration again. Leave all existing configurations alone. Open the newly added numbered entry, keep Start Automatically off, enable its window, and move it to the working display.
- Enable cropping in this second entry and draw a different source region. Accept it, then resize and position the two viewing windows beside each other. Repeat from the original entry if a third region is useful. Each configuration keeps its own crop; changing the second does not redraw the first.
- Keep Free Aspect Ratio off so resizing preserves the crop’s proportions. Keep Title Bar & Window Controls on while arranging the windows, with Lock Window Position and Prohibit Resizing off. These are the initial defaults. Leave flip/rotation unchanged and Video Filters off; use Magnification and Alpha at 100% for a straightforward view.
- For a modest status dashboard, set each entry’s Target FPS to 30, if that meets your needs, and let capture settle after releasing the slider. The default is Unlimited. This setting is a requested capture cadence, not a measured frame rate or a guarantee that every source update appears. Multiple live views use more resources.
- Keep Keep Above Other Windows, the default, to see the views above ordinary windows. After confirming placement, optionally turn on Lock Window Position and Prohibit Resizing for each view. Turn them off again before rearranging. These locks do not lock the source resolution or application layout.
Each PIP configuration keeps its own crop of the same source desktop.
Above Menu, Dock, Spaces is a separate priority for presentation across Spaces and above those system surfaces; it is not implied by Keep Above Other Windows. Try it only if you need that behavior and check the actual Spaces you use. Keep its conditional Show on Lock Screen option off.
You may hide the title bars later for a compact dashboard, provided the windows are separate and not active in full-screen mode. The menu then supplies Window Controls. Keep the titled layout for the initial test; the PIP reference explains these optional presentation choices.
Check the result
- Make a harmless visible change inside each original status region. Confirm that the corresponding PIP updates and that the other crop stays on its own region. A still image alone does not establish live updates.
- Work in an ordinary window on the viewing display. Check that the PIPs remain visible, readable and correctly proportioned, without covering a critical part of your workspace.
- Check that every viewing window is outside the source desktop and that none appears inside another crop. Keep unrelated PIP windows outside the source too. If a repeated picture appears, move the offending viewing window off the captured source.
- If you change the source resolution, scale, orientation, application geometry or scroll position, inspect every crop again and redraw only those that no longer frame the intended content. A saved proportional rectangle cannot keep tracking the same application item after its layout changes.

Arrange independent cropped views together while the source application keeps its original layout.
Interact with the original application on the source desktop. With Mouse Click-through off, Command-click a harmless location inside the PIP to move the real pointer to the corresponding source location; release Command, then click normally on the source. This moves the pointer rather than forwarding the original click. You can return through the normal display edge. Show Mouse Pointer is on by default and can be turned off separately for a cleaner view.
Mouse Click-through passes input to windows underneath the PIP on the viewing desktop. It does not operate the source application through the copy. It starts off; if you enable it, use the App Menu to disable it again. See PIP pointer interaction for optional return shortcuts and shared automatic pointer warping.
Exclude PIP Window removes only that configuration’s own viewing window from BetterDisplay’s capture. It does not exclude other PIPs or configure another recording app. Keeping all views off the source is the clearer arrangement for this multi-view dashboard. See capture-exclusion scope before relying on it for another workflow.
Optional automatic start
After the manual test, enable Start Automatically only for the new configurations you want to reopen when BetterDisplay recognizes their source as newly connected. The source must remain capturable, and any virtual source needs its own connection setup. This preference does not guarantee source availability or correct crops after a changed layout.
Active PIPs can resume after wake, and an automatically started PIP can recover from an unintentional stop while its source is connected. Deliberately closing a PIP keeps it closed while that source stays connected; a later reconnection can trigger automatic start again. See automatic-start and wake behavior. Retest framing after reconnecting, rather than treating an opened window as proof that it shows the right region.
Troubleshooting
The source or picture is missing
Confirm that you opened the intended source’s PIP entry, that the source is connected, and that macOS allows screen capture. Protected content may stay blank. Use the active configuration’s Show and Bring to Front if the window was hidden or minimized. Display-menu visibility also follows its more-options and mirror-target conditions; consult the PIP reference.
The picture shows the wrong region or stretches
Check which numbered configuration you edited. Redraw its crop after source geometry or application layout changes, and turn Free Aspect Ratio off if you want its original proportions. Cropping views an area already rendered by the application; it does not split a long document into independently scrolling columns. For a copy of a specific app window instead, use the selected-window tutorial.
Updates stop or the dashboard is expensive to run
Check Pause Picture in Picture, source availability and capture permission. Reduce the number of views or their Target FPS to suit the status information. Pause can hold a visible image, but changing crop or capture settings can resume or restart capture. Stop the relevant PIPs before private source work; hiding or pausing them is not a reliable privacy boundary.
Stop, remove and restore
- Turn Start Automatically off for each trial configuration and stop issuing trial starts, crop changes or other presentation requests. Finish or cancel the open crop selector, then let already dispatched menu, start, capture-restart and geometry changes settle. Stop each trial again with Enable Picture in Picture Window off and verify that it is inactive before private source changes or removal.
- An ordinary close or focused Command-W stops a PIP; Command-H and Option-click on its close button only hide it while capture continues. Stopping retains the configuration, crop and other preferences. Leave existing PIPs running if they belong to another workflow.
- In each newly created numbered entry choose Remove PIP Configuration once. There is no confirmation. The menu closes before the queued removal completes; wait until that exact entry disappears. Remove only the configurations created for this dashboard, not an original or another additional entry.
- Restore the original source application geometry, scroll position and any individually changed PIP or shared pointer preferences. For a borrowed configuration, restore its crop and every changed option, saved geometry, active/paused/hidden state and automatic-start setting separately. Turning cropping off alone does not remove its saved rectangle. If normal UI cannot restore an originally absent saved field independently of a displayed fallback, preserve the original private record or backup and document the precise limitation.
- If you also changed a display mode, main display, arrangement, connection rule or protection setting, recover a visible physical desktop and restore only those recorded changes. Restore current values and protected targets independently. If ordinary UI cannot recreate both an original current value and a different protected target, leave only that affected rule off and preserve the original record or backup rather than retargeting it to the wrong value. Do not use a global Reset, Forget or Import. Keep pre-existing virtual screens; for a fresh temporary virtual source, move its windows back and stop its views before following its own disconnect/discard procedure.
Related pages
- Several cropped PIP views of one screen
- PIP configuration, presentation and pointer options
- PIP automatic start and wake recovery
- What Exclude PIP Window excludes
- Keep a selected app window visible
Additional information
This section explains feature licensing and platform requirements for the dashboard.
Features requiring Pro license
Starting or pausing PIP, adding configurations, enabling automatic start or cropping, and the priority, aspect, pointer, sizing/position, shadow, filter and FPS preferences used here require Pro. The bring-forward, move-to-pointer-screen and pointer-warp menu actions also require Pro. Stopping or hiding an existing view, its basic Window Controls strip, disabling automatic start and removing an additional configuration remain available without Pro.
Platform compatibility
The cropped PIP workflow is available on both Apple silicon and Intel Macs, using macOS 26.3 or later with the documented app. The source must be connected and available to screen capture, and macOS Screen Recording access is required. No particular DDC hardware capability is needed for the viewing workflow. Optional virtual-source and captured-image filtering features have their own requirements in the linked references.