Picture in Picture
Picture in Picture (PIP) keeps a display's live contents in a movable window, so you can watch that desktop while working elsewhere. You can enlarge part of the picture or apply filters to its preview. The window is a separate presentation of the source display, with its own size and appearance.
Where to find it: App Menu > [display] > Picture in Picture. Right-click or Control-click the picture for a context menu with the same settings and additional pointer and tab actions.
The source must be connected, and macOS Screen Recording access is needed to capture it. Granting that access does not select a source: this PIP is already tied to the display whose menu you opened.
With one display, the section appears when the menu setting to show PIP with one display is enabled, as it is by default. It also appears when a PIP is active or set to start automatically. The section is hidden when the source is a mirror target and already has an active PIP.
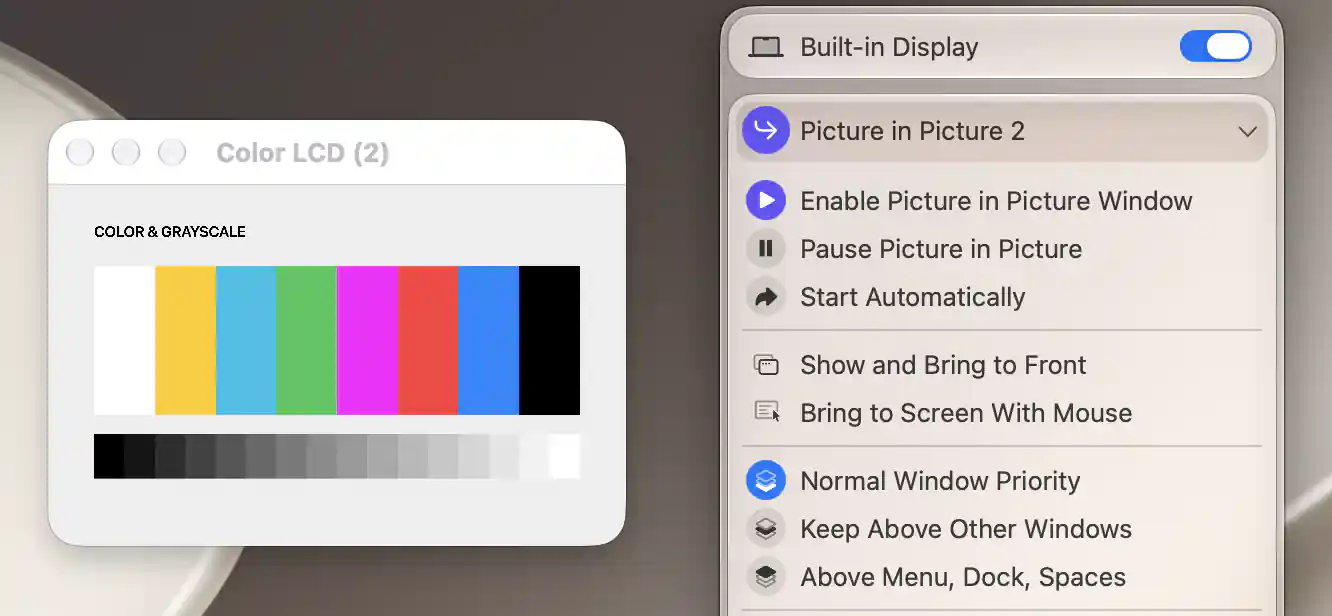
The active PiP window shows the source display beside pause, automatic-start and window-priority options.
Start, pause and find the window
Turn on Enable Picture in Picture Window to show this configuration. Turn it off again to stop the window. If you only want to hold the current image while leaving the PIP in place, select Pause Picture in Picture; select it again to resume the live image.
For an active PIP, Show and Bring to Front restores its presentation. Bring to Screen With Mouse moves it to the display containing your pointer, preserving its saved relative position and size there. Both commands appear in the App Menu rather than the picture's context menu.
BetterDisplay remembers the window's position and dimensions relative to its display. If that saved display is unavailable, it uses a connected fallback screen. Enable Start Automatically if you want this PIP to start when its source connects; that preference is off by default.
Window priority and actions
Choose a priority according to how visible you want the picture to remain while you work:
- Normal Window Priority behaves as an ordinary window.
- Keep Above Other Windows, the default, keeps the picture above ordinary windows.
- Above Menu, Dock, Spaces places it above those system surfaces and across Spaces. This exposes Show on Lock Screen, initially off.
Title bar and window actions
Title Bar & Window Controls starts on. You can hide it for a simpler picture, but cannot change that setting while the window is tabbed or active in its full-screen mode.
When the title bar is hidden or full-screen mode is selected, the menu supplies Window Controls. These let you bring the window forward, minimize or restore it, enter or leave full screen where supported (otherwise zoom the window), and hide it. Bring-forward is unavailable in the context menu. Minimize, zoom and hide are disabled in full-screen mode.
Position, size and proportions
Use Lock Window Position to prevent moving the picture, or Prohibit Resizing to prevent user resizing. Both start off.
Free Aspect Ratio lets you resize the width and height independently; with it off, resizing preserves the source's proportions. Integer Scaling selects nearest-neighbor sampling to keep hard pixel edges. It does not force the window to a whole-number size; the integer scaling entry explains the distinction. Both options default off.
Pointer, appearance and tabs
Show Mouse Pointer is on by default, so the preview includes the source pointer. When the PIP is on its own source screen, Exclude PIP Window can keep the PIP itself out of the captured image. That option starts off. Window Shadow starts on.
Mouse Click-through sends input to the windows underneath the picture. This option is available only in the App Menu, which is also where you can switch it off again.
Move the pointer to the source
You can use the picture to relocate the pointer to the corresponding place on the source screen. Command-click the picture, or choose Warp Mouse Cursor in its context menu. A return shortcut can be configured under Settings > Keyboard.
Shared automatic PIP pointer warping can also move the pointer when it enters the picture. That automatic behavior is off by default.
Keep several pictures in tabs
When more than one PIP window exists, the context menu offers Merge All Windows if separate windows are available to merge. Merging prepares them for tabbing, including making their title bars visible.
A tabbed PIP also offers Show All Tabs and Move Tab to New Window. Tab and full-screen preferences are remembered for subsequent starts, so you do not have to arrange them afresh each time.
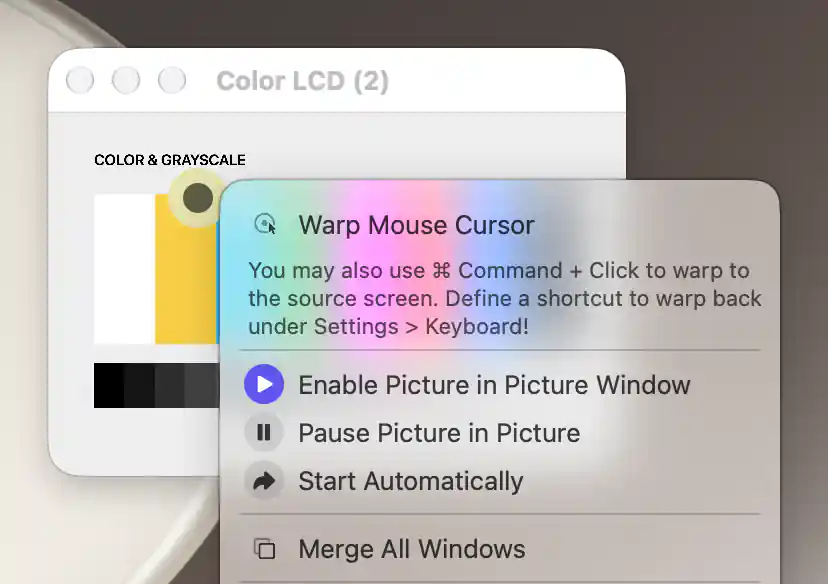
Merge All Windows combines active PiP windows into one tabbed window.
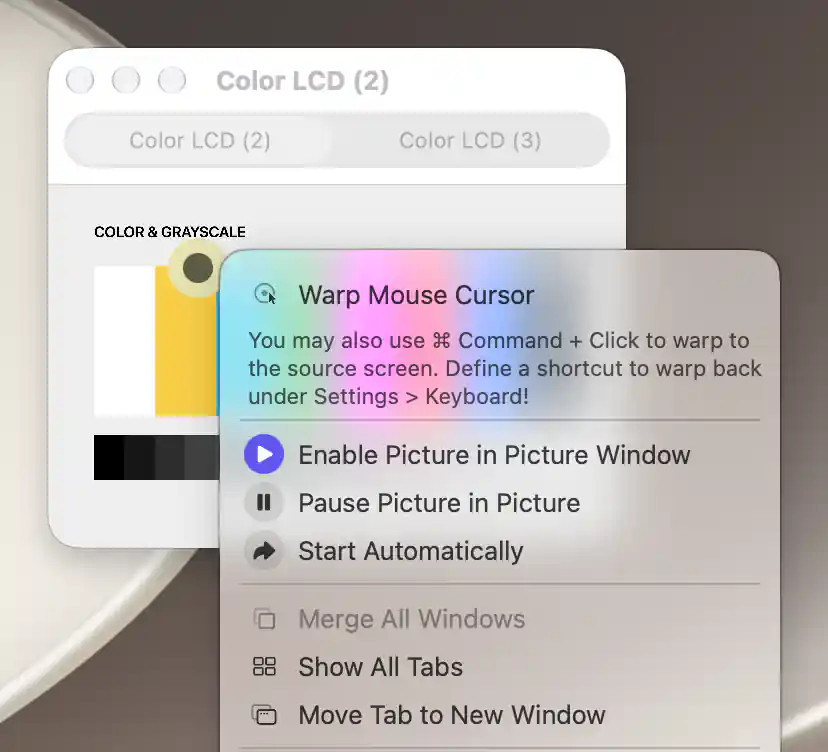
A merged PiP window offers tab overview and an action to move the selected tab into its own window.
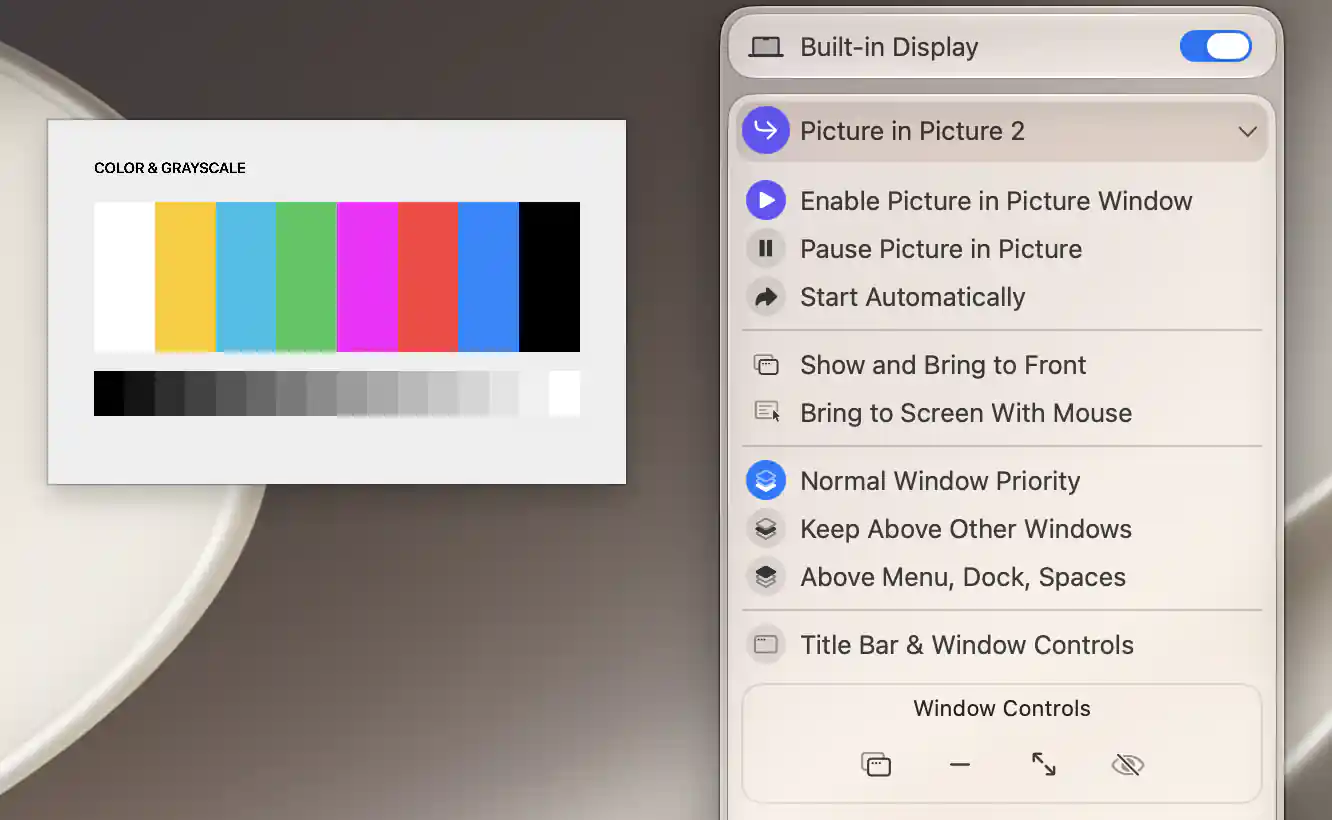
Window Controls remain available in the menu when the PiP title bar is hidden.
Crop, transform and filter the picture
You can change which part of the source appears in the PIP and how that copy looks. Enable Video Filters to reveal the shared filter settings; filtering starts off.
Enable Cropping, also off by default, reveals options for a source boundary with color swatches, Draw Crop Area On Screen…, and Keyboard Shortcuts…. The crop selector lets you accept or cancel a selected region, or choose the whole screen. After you accept a crop, PIP adjusts its window proportions to that region unless Free Aspect Ratio is enabled.
Orientation and image size
The flip buttons and 90°/180°/270° rotation buttons transform only the picture. Use the rotation reset button to return it to its original orientation.
In a full-screen presentation, horizontal and vertical alignment place the image within the available area. Those alignment options are disabled with Free Aspect Ratio. Zoom appears while the picture is actually full screen and ranges from 10% to 300%.
Magnification enlarges the content within the window from 100% to 200%. Alpha controls its opacity from 0% to 100%. Both start at 100%. Target FPS selects 1–200 captured frames per second or Unlimited (∞), the default.
Save a separate picture setup
Add PIP Configuration, available only in the original unnumbered entry, creates another independent window configuration. Each configuration keeps its filter, crop, transform, window and automatic-start preferences for the source display. Pausing or stopping the picture does not reset them.
Numbered entries offer Remove PIP Configuration instead. There is no confirmation. The menu closes before the queued removal completes, so wait until that entry is gone. Add/remove commands appear in the App Menu, not in the picture's context menu.
For a complete multi-view setup, follow Build a floating dashboard from several live screen regions.
To put two independent virtual desktops side by side or stack them on one physical monitor, follow the two-desktop tutorial.
See Video Filter Window for a movable filter over the content behind it, and Stream Selected Content for a window selected through macOS.
Additional information
This section explains which features require Pro and how availability differs between Mac platforms.
Features requiring Pro license
- Starting or pausing PIP and changing its preferences.
- Enabling automatic start and adding a configuration.
- The menu commands for bringing the picture forward, moving it to the pointer's display, pointer warping and tab management.
Stopping or hiding an existing window, its basic Window Controls strip, disabling automatic start and removing an additional configuration remain available without Pro.
Platform compatibility
Picture in Picture and its window actions are available on both Apple silicon and Intel Macs. The shared HDR Filter Pipeline option for captured-image filtering requires Apple silicon.
The source must be connected and macOS Screen Recording access must be granted. Menu visibility also follows the single-display and active mirror-target conditions described above.