Create a dedicated 16:9 desktop for recording and screen sharing
Create a separate 16:9 desktop for the windows you want to record or share, while keeping your everyday workspace on your physical display. A BetterDisplay virtual screen supplies that desktop; a local Picture in Picture (PIP) window lets you see it. In this example, OBS Studio records the virtual display itself.
Before you begin
- Keep a usable physical desktop connected. Use a new, unassociated virtual screen for this task, so its connection is independent of your other displays. You do not need a dummy plug, a matching physical 16:9 panel or additional monitor hardware.
- Have OBS Studio installed and ready for local recording. BetterDisplay needs its own Screen Recording permission for PIP, and OBS needs separate permission to capture your screen. In OBS, use OBS Studio > Review App Permissions... and its Screen Recording entry. Follow each app’s permission prompt and any requested restart. Permission for one app does not grant access to the other. See the OBS macOS permissions guide.
- Record your current display arrangement, main display, modes and window positions before connecting the new desktop. If existing groups, UI Scale Matching, Layout Protection or automated presets would change this setup, temporarily pause only the relevant rule and record its original state. Keep any saved Configuration Protection targets separate from the current settings; they may differ.
- In OBS, record the current scene, video sizes, recording destination, Simple/Advanced output choice and any audio mute and hidden states you change. The steps below change OBS settings as well as adding a capture source. Use harmless demonstration content and keep private windows away from the captured desktop.
The workflow uses PIP, which requires Pro or an active trial. Creating and connecting the preset virtual screen does not require Pro.
Create and connect the recording desktop
- Open BetterDisplay from its menu bar icon and select the gear button. Go to Settings > Displays > Overview > Create New Virtual Screen….
- Choose Pre-configured settings (recommended) and 16:9 - HD/4K/5K/6K. These are the initial choices. Leave the display-matching and custom-aspect-ratio alternatives alone: this desktop does not need an association, full-screen streaming or mirroring.
- Select Create Virtual Screen. The preset creates a saved definition, initially disconnected. Select the new screen under Settings > Displays and turn on Connect this virtual screen. Alternatively, use App Menu > [virtual screen] > Connect Virtual Screen. Check that it connects before continuing.
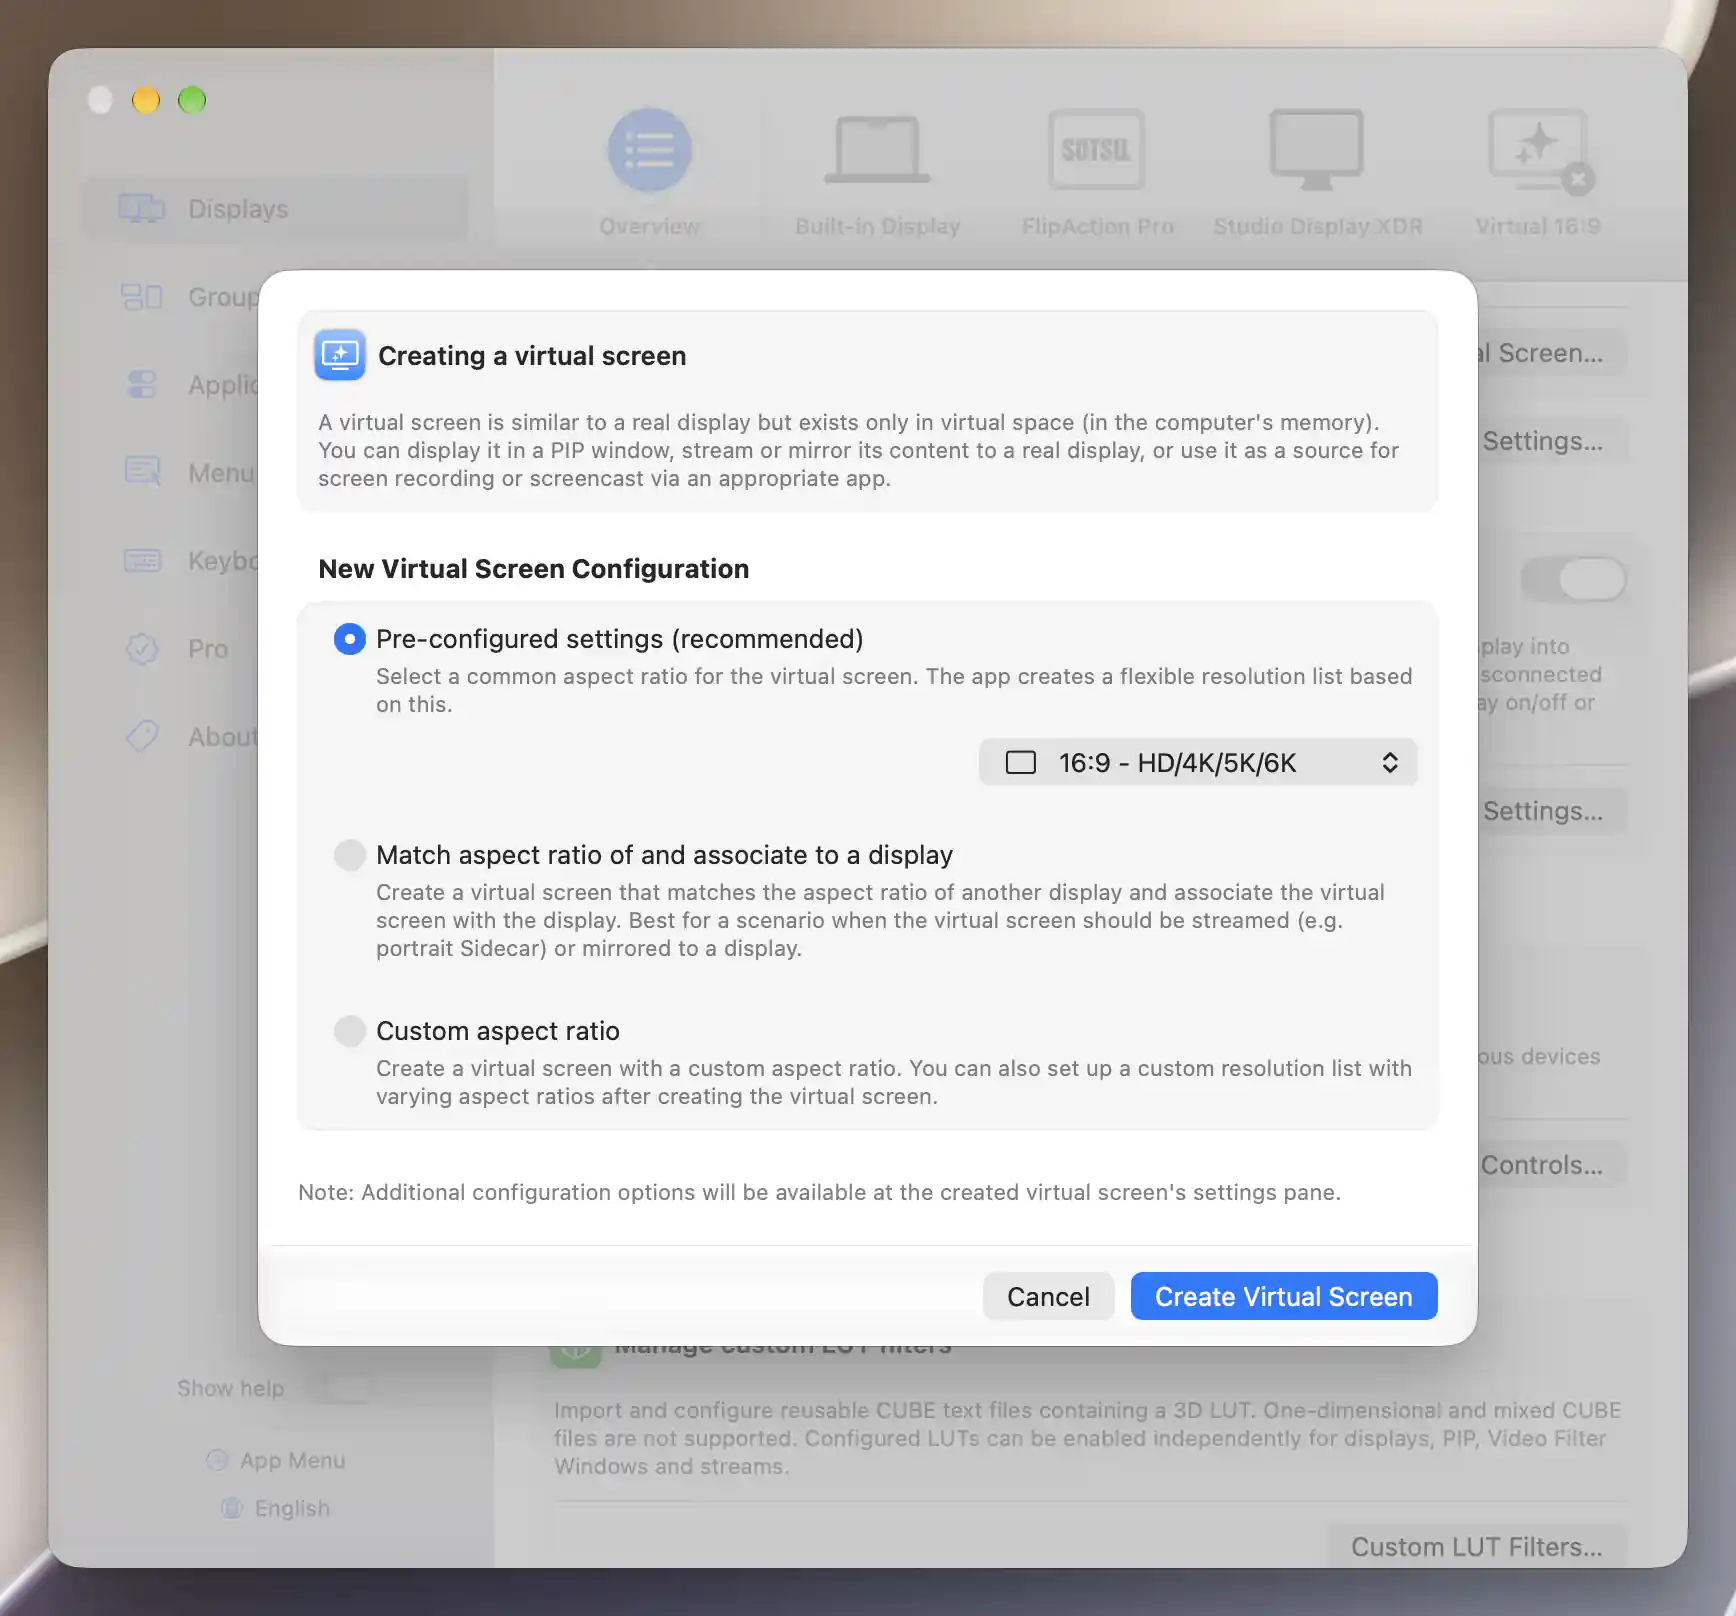
The 16:9 preset creates a separate desktop without a display association.
The new screen is normally named Virtual 16:9. If you already have one with that name, identify the newly created entry before changing it. The preset generates available modes, enables HiDPI, and starts with standard dynamic range and a 60 Hz refresh-rate list. It does not select the size of your finished recording.
Choose the size and put content on it
- Open App Menu > [new virtual screen] > Virtual Screen Mode. Choose an available 1920 × 1080 HiDPI mode for this example. The sparkle icon identifies HiDPI, and the current mode has a filled selection symbol. If that choice is hidden by the current filter, open Filter… and select HiDPI; see Display Mode for the filters. Choose a usable offered mode rather than exposing unsafe choices.
- Open App Menu > [new virtual screen] > Move Virtual Screen, expanding the more-options chevron if needed. Choose Arrange and drag its rectangle beside your physical desktop, with adjoining edges so you can move the pointer and windows between them. Keep the physical screen as main. This immediately saves the system arrangement; other screens can move to resolve overlaps. See Move Display for the arrangement interface.
- Open App Menu > [new virtual screen] > Picture in Picture and turn on Enable Picture in Picture Window. Put the PIP on your physical display. Leave Start Automatically off for this temporary setup. Its source is the virtual screen whose menu you opened, even though the PIP window sits elsewhere.
- Drag the demonstration windows across the adjoining desktop edge onto the virtual screen. Watch them appear in the PIP. Keep BetterDisplay Settings, OBS and private work on the physical desktop; arrange the demonstration content so the whole intended frame is visible.
- To interact with the source, Command-click a point inside the PIP to move the pointer to the corresponding position on the virtual screen. Release Command, then click normally on that source desktop to focus the application and type. The Command-click relocates the pointer; it does not send that click through to the pictured application. Move the pointer back across the adjoining edge when finished. Leave Mouse Click-through off: that option sends input to windows underneath the PIP on its local desktop.
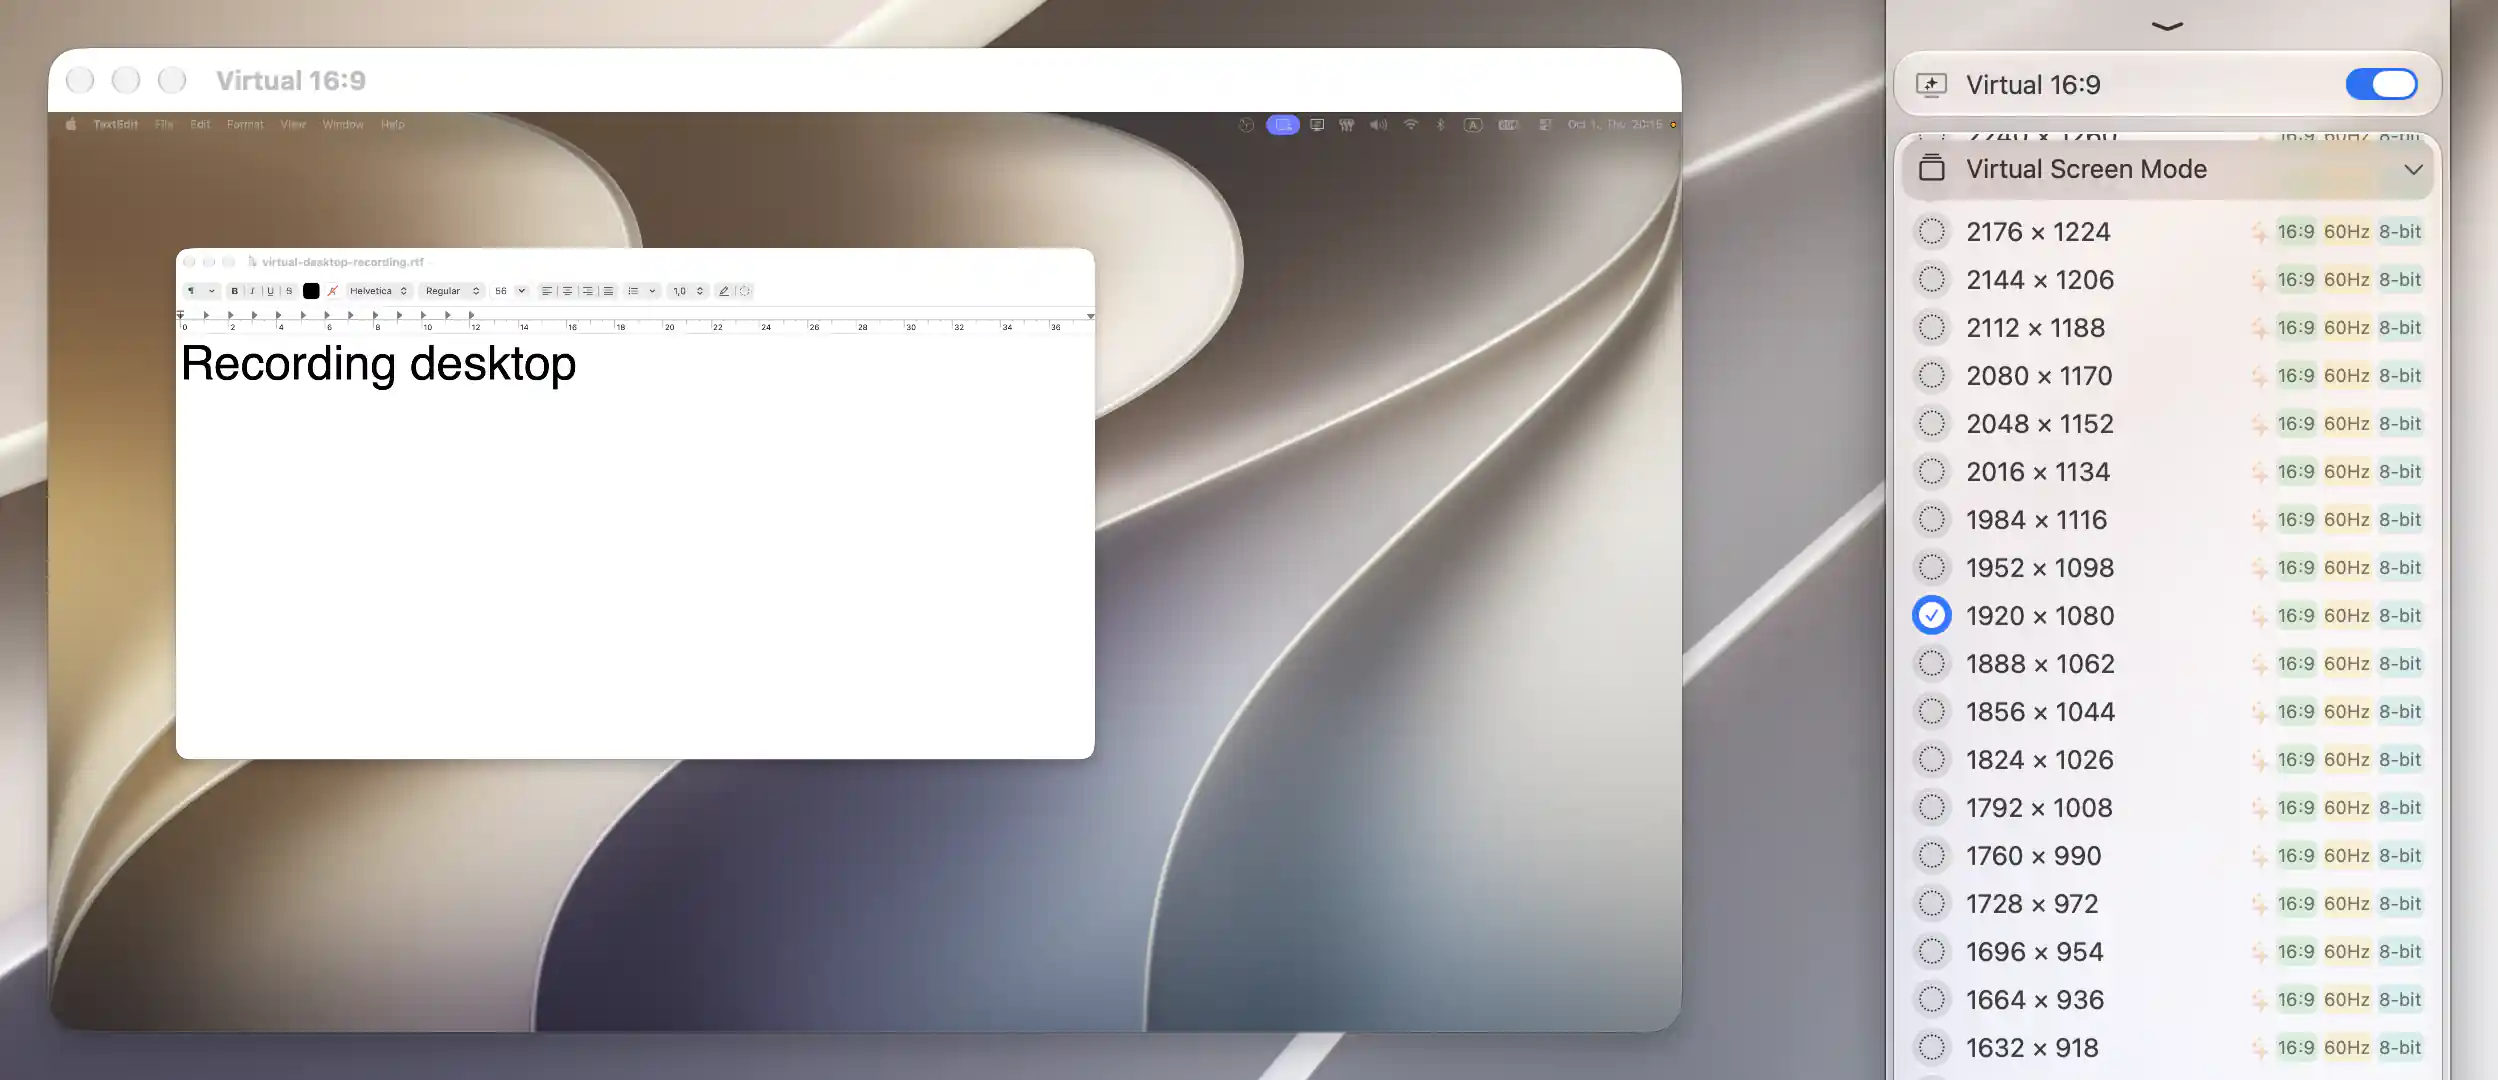
The virtual mode sets desktop space; PIP shows that desktop locally on the physical screen.
The mode dimensions describe the logical resolution, which determines how much space applications have. A 1920 × 1080 HiDPI virtual desktop renders a 3840 × 2160 backing image. A recorder can then resize that captured image. Enlarging or shrinking the local PIP changes only how you view the source, not the source desktop or OBS’s output dimensions. See virtual recording size and HiDPI backing pixels.
Select the whole virtual display in OBS
- With recording and other OBS outputs stopped, open OBS Settings > Video. For a 1080p example, set both Base (Canvas) Resolution and Output (Scaled) Resolution to
1920x1080, then select Apply. The canvas is where sources are composed; the output setting determines the scaled recording size. Record any other video setting you change. See the OBS video settings explanation. - In OBS’s Scenes dock, select + and create a separately named scene for this desktop. In its Sources dock, select + > macOS Screen Capture and create a new source. Give it a name you can distinguish from existing sources.
- In the source’s properties, set Method to Display Capture and select the new virtual screen under Display. Confirm the preview shows your demonstration windows, then select OK. Choose the virtual display itself, rather than a window capture of the PIP. The OBS macOS Screen Capture guide explains these source choices.
- With that source selected, use Edit > Transform > Reset Transform, then Edit > Transform > Fit to screen. This fits the whole source into the canvas while retaining its proportions. Check all four edges in the preview. Refit after changing the canvas or virtual-screen mode; see the OBS Sources guide.
- Open OBS Settings > Output and choose a writable Recording Path with enough free space. Keep an already working recording setup. If Advanced is selected with Standard recording, check the Recording settings and disable Rescale Output for this example so it does not introduce a second size change. Other recording types need their own output-size check. See the OBS recording output guide.
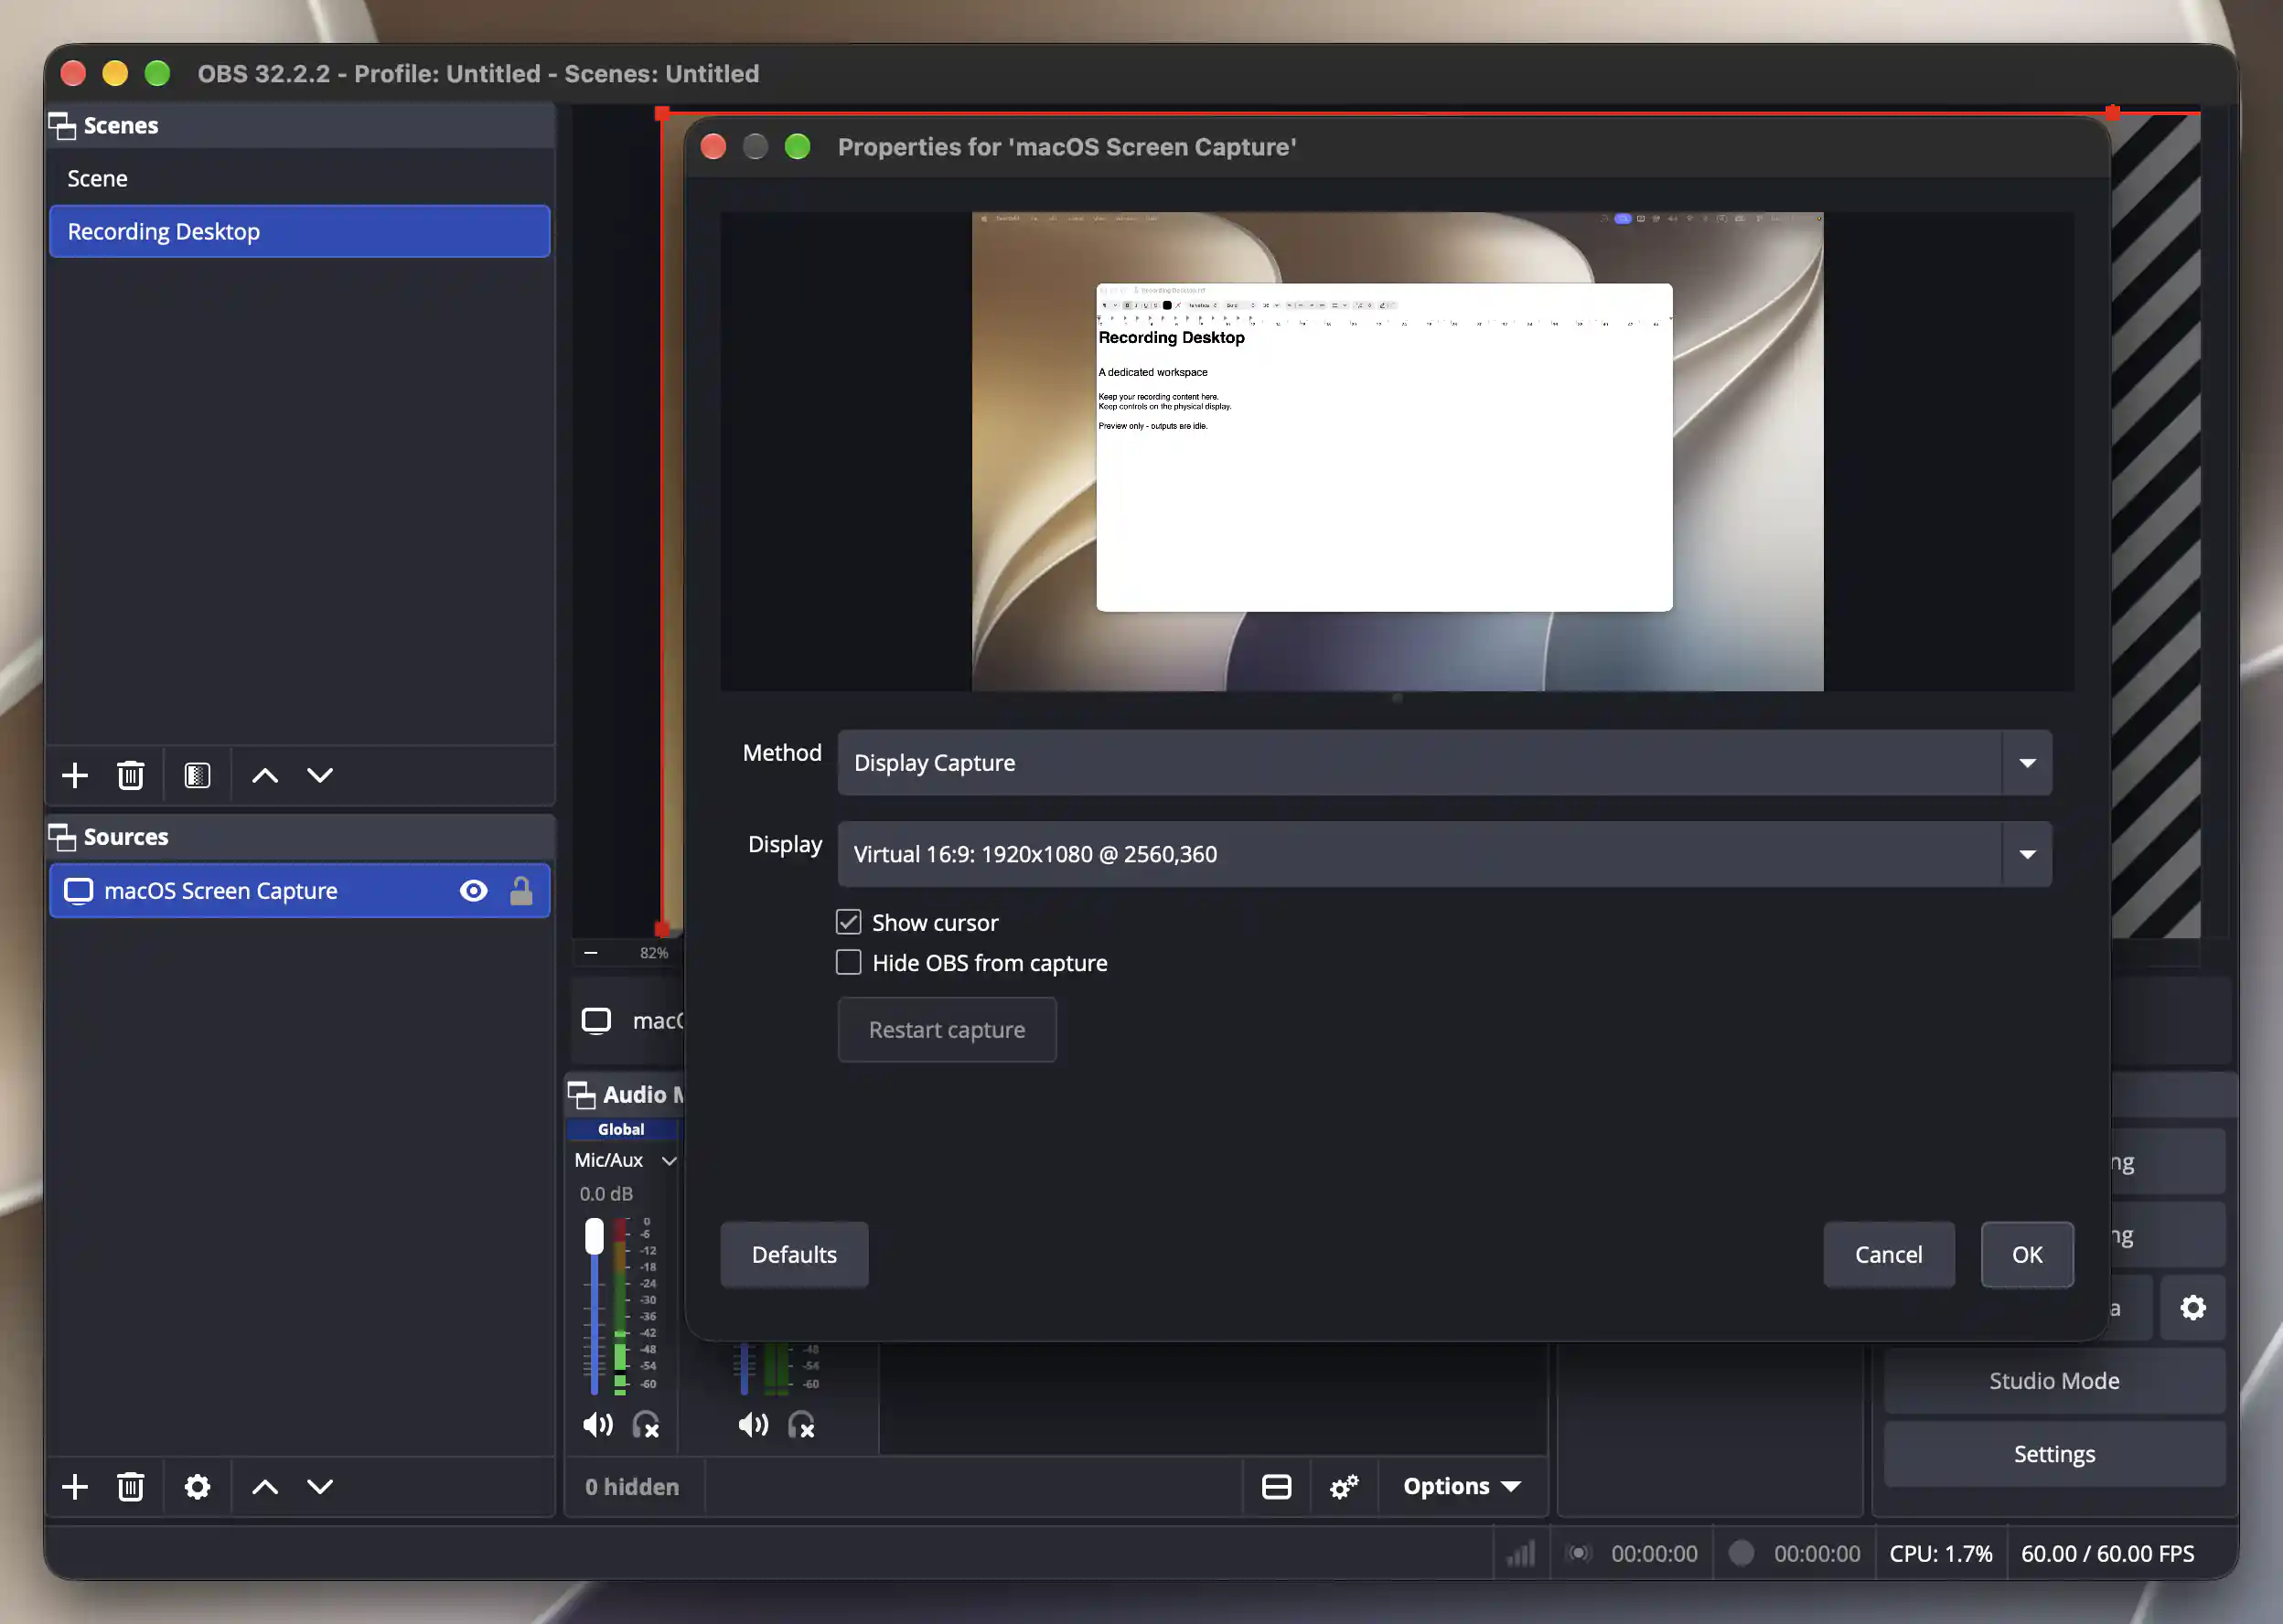
Select the virtual display itself as OBS’s whole-desktop source.
Keep the PIP and OBS on the unrecorded physical display. BetterDisplay’s Exclude PIP Window affects BetterDisplay’s own capture; it does not configure OBS or a meeting app. Selecting the separate virtual display avoids recording the local PIP in this setup. See PIP capture exclusion.
Check the result
- Check OBS’s preview for the correct desktop and all four frame edges. Move a harmless demonstration window on the virtual desktop and confirm that the preview follows it. A private window left on the physical display should not appear. Review notifications and any content that could open on the shared desktop; a separate desktop does not automatically suppress them.
- Make the first test visual only. Before changing OBS’s Audio Mixer, record each source’s original mute and hidden states. If sources are hidden, right-click the mixer and choose Unhide All. Then use the speaker mute button for every active audio source, including microphone and screen-capture audio. OBS can capture audio by default; its Audio Mixer guide explains the mute button.
- In OBS’s Controls dock, select Start Recording. Move or scroll the demonstration content for a short local sample, then select Stop Recording and wait until recording has finished.
- Open the saved file from the chosen recording folder. Inspect its reported pixel dimensions: this example aims for 1920 × 1080, regardless of the HiDPI backing image. Play it back to check readable text, complete framing, motion and silence. The saved file, rather than the PIP’s size or OBS’s preview alone, confirms the actual recording result.
For screen sharing, choose this same virtual display in your meeting app’s display selector and check its preview or a consenting recipient’s view before presenting private work. That app needs its own permission and may resize, compress or omit sources independently. OBS’s configuration does not set the meeting app’s output dimensions.
Troubleshooting
- The virtual screen is missing. Confirm Connect this virtual screen is on and that you selected the newly created definition. Reopen OBS’s display selector after connecting. If reconnecting is necessary, stop capture and move your windows back first. An association can prevent manual connection changes; this procedure uses an unassociated preset. See Virtual Screen settings.
- PIP is unavailable or blank. Check the connected source, Pro/trial and BetterDisplay’s Screen Recording access. If it is paused, select Pause Picture in Picture again. Use Show and Bring to Front for an active window you cannot find. OBS’s permission is separate; check it when OBS alone is blank.
- Text is tiny, cropped or stretched. Check the logical mode and HiDPI selection first. Then reset and fit the OBS source, and verify canvas, scaled output and any recording rescale setting. An 8K HiDPI backing image corresponds to a 4K logical desktop, not a 1080p interface. For larger text, choose a smaller logical desktop or enlarge content within the application.
- The setup changes other screens or returns to an old arrangement. Review relevant UI Scale Matching, Layout Protection, device protections and automatic presets. Pause only the interfering rule before trying again. A mode change can update already enabled resolution and refresh-rate protection targets; switching a rule off does not undo a completed change.
- The recording contains the PIP, OBS or private work. Recheck the chosen OBS display and the contents of this scene. Window capture of the PIP or capture of the physical desktop produces a different result. Keep unwanted windows off the source desktop and verify the file before sharing.
- Protected video is black or a sharing app does not offer the screen. Some content and capture paths restrict recording. A virtual screen and capture permission do not bypass those restrictions. Test permitted content and use a capture source the other app supports.
- Settings appears when opening BetterDisplay’s menu. An already open Settings window may come forward with the app. Close it with its normal close button when finished; the menu bar app remains available.
Stop and restore your workspace
- Stop OBS recording and wait for it to finish saving. Stop any meeting-app sharing too. Return to the original OBS scene, remove only the test source and scene you created if no longer needed, and restore the recorded video/output settings, recording path and audio mute/hidden states. Keep or remove the test file according to your needs.
- While the virtual desktop is still connected and visible, move every window you need back onto the physical desktop. Restore their positions and confirm you can use them there.
- Turn off Enable Picture in Picture Window for this source, or close its PIP normally. Leave Start Automatically off if retaining this temporary definition.
- To keep the definition for later, turn off Settings > Displays > [new virtual screen] > Connect this virtual screen, or use Disconnect Virtual Screen in its App Menu. The saved definition remains. To remove only this new definition instead, select Discard… in its settings and confirm Discard Virtual Screen. Discard also disconnects it and removes its saved configuration. A separate color-profile removal choice can appear; it is not required to discard the definition.
- Restore any changed physical-display modes, arrangement and main-display choice, then the original states of the specific rules you paused. If a protection target changed, restore that saved target as well as the current mode. Re-enabling a protection captures the current value, so select its original target before doing so; an originally absent target should remain off. If the original current mode differed from its protected target, ordinary mode changes can update that target again—retain your original record or backup and verify both rather than assuming a switch restores them. If ordinary UI cannot recreate both independently, leave the affected protection off and record the precise restoration limit instead of enabling it with the wrong target. Removing the new virtual screen does not automatically restore moved windows, other displays or OBS settings.
If you reuse the new definition later, its saved connection state and PIP preferences matter. A connected definition normally reconnects when BetterDisplay starts, while Start Automatically separately determines whether its PIP starts. Disconnect it after use when you want it to stay out of the next session.
Related pages
- Creating a 16:9 recording desktop.
- Logical desktop size and recording pixels.
- Picture in Picture viewing and pointer actions.
- PIP exclusion and third-party capture.
- Virtual Screen configuration, connection and removal.
Additional information
This section explains the license and platform requirements for this workflow.
Features requiring Pro license
Starting PIP, changing its preferences and the menu’s pointer-warp action require Pro or an active trial. Preset virtual-screen creation, connection, disconnection, discarding and ordinary mode selection do not require Pro; the Arrange drag interface is also available without Pro. Optional custom virtual-screen configuration, naming and configuration protections require Pro, as do the group features UI Scale Matching and Layout Protection. OBS’s features have their own requirements.
Platform compatibility
This workflow is available on Apple silicon and Intel Macs running the app’s supported macOS 26.3 or later. Offered virtual modes and capture results still depend on the Mac, configuration and recorder. BetterDisplay and OBS need separate screen-capture permission for their respective capture paths. The example uses OBS’s modern macOS Screen Capture source; another recorder or meeting app must support selecting the virtual display.