Make text and interface elements a similar size across different displays
Make text and windows a similar physical size when you move between a laptop and a larger monitor. UI scale matching follows one display's desktop size and chooses suitable existing modes for the others, so their resolutions can differ while their interface sizes come closer.
Before you begin
Choose two connected displays with different physical sizes or pixel densities, such as a smaller built-in display and a larger external monitor. Use separate extended desktops for the first test: a mirrored target is skipped. Pick the display whose text size you find comfortable as the watched display; the affected displays will follow it.
Check that each affected display offers useful display modes at its preferred refresh rate, the frequency at which the screen updates. A mode combines desktop size with rendering and timing properties. If the choices are too sparse, complete Set up a fully scalable HiDPI desktop first. Flexible scaling adds choices on supported displays; scale matching itself does not create modes.
Write down each display's current logical resolution (the desktop size used for text and windows), HiDPI state, refresh rate and bit depth. HiDPI renders the desktop with more detail before fitting it to the panel. Also record any enabled configuration protections and their exact saved resolution and refresh-rate values, which may differ from the current mode. Save work before mode changes, which can briefly interrupt the picture.
Check the physical size used for matching
The calculation needs credible dimensions for the actual image area, not the monitor enclosure. Compare the reported width and height with the display's specifications or measure the visible image area. A fallback value shown by the app is not evidence that the panel has that size.
- Open Settings > Displays > [display] > General Settings > Additional Settings….
- Check Display physical dimensions. Record whether each field is empty or contains an explicit value; an empty field can show the app's calculated or reported value as a hint.
- If the values are wrong, enter positive, verified width and height in millimeters for the panel's normal unrotated orientation. Repeat for the other display. Do not substitute the desktop's pixel dimensions or guess from a product's rounded diagonal size.
- Select Done. These are saved app settings; this sheet does not require a system-configuration Apply or restart.
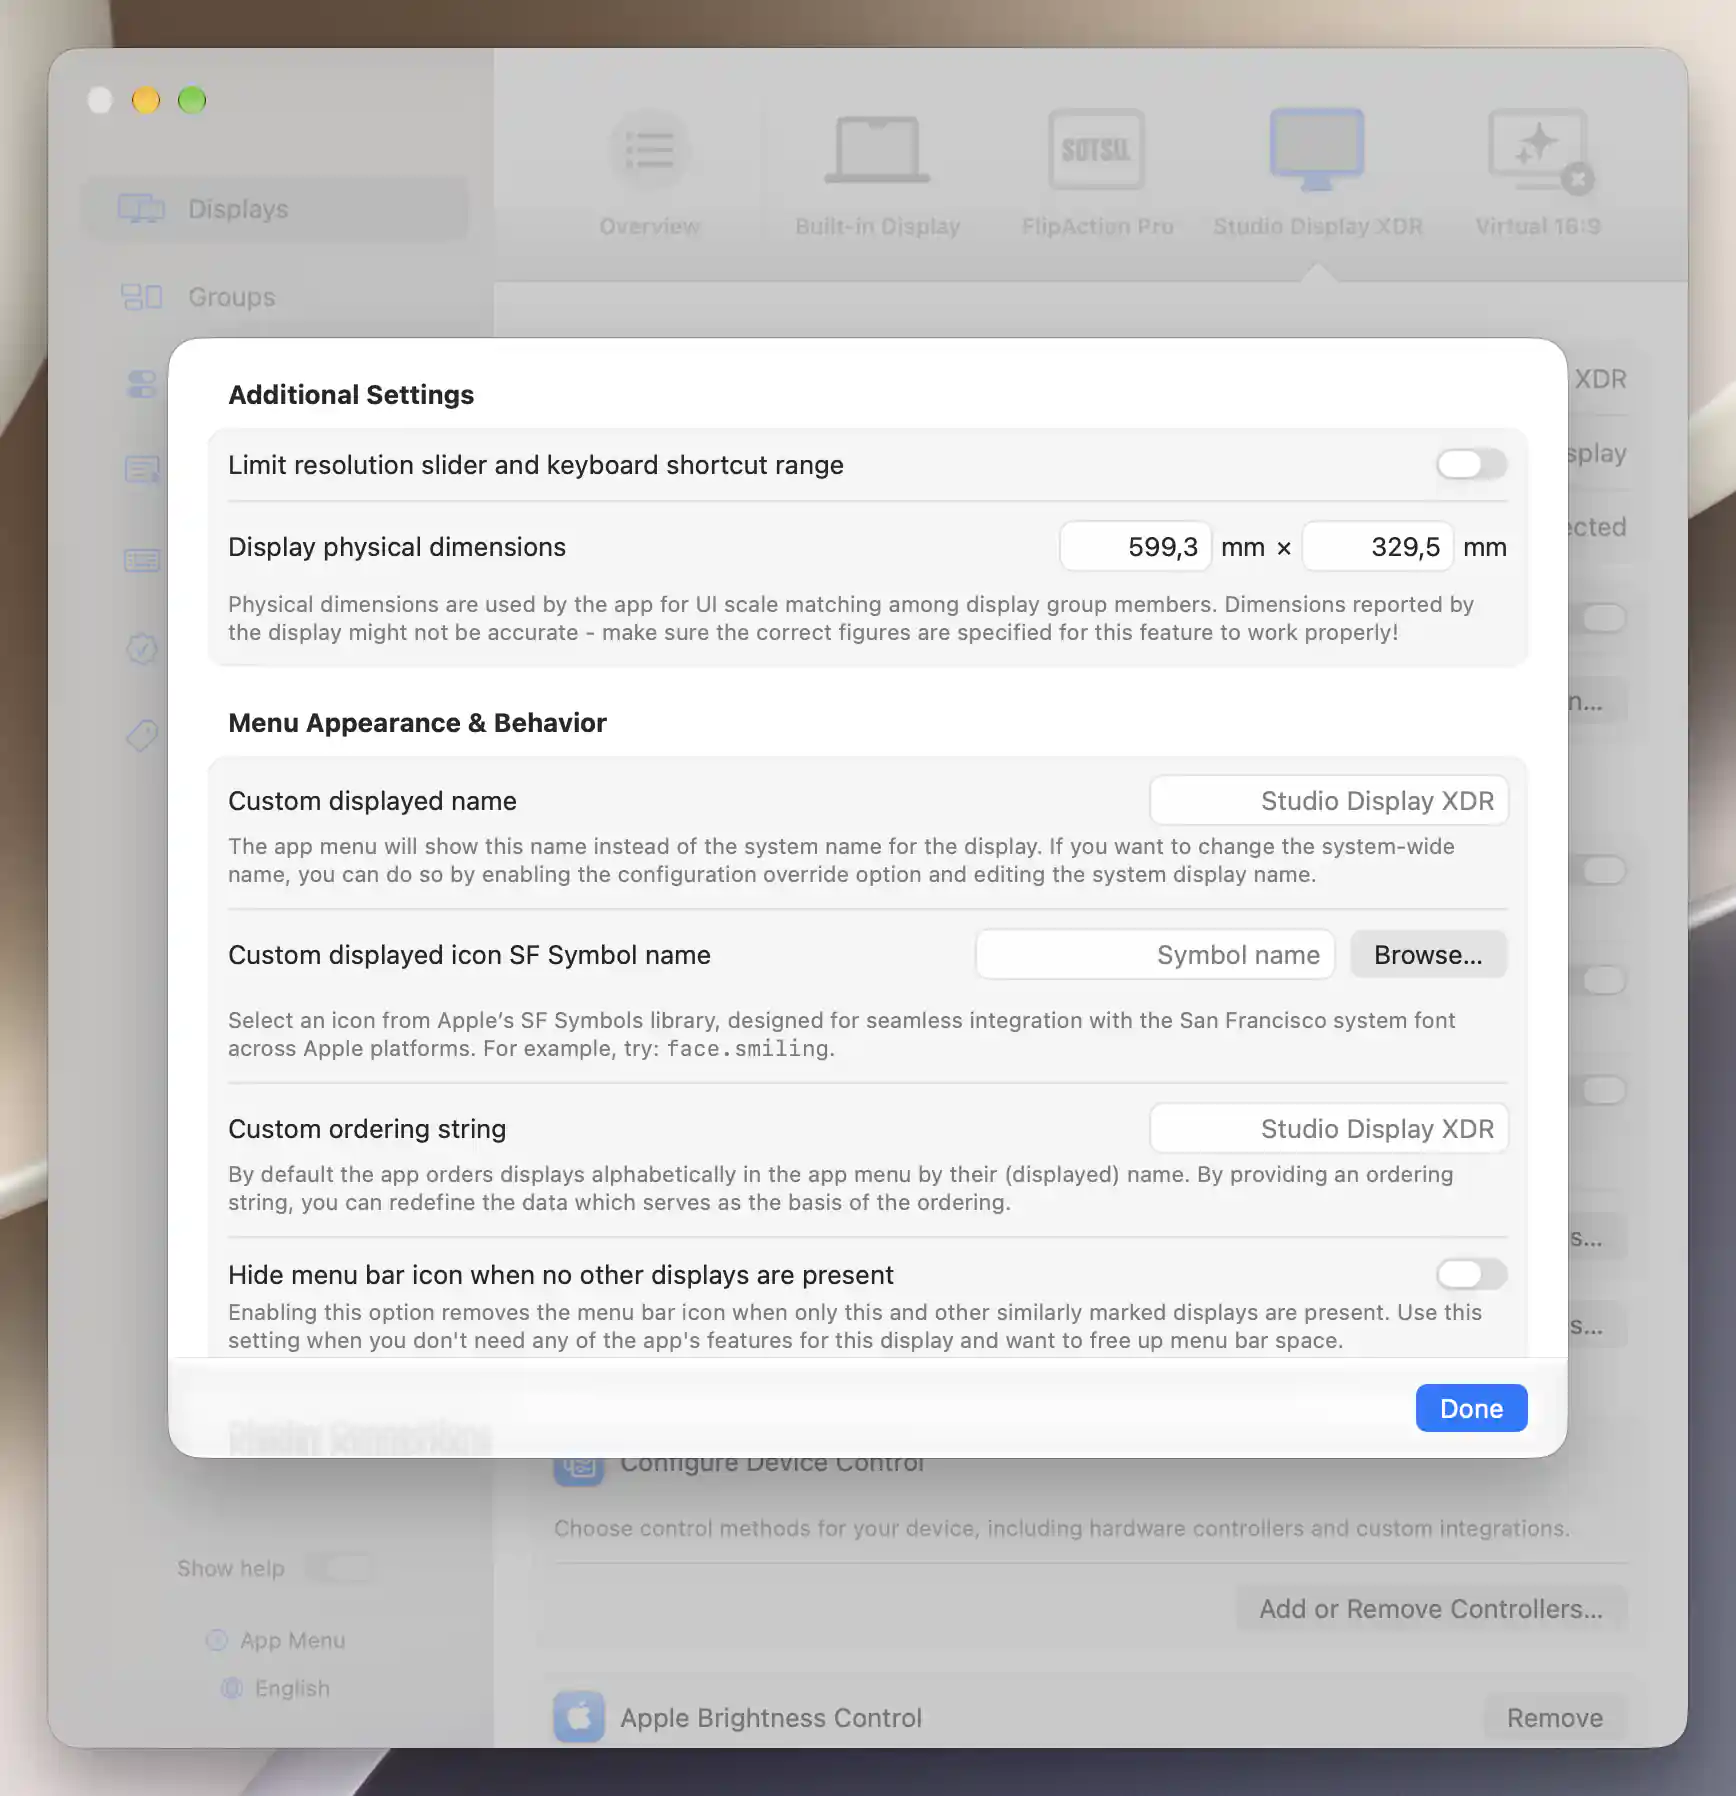
The XDR reports 599.3 × 329.5 mm; these explicit values illustrate the setting, without an independent physical measurement.
Choose one display to follow
Use a dedicated display group for this first test. Prepare its membership and matching rules while it is disabled, then activate it when the choices are complete. Group membership defines the available participants; watched and affected lists give them their separate roles.
Before testing, record and temporarily pause any other UI scale matching rules involving these displays. Otherwise a source change can affect additional targets through another active group. Restore those original rules after the comparison.
- Record your existing group states first: a new group starts enabled and exclusive, so creating it can temporarily deactivate lower-priority groups. Open Settings > Groups > Overview > Create New Display Group…, name it UI Size, and select Create Display Group. Turn Enabled off in the new group's pane immediately, and check that the previous groups become active again.
- Under Group Membership, turn Treat all currently connected displays as group members off. In Member displays, select only the watched display and the displays you want to match.
- Open Configure Activation Rules… and select All configured group member displays are connected. If other connected displays should be allowed to remain outside this group, turn Only group members can be present off. Leave unrelated group features unchanged; this task does not need synchronization or layout protection. Select Done.
- Under UI Scale Matching, turn Enable UI scale matching on. Leave Update resolution configuration protections off for the first test, so displays with protected resolutions stay unchanged.
- Open Advanced UI Scale Matching Settings…. Turn Watch all group members for resolution changes off, then select exactly one display under Watched group member displays.
- Turn Match UI scale of all group members off. In Affected displays, select only the intended receivers; leave the watched display and other members off.
- Leave Matching tolerance empty for the default 10%, and keep Watch for resolution changes made outside of the app off. Select Done to close the sheet.
- Turn the group's Enabled switch on and check Activation for Display group is currently active. If it remains inactive, resolve the displayed reason before testing.
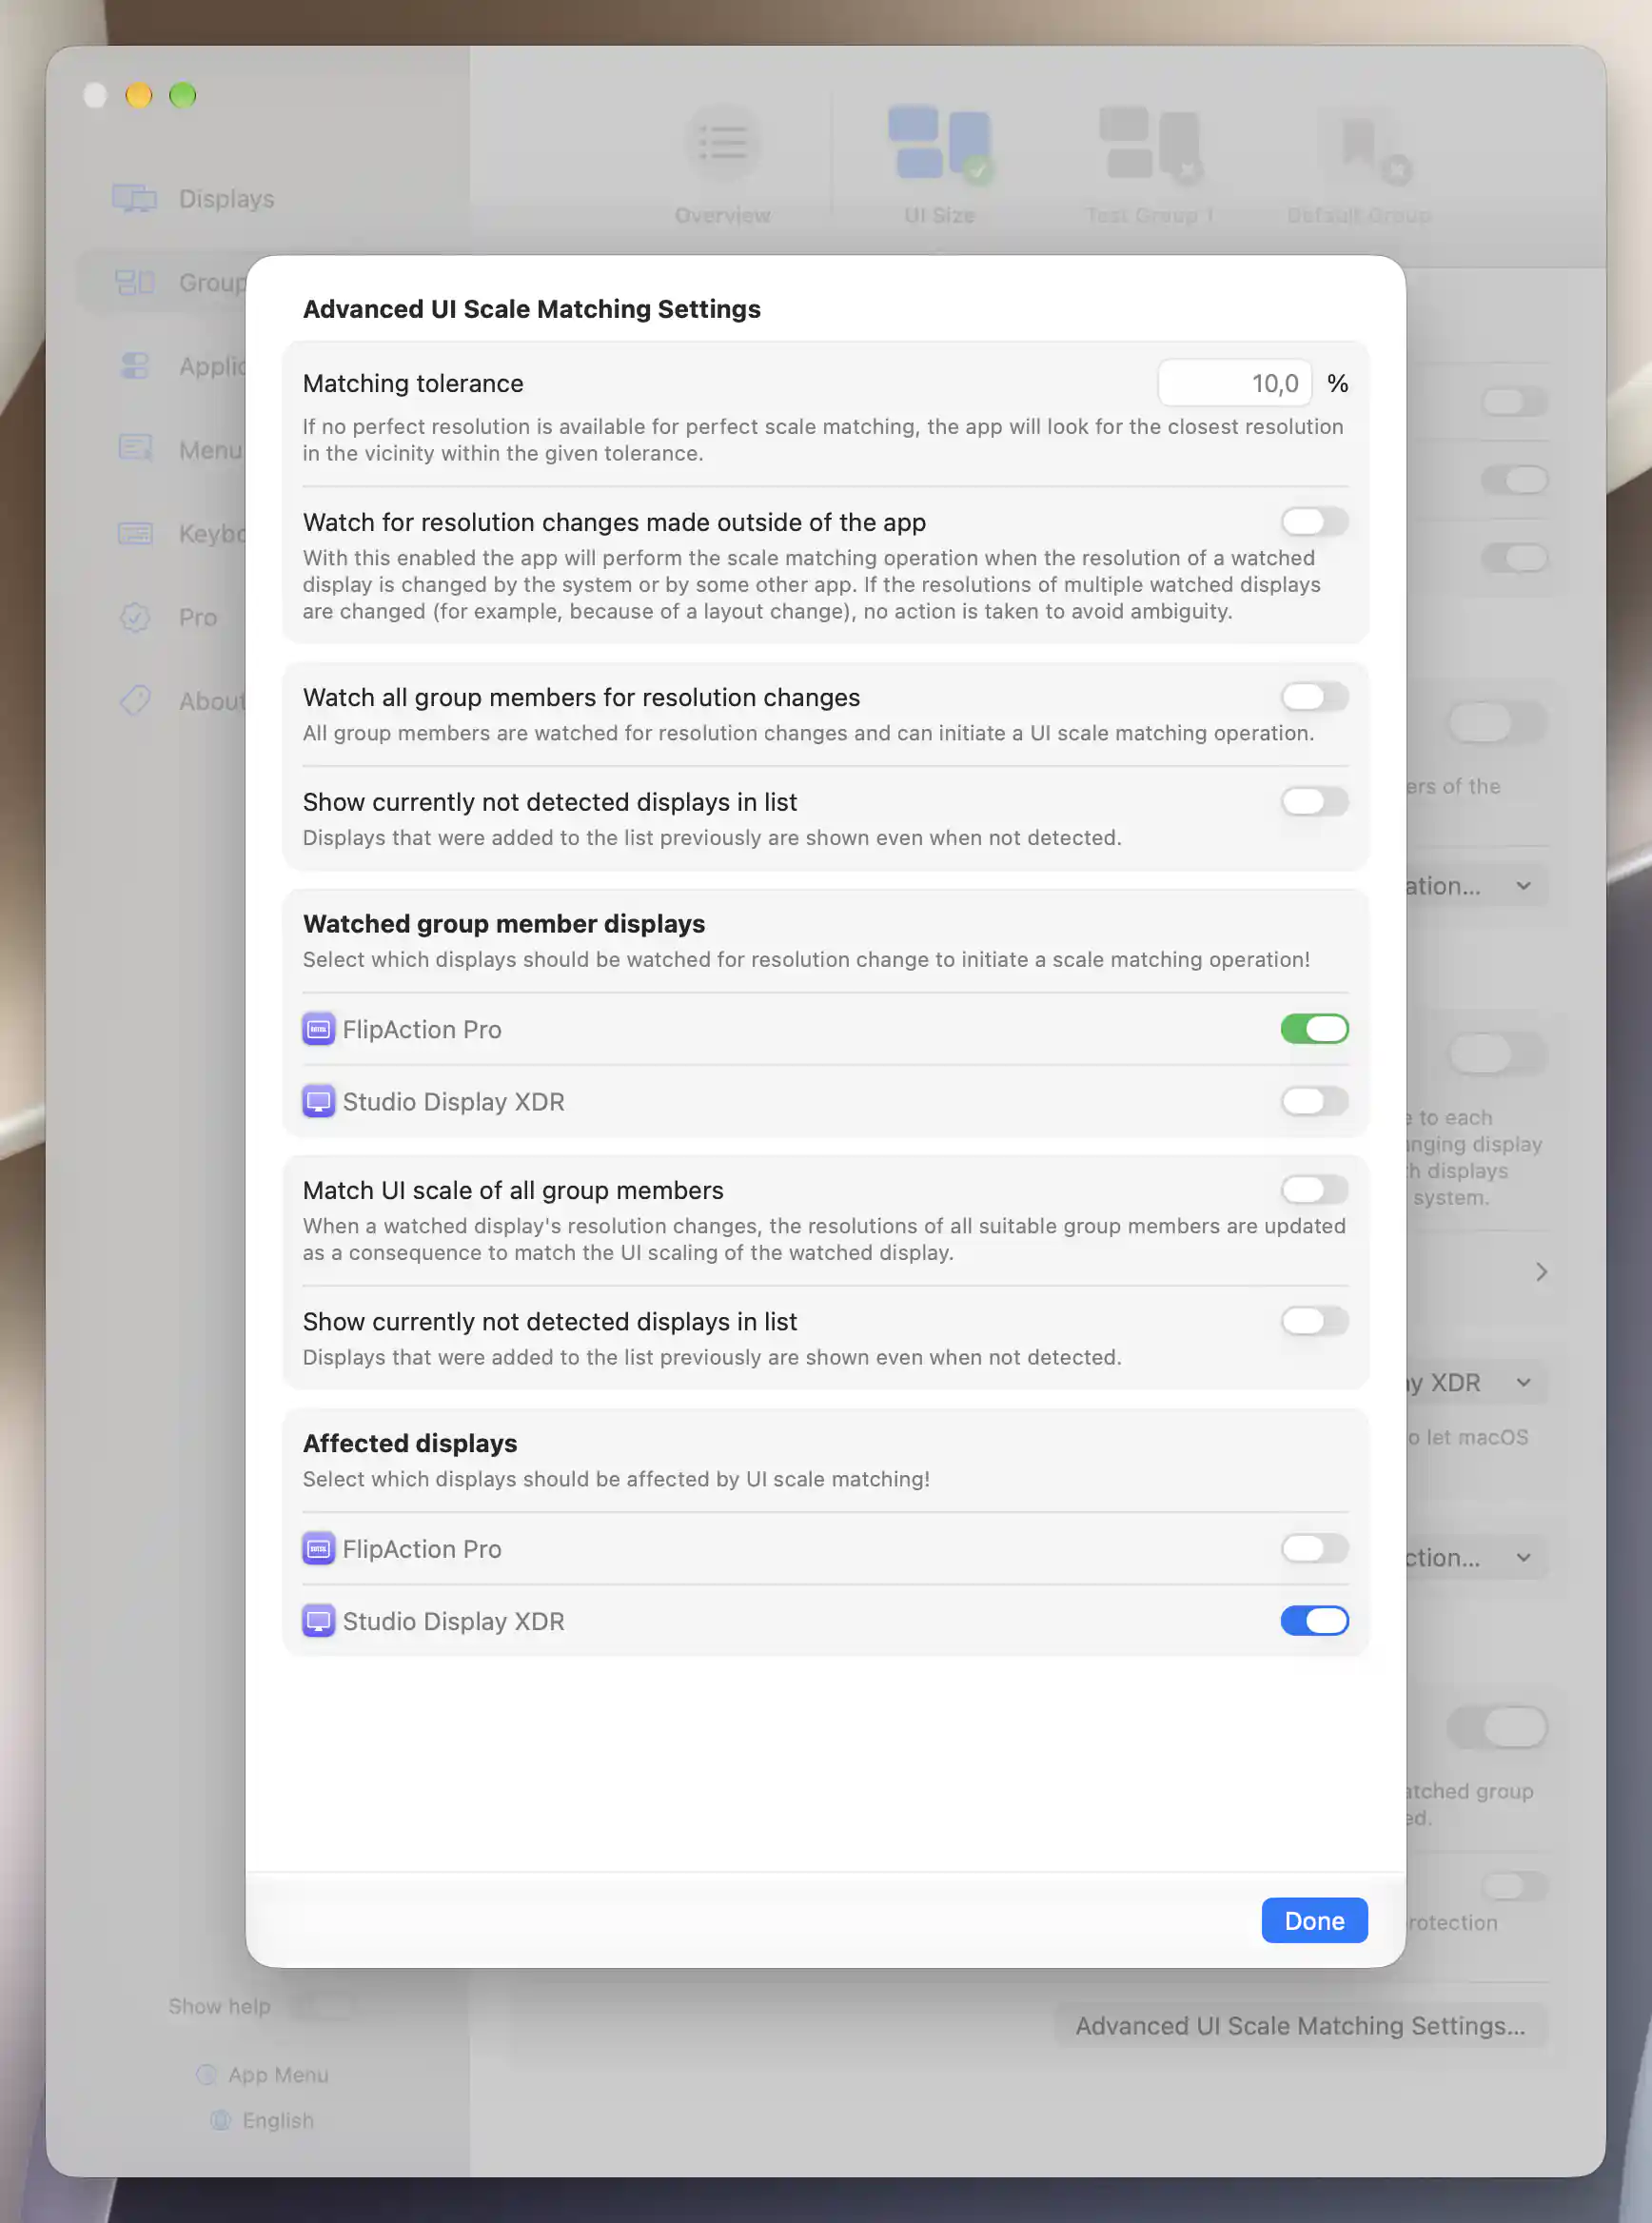
FlipAction Pro supplies the size to follow; only the XDR is selected to receive suitable matching modes.
The two automatic member lists start on in a new configuration. Explicit selections make this test predictable: only the chosen watched display starts matching, and only the chosen affected displays can receive it. Changes are saved as you edit; no Apply or restart is needed.
Change the watched display and try a manual match
- Open App Menu > [watched display] > Display Mode. Choose a different known-working logical resolution that gives you a comfortable interface size. Use the resolution slider instead if you prefer.
- Wait for the change to settle, then inspect the affected displays. BetterDisplay looks for a nearby mode that brings their physical interface size toward the watched display's size while preserving each target's current aspect ratio, the relationship between its width and height.
- To try manual matching, use an affected display's Display Mode menu to choose a different known-working desktop size. This display is not watched, so it does not drive this group's match.
- Open App Menu > [watched display] > Manage Display > Match Group UI Scales. This uses the watched display's current mode without changing that source. Recheck the affected display for a suitable match.
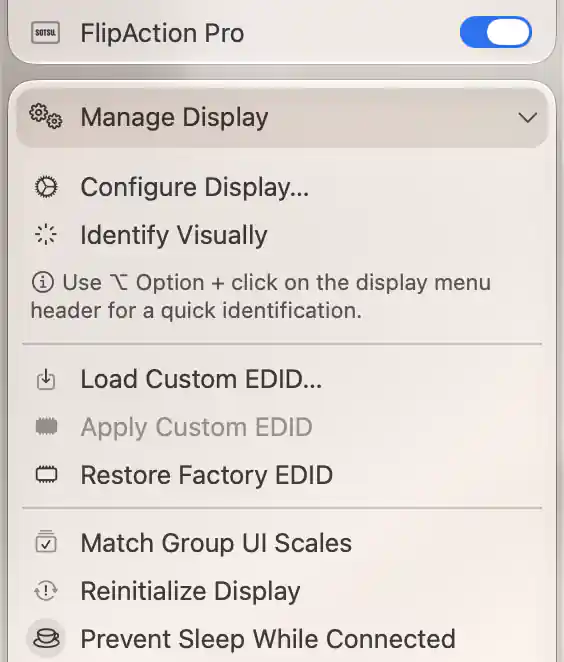
Run matching from the watched FlipAction Pro display without changing its current desktop size.
The manual action still needs an active group with matching enabled and that display accepted as a watched member. It works with outside-change watching off. It does not align every connected display regardless of the group's lists.
Check the result
Move the same document window between the displays without changing its font size or app zoom. Compare the physical size of text and familiar interface elements on the actual screens. Similar size is the goal; the panels' physical pixel densities and rendering sharpness can still differ.
Check each target's current Display Mode and Refresh Rate selections after the match. Matching looks for modes with the target's current refresh-rate representation and bit depth. It also looks for its current HiDPI state, but can select a native mode as an exception, so verify HiDPI rather than assuming it stayed on. The source's refresh rate is not copied to the targets.
A target stays unchanged when no suitable available mode is close enough. Both target dimensions must be within tolerance; accepting a wider tolerance permits a less exact physical-size match. Keep the default for the first comparison rather than raising it to conceal incorrect panel dimensions.
Optionally follow outside changes and connections
Once the basic match works, return to Advanced UI Scale Matching Settings… if you want changes made by macOS or another app to start matching too.
- Enable Watch for resolution changes made outside of the app. It starts off; keep the same single watched display.
- If newly connected affected displays should be matched to that source, enable the now-visible Enforce UI scale match upon connecting a display. It also starts off.
- Leave Treat newly connected displays as possibly watched displays off for this setup. Enable it only if a connecting display should itself be considered as a source under your watched-display rules.
- Select Done. After BetterDisplay has finished startup, test the next outside resolution change or an intended affected display's reconnection and repeat the result checks above.
These switches prepare responses to qualifying events; turning them on does not perform an immediate match. Multiple watched displays can propose conflicting modes for the same target, in which case that target is skipped. One watched source avoids that ambiguity.
Troubleshooting
Nothing changes
First confirm that the group is active, matching is enabled, the source is watched, and the target is a connected member selected under Affected displays. Choosing an already suitable mode can leave the target unchanged. For outside changes, check the outside-watch switch; connection enforcement also needs its own switch.
A mirrored target or a display with resolution protection is skipped in the initial setup. If you deliberately want the match to replace a protected resolution, record the exact old target first and enable Update resolution configuration protections. Successful app mode changes update existing saved resolution and refresh-rate protection values; simply switching protection back on later does not retrieve an earlier value. See Configuration Protection.
The sizes are still different
Recheck the actual image-area dimensions on both displays and keep app zoom unchanged during comparison. Review the available target modes at its current refresh rate and bit depth. If none is close enough, use the flexible-scaling setup where supported or choose a different comfortable source size. Increasing tolerance cannot supply a missing mode.
If another group also matches these displays, inspect its watched and affected lists before changing more settings. Overlapping active groups can broaden the affected set and matching choices. Keep one predictable matching rule for the first test.
Undo or stop matching
- Turn Enable UI scale matching off in the group to stop this feature. Disabling the entire group also stops it, but stops that group's other features as well.
- Restore each display's recorded mode, HiDPI state and refresh rate. Turning matching off does not revert resolutions already selected.
- If protection values changed, temporarily turn off only the relevant Resolution or Refresh Rate protection, select the exact originally protected mode or rate, and re-enable that protection. Verify its saved value. Restore protections that were originally off to off; selecting another mode while a protection is enabled can replace its saved value again.
- Restore any physical-dimension fields you edited to their original explicit values or empty state. Re-entering a visible fallback number is not the same as clearing a previously empty field.
- Restore any existing group activation settings you changed. To remove the temporary group, select Settings > Groups > UI Size > Discard…, then confirm Discard. Do not discard an existing desk group just to stop matching.
If an original protected mode is no longer available, or the original current and protected modes differed and you cannot recreate both safely, leave that particular protection off and keep the recorded target for later restoration. Do not enable it on the wrong current mode and assume the old target returned. If you enabled flexible scaling as separate preparation, use that tutorial's undo procedure only when you also want to remove its mode choices.
Related pages
- UI Scale Matching — all watched, affected, virtual-screen and advanced options.
- Individual group — membership, activation and exclusivity.
- Set up a fully scalable HiDPI desktop — prepare more scaling choices where supported.
- MacOS scaling, HiDPI, LoDPI explanation — desktop size, rendering detail and physical pixels.
Additional information
This section explains the license and platform requirements for the matching setup.
Features requiring Pro license
UI scale matching, manual Match Group UI Scales, watched and affected selections, tolerance, protection updates and outside-change/connection matching require Pro or an active trial, including in the Default Group. Activating a custom group also requires Pro. Physical-dimension editing is not separately Pro-gated.
Platform compatibility
This matching workflow is available on both Apple silicon and Intel Macs. The documented app requires macOS 26.3 or later. Each participating display still needs credible dimensions and suitable modes; flexible scaling has its own display and activation requirements. Matching itself needs no brightness controller, administrator helper or Screen Recording permission.