Show two virtual desktops on one ultrawide or portrait monitor
Show two separate virtual screens side by side on an ultrawide monitor, each through its own Picture in Picture (PIP) window. Put different apps on the two sources and select either source in a sharing app that supports it. Your physical monitor still has its original desktop underneath the views.
Before you begin
- Use a connected ultrawide monitor with a usable extended desktop. The example is a 5120 × 1440 panel, with two 16:9 views. Keep an independent physical recovery display available, such as an open MacBook’s built-in display. Keep the physical desktop as your main display; do not mirror it to either virtual source. Check macOS display arrangement if necessary.
- Prepare two harmless, distinguishable app windows and save their documents. Record their original positions and which physical display contains them. Virtual screens disappear when the app quits; do not leave important windows dependent on them during setup or removal.
- Record current connections, main display, arrangement and complete display modes for every connected physical and virtual display. Record existing virtual definitions, associations, PIP configurations and their automatic-start, position and size settings. Keep current values separate from independently saved Configuration Protection targets. Pause only specific interfering layout, main-display, mode or UI Scale Matching rules, including rules in display groups, and record their originals.
- Open Settings > Displays > Overview > Advanced Virtual Screen Settings… and record its choices. On Apple silicon, Restore display layout after connecting a virtual screen is on by default and the first connection can restore modes and positions across all existing physical and virtual displays. Check all of them after connecting each new source. Leave wake/lock workarounds unchanged during the initial test. If Reconnect all remaining connected virtual screens after disconnecting one is on, record it and turn it off for this trial so removing a trial source does not restart unrelated virtual screens.
- If the open built-in display is your recovery view, record and turn off Settings > Displays > Overview > Connection Management Settings… > Disconnect built-in display when an external display is connected for the trial. Keep connection safeguards in place. Restore this choice only after safe physical recovery.
- Follow the actual macOS screen-access request when starting capture. The relevant screen-recording permission is under System Settings > Privacy & Security > Screen & System Audio Recording; follow any requested relaunch before retrying. See Apple’s screen-access instructions. A sharing app has its own permission and source selection.
Choose the geometry
Each source needs a 16:9 aspect ratio because half of 5120 × 1440 is 2560 × 1440. Three sizes matter: the panel’s physical pixels, the physical desktop’s current logical size, and the virtual source’s logical and backing-pixel resolution. A PIP window’s size does not choose the source’s resolution.
| Example physical desktop | Each half in logical screen points | Source shape |
|---|---|---|
| 5120 × 1440 logical | 2560 × 1440 | 16:9 |
| 2560 × 720 logical on the same panel | 1280 × 720 | 16:9 |
These are geometry examples, not modes to force onto your monitor. Open Settings > Displays > [physical monitor] > Display Information… and check Current Display Mode, including Logical width, Logical height, Pixel width and Pixel height. Use the actual logical width divided by two for each view. Leave room for physical desktop controls initially.
A virtual source offering 1280 × 720 HiDPI can have a 2560 × 1440 backing image. That can suit one half of this panel while giving apps a comfortable logical desktop. Check the actual offered mode and information; do not assume that two equal-looking windows have equal source resolutions.
Create two independent sources
- Open Settings > Displays > Overview > Create New Virtual Screen…. Choose Pre-configured settings (recommended) and 16:9 - HD/4K/5K/6K. Do not choose Match aspect ratio of and associate to a display: this task needs two independent sources, not a source tied to the viewing monitor.
- Choose Create Virtual Screen and wait for the new definition to be selected. Creating this preset saves a disconnected record. Before connecting, give it a unique, recognizable Virtual screen name in its Settings pane, if that feature is available to you. Record its actual identity; do not identify the two sources only by assumed numbering. Leave every Associated Displays selection off.
- Turn on Connect this virtual screen. Wait for an actual connected display, then check all pre-existing physical and virtual displays’ modes, main display and positions against your record. Restore unintended changes before proceeding.
- Repeat the same creation, naming and manual connection for the second source. Check both are connected, unassociated extended desktops and that the physical main display remains usable.
- For each source, open App Menu > [that virtual screen] > Virtual Screen Mode. Select a comfortable, actually offered 16:9 mode, using HiDPI if wanted. Check its Display Information… for the actual logical and pixel dimensions. Use the same verified mode on both sources for equal app sizing. Changing a mode can affect protection or matching rules, so recheck the other displays as well.
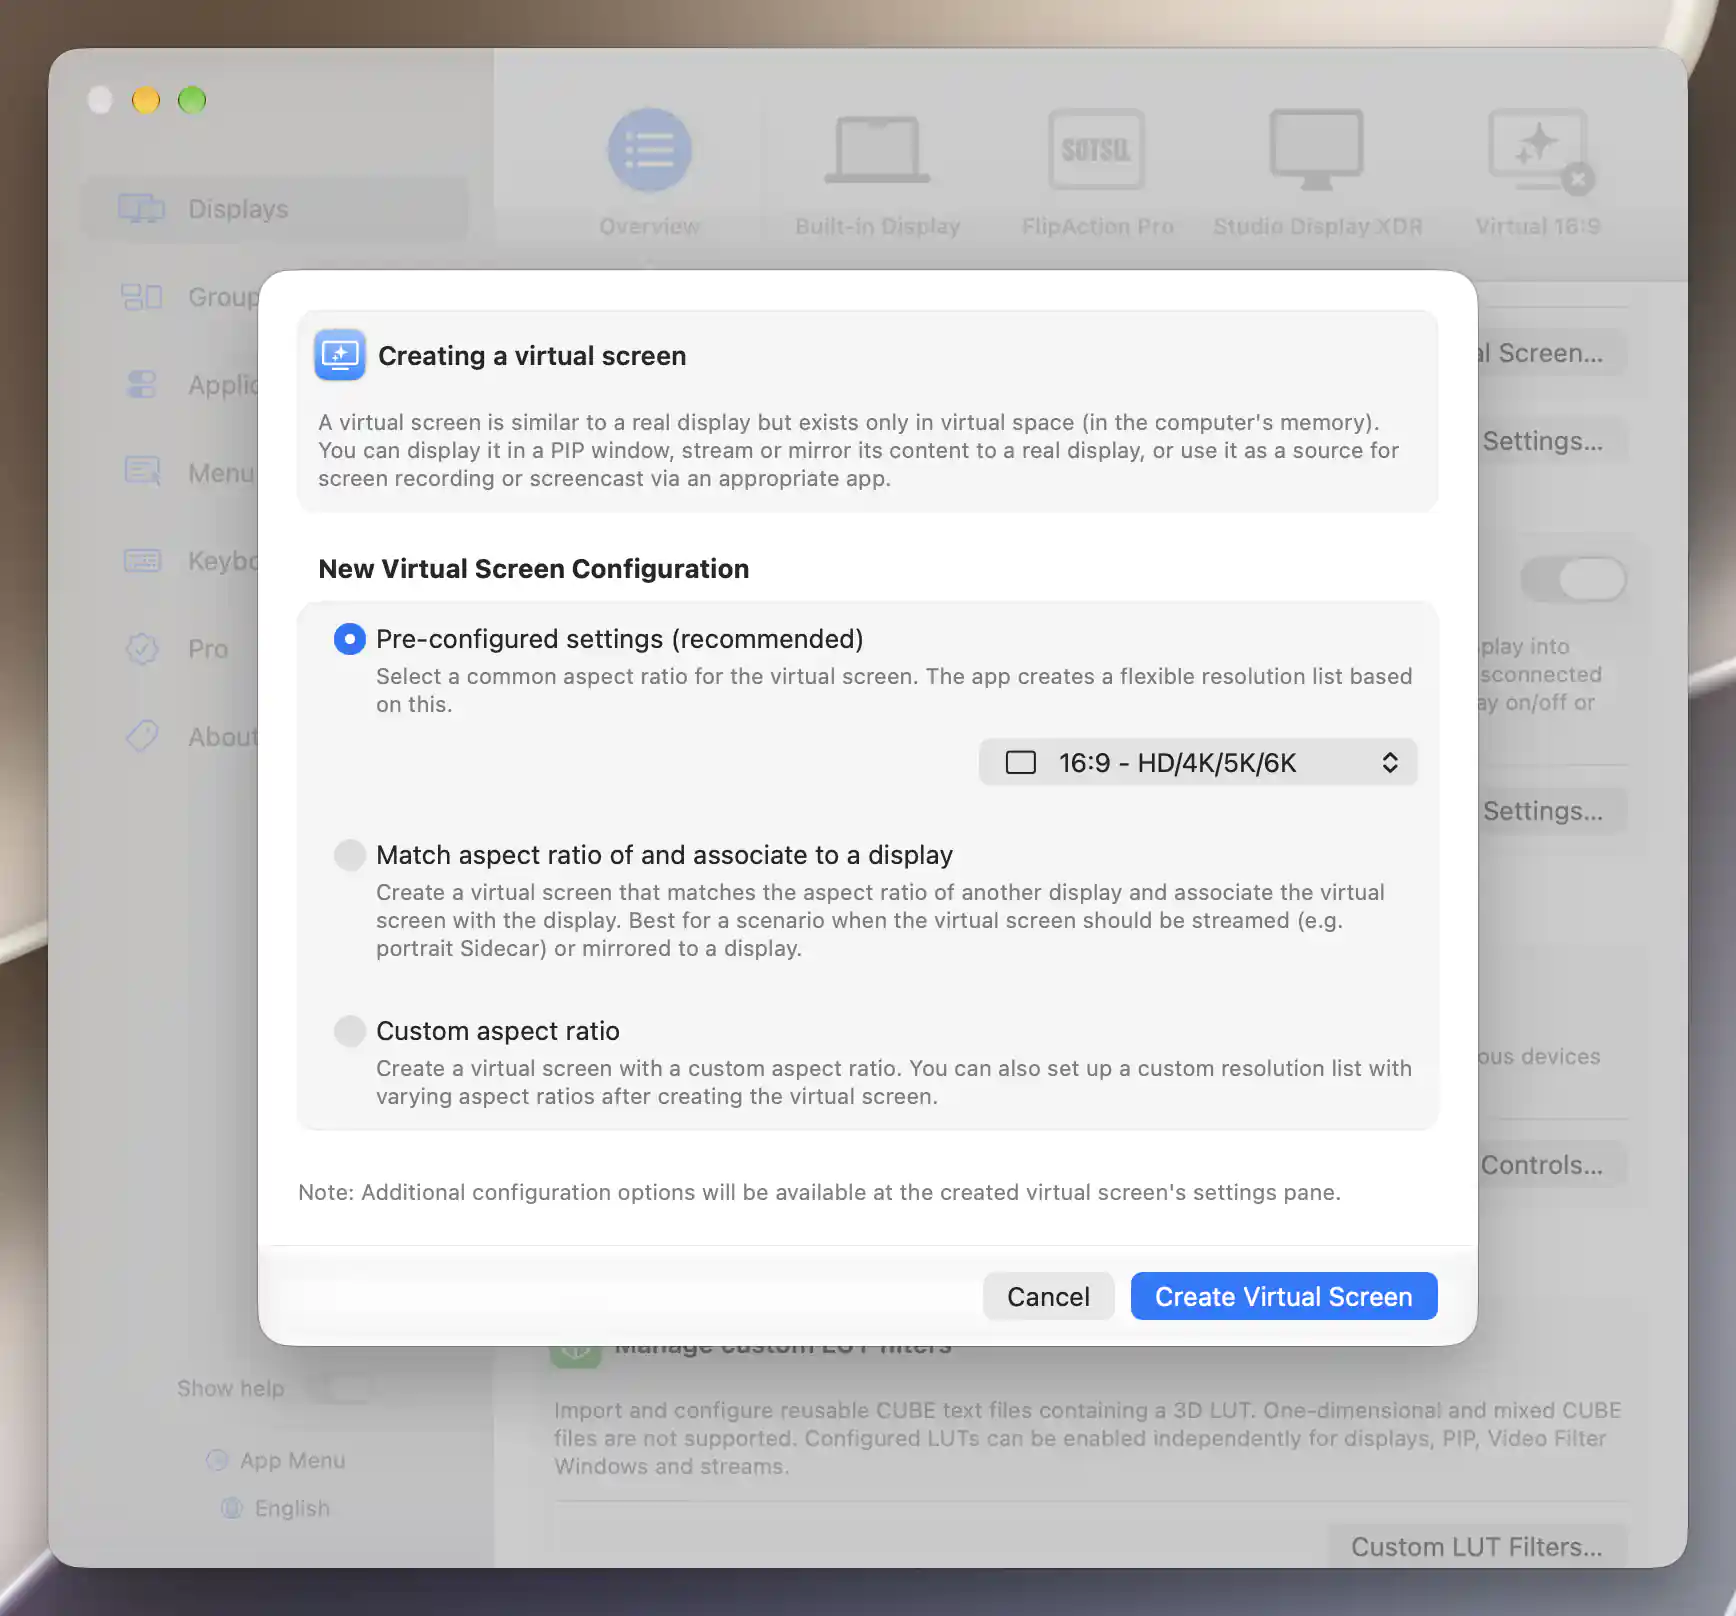
Choose the 16:9 preset to create each separate desktop without a display association.
Leave custom resolution lists, custom refresh rates, orientation-following and HDR off for the initial ordinary desktop test. If a desired mode is absent, choose a supported comfortable mode of the same shape; a preset does not guarantee every logical/backing-size combination.
Show and place both views
- In the attached App Menu > [first virtual screen] > Picture in Picture, find that source’s original/default PIP entry. Only that entry offers Add PIP Configuration. Add one fresh configuration, wait for its entry to appear and record the actual numbered label. Keep the default and any existing additional entries unchanged.
- Open the new entry and choose Enable Picture in Picture Window. Leave Start Automatically off. Confirm that it shows the first virtual source, not the physical monitor. Keep Keep Above Other Windows, Title Bar & Window Controls and Window Shadow on initially, and Lock Window Position and Prohibit Resizing off.
- Drag the PIP’s title bar onto the ultrawide physical display and resize it near the intended left half. Repeat the add/start procedure under the second virtual source and place that new view on the right. Do not add both views under the physical monitor: that captures the desktop containing the PIPs and can create recursion.
- Move one original app window to each virtual desktop by dragging its title bar across the actual display boundary. Watch the destination PIP to confirm where it arrives. See Apple’s window-moving instructions. Make a harmless change in each source window and verify that only its corresponding PIP changes.
- For each fresh view, turn off Title Bar & Window Controls and Window Shadow. Keep Free Aspect Ratio, Integer Scaling, Snap to 25% Steps, Mouse Click-through, Video Filters and Enable Cropping off. Leave transforms unchanged, Magnification and Alpha at 100%, and Show Mouse Pointer on. Resize and position the borderless views to your actual logical halves. If easier, temporarily restore the title bar to move a view, then turn it off and check the resulting content size again.
- After both content rectangles fit without overlap or stretching, turn on Lock Window Position and Prohibit Resizing in each new configuration. These keep the view windows in place; they do not lock source apps or guarantee placement after the physical layout changes.
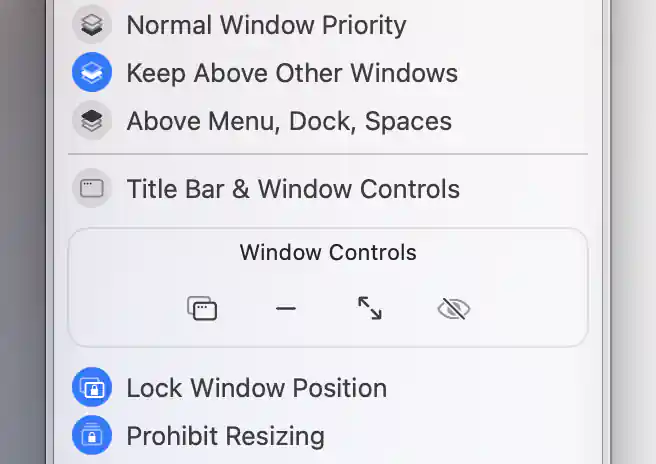
Keep the view above other windows, hide its title bar, then lock its position and prohibit resizing after placement.
Keep Above Other Windows is the initial ordinary window priority. If you need the views above the menu, Dock and Spaces, try Above Menu, Dock, Spaces only after the basic arrangement works and the independent recovery desktop is accessible. Leave Show on Lock Screen off. This choice can cover the viewing monitor’s controls; it does not turn its two views into separate hardware displays.
Leave Target FPS at Unlimited initially. If capture load is excessive, try a lower target such as 30 on only the trial views and check responsiveness again. A requested frame rate is not a measured delivery rate, and lowering it does not solve a missing or incorrectly selected source.
Check the result
Change harmless content on the first source, then on the second. Each view should show only its own source. Confirm the physical desktop is still present underneath; hiding a view reveals it but leaves capture running. Use the correct source’s Show and Bring to Front to restore the view. Stop it before private source work.
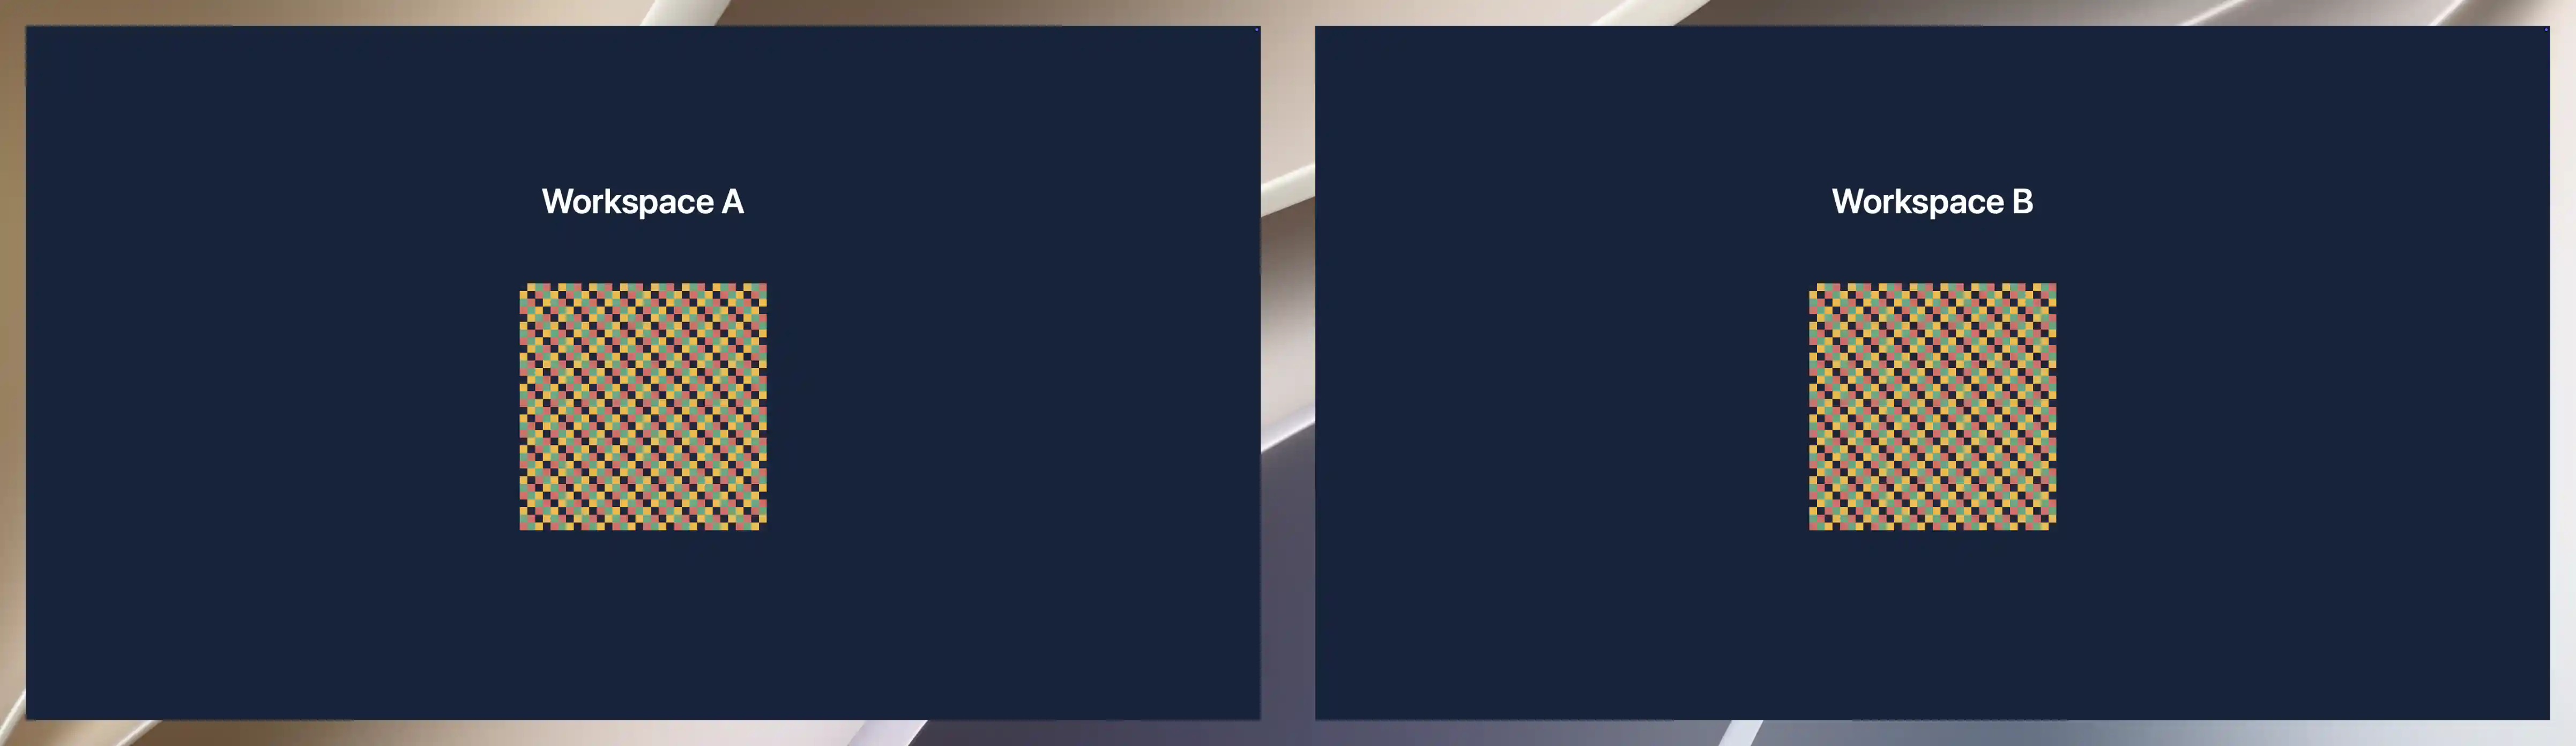
Two independent virtual desktops appear side by side on Studio Display XDR, with desktop margins around their 16:9 views.
- Hold Command and click a harmless location in one PIP. This warps the actual pointer to that source location; it does not forward the click into the app. Make a subsequent normal click to interact with the original source window. Return along the real display arrangement to the physical desktop, or use a separately tested Settings > Keyboard > Keyboard Shortcuts… > Picture in Picture > Warp mouse cursor from screen binding. Record its original binding before assigning one.
- Keep Mouse Click-through off for this test. When enabled, it sends pointer interaction to the physical desktop underneath the PIP, not to the virtual source. See the mouse interaction FAQ.
- In your intended sharing app, inspect its actual display-source chooser and preview each virtual source separately using harmless content. Select the original virtual desktop, rather than the physical monitor containing both views, if you want to share just one. Confirm the other source and physical desktop are absent from that preview. If the app does not offer the source, this setup cannot promise that it will. See the dedicated recording and sharing desktop tutorial for a concrete capture workflow.
- Only after manual use works, consider Start Automatically for each trial PIP. Saved connected virtual definitions can return with the app in a normal user session, but a PIP still needs its source and permitted capture. Rehearse an ordinary app restart and wake using only harmless source content. Check both source identities, modes, window positions and views; do not treat saved settings as proof of recovery.
- After moving or changing the physical monitor’s mode, check the arrangement again. Unlock only the trial views and resize/reposition them as needed, then relock. Saved PIP geometry is relative to its output display, and a missing output can lead to placement on another display. Stop and recover if source windows or a view are inaccessible.
This creates two app desktops viewed through software windows. It does not add two hardware inputs, isolate keyboard/mouse devices or constrain a full-screen app launched on the original physical desktop to one half. An app moved to a virtual source may use that source’s full desktop, but check its own full-screen and sharing behavior. A supported monitor’s hardware Picture by Picture (PBP) can be a better choice when you need real independent input regions; confirm the monitor’s actual supported layout and modes.
Optional: stacked portrait views
For a 1080 × 1920 portrait panel, the two physical halves are 1080 × 960, so each source needs a 9:8 shape. Create two new unassociated records using Custom aspect ratio, with width 9 and height 8, then follow the same naming, manual connection and one-PIP-per-source procedure. Use the actual physical desktop’s logical height divided by two for the top and bottom view sizes. Two 9:16 sources would have the shape of the whole portrait panel, not its halves. Custom aspect ratios require the feature availability below; do not repurpose an existing virtual source just to try this variant.
Troubleshooting
- One view contains the other or repeats itself: check the source entry. Each PIP must belong to its own virtual screen. Move the PIP window onto the physical viewing desktop; do not capture that physical desktop as the source.
- The two views have different UI sizes or do not fit: compare both virtual screens’ actual logical and pixel dimensions, HiDPI state and aspect ratio. Then compare the physical desktop’s logical size and the PIP content rectangles. Turn off only the trial position/resize locks to adjust. Magnification at 100% is not a promise that every source pixel occupies one physical panel pixel.
- A mode or capture is missing: confirm the virtual definition is actually connected, its mode is supported and screen access is permitted. Follow any requested app relaunch safely. Protected content may remain blank; do not bypass its protection. A cable or port change can alter the physical monitor’s offered modes independently of virtual-source sizing.
- Wake or restart changes the arrangement: recover on the physical display, verify both sources, and use the correct Show and Bring to Front entry. Check automatic start and saved output geometry before changing global wake/reconnect policies. Those policies can affect unrelated sources and do not guarantee that every app window returns to its intended region.
- The physical app still covers both halves: it is still on the physical desktop. Move the original app window to the intended virtual source, or use supported hardware PBP. This workaround does not divide the physical desktop itself. See the split-monitor FAQ and hardware PBP mode FAQ.
Stop, remove and restore
- Stop using trial bindings and turn off Start Automatically in both new PIP configurations. Keep both virtual sources connected while moving every original app window back to a usable physical desktop. Save its work and verify it is physically accessible; hiding or stopping a PIP alone does not move source windows back.
- Stop issuing add/start, mode, crop, filter or placement changes. Let already dispatched capture starts/restarts, mode/layout updates and menu callbacks settle. Then stop each actual trial entry with Enable Picture in Picture Window if active and verify both are inactive before private source work. An earlier Stop is not proof that queued work has finished.
- In each recorded additional PIP entry choose Remove PIP Configuration. The menu closes and removal follows a deferred callback without confirmation. Wait for that exact entry to disappear. Preserve both default entries and all unrelated configurations.
- For each newly created virtual definition, open Settings > Displays > [that virtual screen] > Discard…, then choose Discard Virtual Screen. Do not use Discard & Remove Color Profile. Discard only these two fresh definitions. Turning off Connect this virtual screen instead disconnects a source but retains its definition for later use. Wait for the actual physical connections and layout to settle after each removal.
- Restore only changed physical and pre-existing virtual modes and origins, main display, arrangement, app-window positions and any optional trial binding. Restore individually paused rules to their original targets and enablement after safe current values are restored. Keep an original current value separate from a different protected target: if ordinary targeted UI cannot recreate both independently, leave only that affected rule off, retain the private original record or backup and report the precise restoration limit. Treat originally absent or nil saved fields similarly; do not enter their displayed fallback as though it were the original stored value.
- After stable physical recovery, restore only changed global virtual-screen and built-in-disconnect policies, permissions, appearance and fixture settings. Keep permissions needed by existing captures. Do not use global Reset, Forget or Import to undo these two desktops.
Related pages
- Can I split one physical monitor into two independent desktops?
- Why does the resolution not change when I enable Picture by Picture on my monitor?
- Why does the mouse hover over a stream instead of controlling its desktop?
- Picture in Picture
- Virtual Screen settings
- Create a dedicated recording and sharing desktop
Additional information
This section explains feature availability and platform requirements.
Features requiring Pro license
Creating a pre-configured virtual screen and manually connecting it are available without Pro. Custom naming and aspect ratios, additional PIP configurations, starting PIPs, the PIP preferences used here, automatic start and the optional pointer-return shortcut require Pro. Stopping an active PIP, disabling automatic start, removing an additional PIP configuration and discarding a virtual definition remain available for cleanup.
Platform compatibility
The documented app requires macOS 26.3 or later. This ordinary virtual-screen/PIP workflow supports Intel and Apple silicon Macs, with usable connected physical recovery and permitted capture. Apple silicon has the first-connection layout-restoration behavior described above. Actual modes, source availability, performance and recovery must be checked on your Mac; neither virtual screens nor PIPs create hardware PBP.