Make volume keys follow the device you are actually listening to
Make the volume and mute keys adjust your monitor speakers when you select that output, then return to macOS handling when you switch to headphones. The setup uses a matching audio device to decide both when BetterDisplay listens and which display receives the adjustment.
Before you begin
Use a connected monitor with speakers and already working ranged hardware volume through DDC, plus headphones that macOS can adjust normally. Volume and mute need their own support; working hardware brightness or sound over the display cable does not establish either. If the monitor’s BetterDisplay volume slider does not change its actual speaker level, start with the hardware volume connection tutorial before changing keyboard preferences.
This worked example keeps native audio association off so the display’s volume controller remains DDC. Use a monitor with ranged volume and stateful mute for the full procedure. An up/down-only controller does not enable the matching-name fields by itself. If your monitor lacks hardware volume, use its supported speaker/audio-device method; a keyboard setting cannot add that capability.
Pause playback before changing outputs or trying mute. Record the actual monitor and headphone levels, mute states, Mac output and volume, plus the app’s saved volume/mute values and previous-mute level when available. An app slider can hold a stale or default value. Establish and verify quiet levels before resuming audio; do not set the monitor to maximum for this task.
Record the existing native-key policies, target, matching-name field and native association, including blank versus a saved override. Also record any affected synchronization, automation and their original targets. Pause only rules that would change another device during the test. Preserve current display modes, arrangement and any different protected targets if you need to change that setup; this workflow normally needs no display-layout changes.
BetterDisplay must be running, and native keys need its offered system permission. You can inspect and use menu volume separately from that permission. A listening message or on-screen display (OSD) is feedback, rather than proof of an audible change.
Verify the monitor output and volume method
- Pause sound. In System Settings > Sound > Output, choose the actual monitor output. Record the previous choice first. Apple’s output-selection instructions explain the available devices; selecting an output and changing its native volume are separate from DDC speaker volume.
- Open Settings > Displays > [monitor] > Device Control > Volume Control…. Under Feature Availability, check Volume control and Mute control, then Controller. For this example, verify ranged Enabled volume, supported stateful mute and DDC Control. Keep Associate this display with an audio device that has native volume controls off. If a different controller owns volume, investigate that method rather than assuming the slider is DDC.
- Use the monitor’s own audio settings to establish a quiet level and known mute state. With playback still paused, establish a suitably low app setting within the verified volume range and check the actual monitor level again. Unmuting or the first adjustment while muted can restore an earlier app volume; correct and verify that level while sound is paused. Resume a quiet test only when the actual result is safe.
- Open App Menu > [monitor] and make a small volume-slider adjustment. Confirm the actual speaker level changes. Pause again and test mute/unmute separately, verifying the returned level before resuming sound. Keep the existing Mute Method, Unmute Method and When Volume Reaches 0%… choices unless this test reveals a specific issue.
DDC mute can combine a minimum-volume write with a mute command. Its default unmute method restores the remembered volume before unmuting, and clears that saved previous-mute value. The configured minimum is not necessarily silence, and an adjustment while muted may first restore that earlier level. See Which level returns after mute before changing these methods.
Match this display to its audio output
- With the monitor still selected in macOS Sound Output, reopen Settings > Displays > [monitor] > Device Control > Volume Control…. Record the exact original Matching audio device name, including whether the stored setting was absent or explicitly blank.
- Select Copy Current Device Name without holding a modifier. Confirm the field contains the monitor output’s actual name, rather than headphones or the Mac’s speakers. This does not change the system output or enable native association. The copied value saves immediately; manual text edits commit with Return or when focus leaves the field, while Escape cancels an uncommitted edit.
- Open Settings > Displays > [monitor] > General Settings and check Keyboard control affects this display. It is on by default. Check other controllable displays for the same matching override so one output will not unintentionally match several displays.
A blank matching field uses the display’s original product name, which can differ from its renamed label in BetterDisplay. A nonempty value supports partial matching against the current output’s name or identifier. Use a distinctive actual value; names differing only in digits or spacing can still match together.
For an ambiguous name, hold Option while selecting Copy Current Device Name to copy the current output’s UID, then retest both outputs. This can help distinguish devices, but a UID is not an unconditional guarantee of one exact target. Several eligible displays can match the same output. See matching without native association.
Listen only for a matching display output
- Open Settings > Keyboard and enable Listen to native audio keys if needed; it is initially on.
- If offered, open Set up Accessibility Permissions… on macOS 26, or Set up Device Control and Data Access… on macOS 27 and later. Follow BetterDisplay’s sheet. On macOS 26, Apple’s Accessibility instructions use System Settings > Privacy & Security > Accessibility. Restart BetterDisplay if it reports Accessibility Configured - App Restart Needed. See permission setup.
- Open Native Audio Key Settings…. Under App should assume control over native audio keys when, select Current audio device matches a controllable display's name. This default choice leaves a nonmatching headphone output to macOS even while the monitor stays connected.
- Keep Handle devices with native volume control on, its default. Keep Leave mute key under OS control off for the monitor’s tested DDC mute; it is initially off. Preserve your existing fine-scale choice.
The engagement policy decides when BetterDisplay captures keys. The fallback option applies only after BetterDisplay handles a key and cannot supply ranged display volume or stateful mute. It does not replace an already handled display-volume operation with the current output, and cannot make a failed hardware write succeed. A relative-only volume/mute command can also be followed by native fallback; this example’s verified ranged DDC path avoids relying on that behavior.
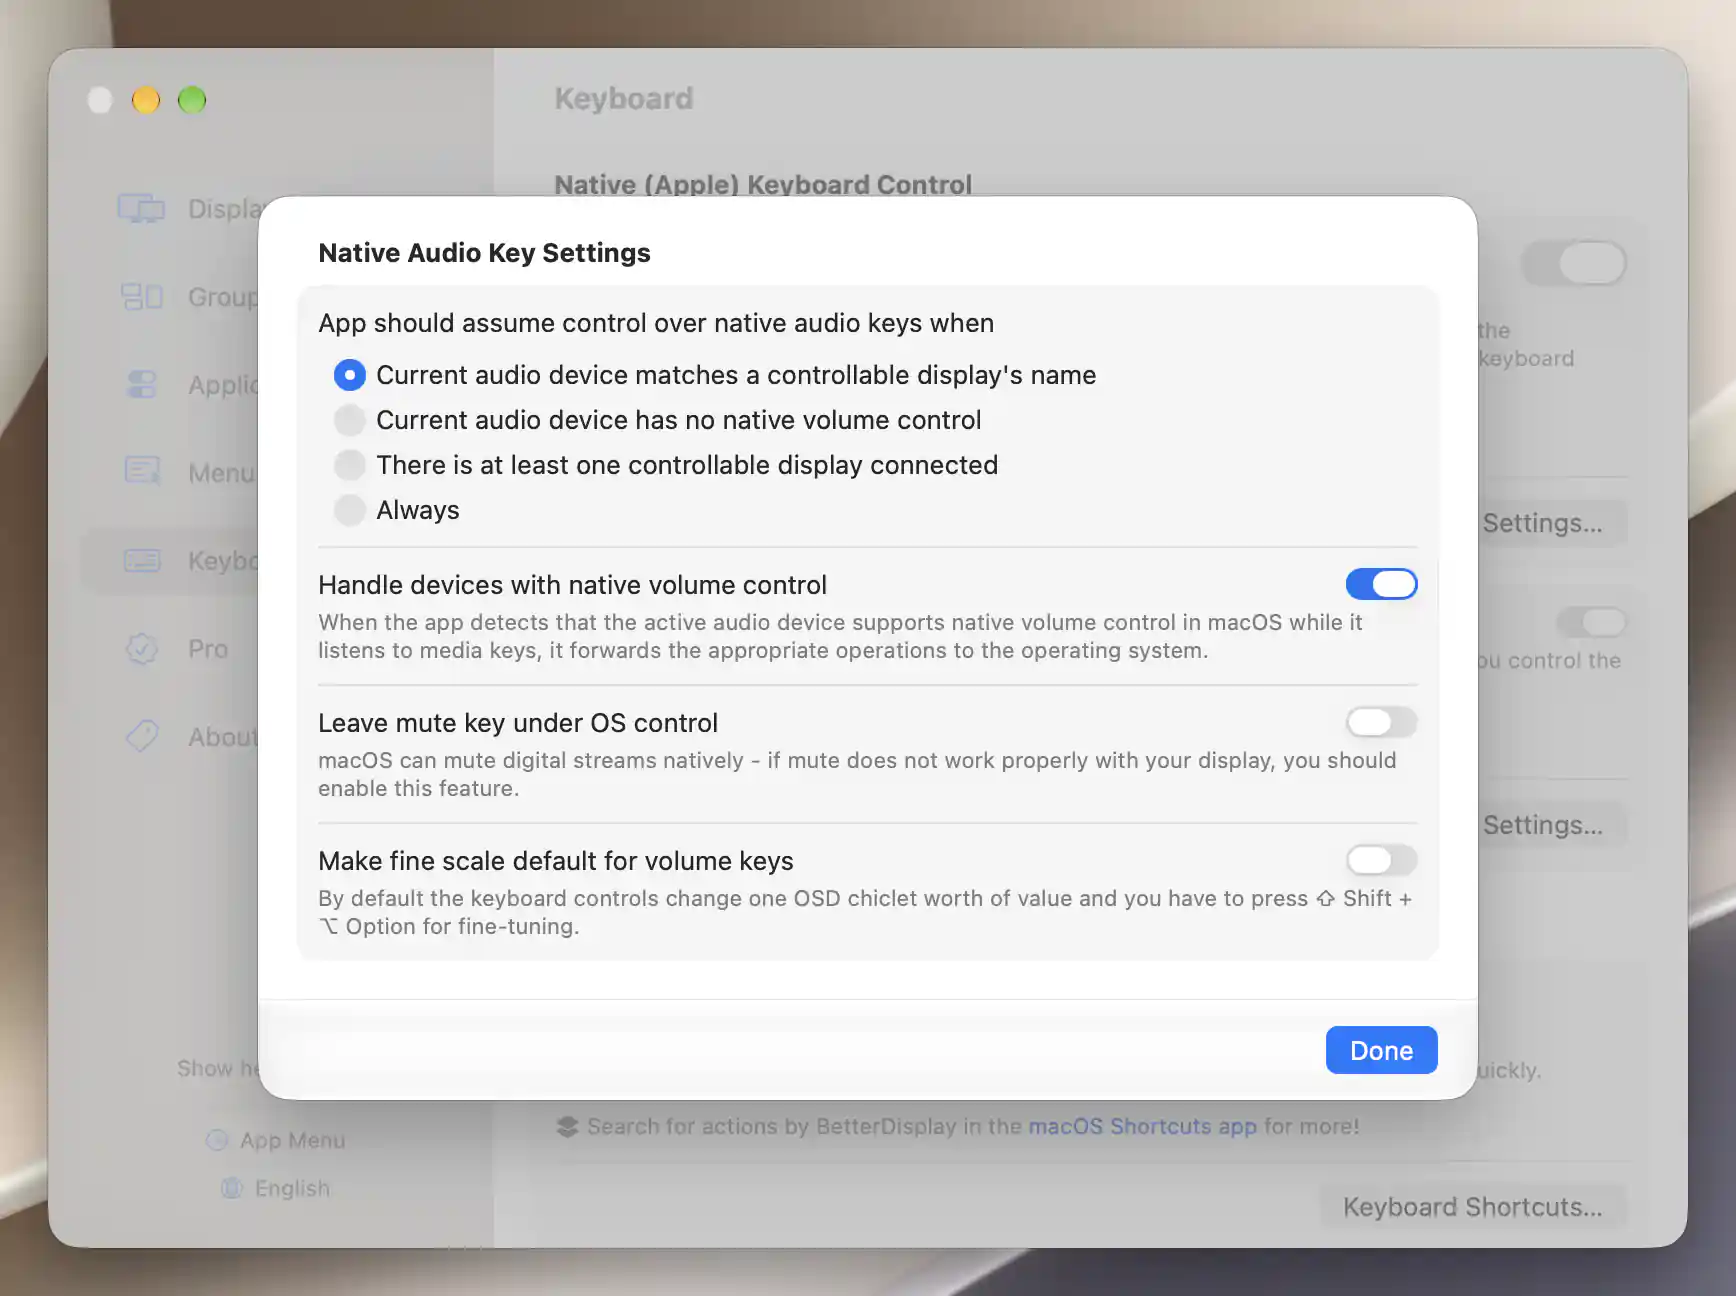
Configure native audio keys to engage when the audio device matches a controllable display; this session has no matching DDC audio output.
Send handled keys to the matching display
- Close Native Audio Key Settings. In Settings > Keyboard > Volume Control Affects:, select Display with the same name as current audio device. This is the default destination, separate from the listening policy above.
- With the monitor selected as the macOS output and a verified quiet unmuted level, press volume down once without modifiers, then up once. Check actual monitor sound. Test mute/unmute separately with playback paused around the transition and verify the returned quiet level before resuming. Avoid holding a key during the first test.
- Pause playback and select the actual headphones in System Settings > Sound > Output. Establish a quiet headphone level before resuming. Allow the output change to settle; in BetterDisplay’s Keyboard pane, check that it is disengaged from native volume and mute keys because no controllable display matches that headphone output.
- Press volume down/up and mute/unmute individually. Check actual headphone sound and confirm the monitor’s hardware volume/mute remains unchanged. Repeat after returning to the monitor output.
Keyboard preferences save without Apply. Output changes refresh the listening policy; do not press keys while an output change is still settling. If a headphone name or UID also matches a configured display, the app may remain engaged, so correct that match before drawing conclusions about the fallback.
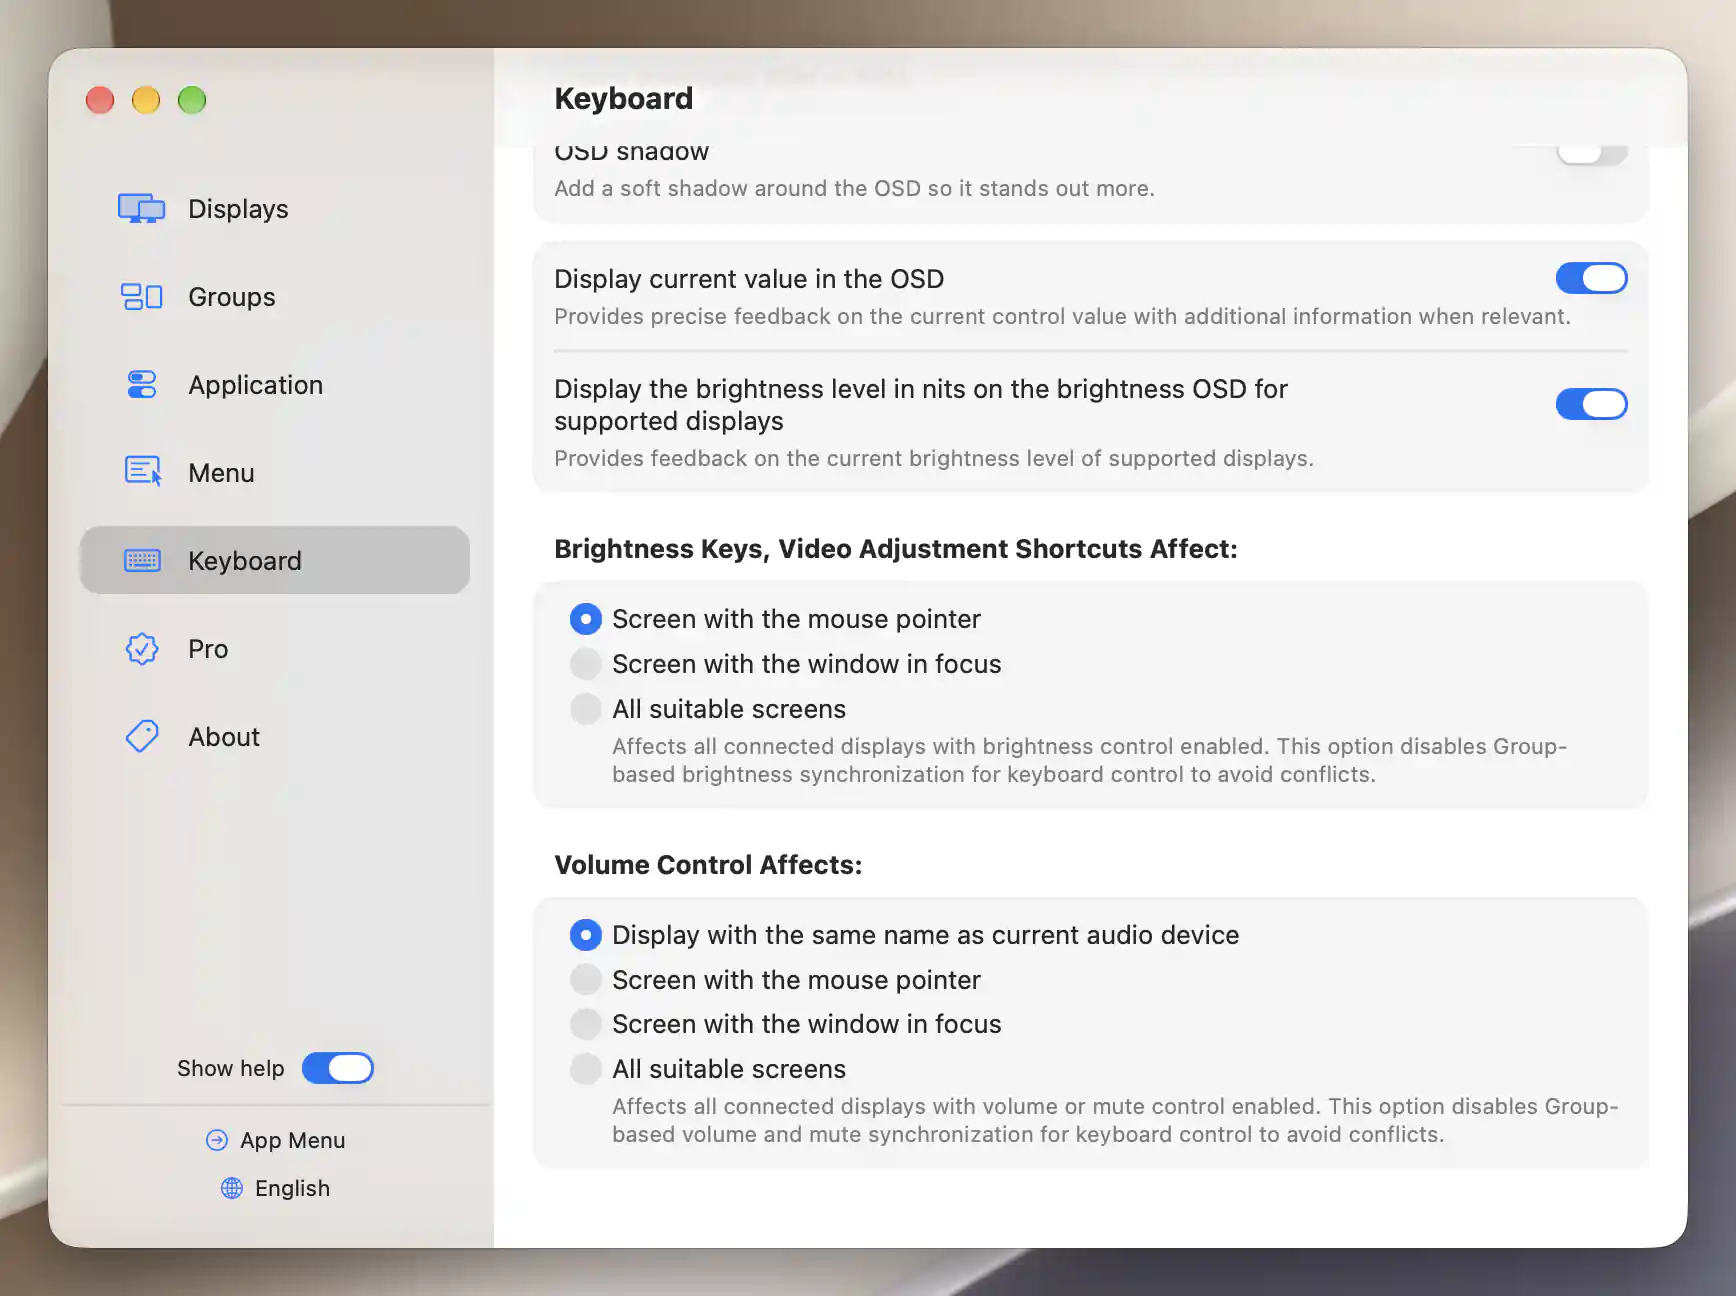
Volume keys target the display matching the current audio device’s name; VIA USB Dongle is the nonmatching output in this session.
Check the result
Repeat the same quiet test in both directions. For the monitor output, BetterDisplay should handle keys for the matching hardware controller and actual monitor speakers should respond. For the nonmatching headphones, BetterDisplay should disengage from audio keys and the headphones should respond through macOS. Move the pointer to a different screen: with the matching destination selected, the output match should remain the deciding factor.
Check volume and mute independently, including the actual level after unmute. Monitor sound, hardware settings and headphone sound establish the result; an OSD, changing slider or listening label alone does not. A disabled macOS output-volume slider can coexist with working DDC monitor volume because those are different adjustment paths.
Troubleshooting
- The monitor slider works but keys do not: check the selected system output, matching field, keyboard eligibility, engagement policy, destination and permission/restart status. Reopen the Volume Control sheet if controller availability has changed. See Native keyboard control.
- The slider moves but sound does not: verify actual DDC volume support and the monitor’s speaker selection and current input. Working brightness does not prove volume. See brightness works but volume does not; keep keyboard diagnosis separate until manual hardware volume works.
- The monitor still changes while using headphones: confirm the headphone output is actually selected; use the name-matching engagement policy rather than Always or There is at least one controllable display connected. Check partial name/UID matches on every controllable display, and relevant synchronization or automation. See volume keys after switching output.
- Several monitors respond: use distinctive actual matching values and inspect Keyboard control affects this display and individually relevant synchronization. The matching destination can include several eligible displays; it is not a unique-device selector.
- Volume works but mute does not, or unmute returns too loud: pause sound and inspect the actual supported mute method and remembered previous level. Restore a safe quiet level before retesting. If macOS can mute the current digital output reliably, Leave mute key under OS control is an optional alternative; record its original and test each output again. Minimum volume is not guaranteed silence.
- The matching field is disabled: it requires ranged volume or enabled native association. An up/down-only controller is insufficient. Do not enable association merely to expose the field when you need hardware speaker volume.
When native audio association is appropriate
Associate this display with an audio device that has native volume controls replaces the display’s hardware volume/mute method with the named macOS device. It does not select that output in System Settings. Use it only when that actual device supports writable native volume; native mute is a separate capability.
The field then becomes Associated audio device name. A Native label identifies the chosen method, even if the device is missing or cannot be adjusted. Native association resolves names before UIDs and does not reject ambiguous matches, so neither a copied UID nor an empty field guarantees the intended target. Use the native association reference for that separate workflow.
Undo the test setup
- Pause playback, release keys and stop any trial automation. Let already dispatched hardware/native-audio requests finish before restoring levels. Restore the original macOS output, actual monitor/headphone volume and mute states at safe levels.
- Restore the original Native Audio Key Settings choices, Volume Control Affects:, matching field, native association and per-display keyboard eligibility. To leave native audio keys entirely with macOS, turn Listen to native audio keys off; BetterDisplay’s menu sliders remain available. Otherwise restore its original state.
- Restore only saved volume/mute/controller preferences and individually paused synchronization/automation changed for this test. DDC unmute may have cleared the previous-mute value; an originally absent saved value or setting is not recreated by typing a displayed fallback. Preserve the original private record/backup and report a precise restoration limit if the normal UI cannot recreate it.
- If display setup changed, restore original actual modes/main/arrangement and affected saved targets separately. If the original current value and a different protected target cannot both be recreated through normal UI, leave only that affected rule off and preserve its original record/backup. Restore any recovery connection policy only after a usable physical desktop is confirmed.
Review only permission changes made for this trial, retaining access needed by any other native-key workflow. Avoid global Reset, Forget or Import to undo a few audio settings; controller or permission removal does not restore hardware levels automatically.
Related pages
- Volume keys after switching audio output
- Brightness works but volume does not
- Native (Apple) Keyboard Control and Target Displays
- Volume Control
Additional information
This section explains licensing and platform requirements for this workflow.
Features requiring Pro license
The native volume/mute-key policies, matching destination and shared Volume Control preferences used here do not require Pro. Other controller features or group synchronization retain their own requirements.
Platform compatibility
The documented app requires macOS 26.3 or later. All features described on this page are available on both Apple silicon and Intel Macs, subject to suitable monitor/audio capabilities, a working DDC transport and the offered native-key permission. Native audio volume and mute capabilities are separate. No Screen Recording permission is needed for this workflow.