Get reliable hardware brightness and volume through your dock
Find out which hardware brightness and volume adjustments reach your monitor through a dock, then use the working controllers for each feature. Compare the same monitor directly and through the dock, checking the picture and sound as well as the app. Brightness and volume can have different answers.
Before you begin
You need a connected external monitor with a suitable DDC path. DDC lets BetterDisplay send supported adjustments to the monitor itself; a dock that carries video may still handle these commands differently. For the volume test, use the monitor’s speakers or its actual audio output, and first confirm that you can hear a quiet, steady sound through that output.
Have a direct connection available if possible, and keep access to the monitor’s own menu. Record the dock and monitor models, Mac port, dock output, cables/adapters, monitor input, picture mode, SDR/HDR state and selected macOS audio device. Use the same downstream cable, monitor input, image and sound source for both arrangements wherever possible. If the direct connection requires a different input or adapter, record that difference: the comparison then changes more than the dock.
Record the settings you will temporarily change, including blank optional fields and existing brightness/volume values. Pause only relevant automatic brightness or synchronization rules that would interfere, after noting their original configuration. Start with SDR and a comfortable brightness and listening level; HDR can impose a separate brightness restriction. Menu adjustments can be tested before setting up keyboard permissions.
Establish a direct-connection baseline
- Connect just the monitor you are testing directly to the Mac. Wait for the desktop and audio output to become available. Select that monitor in Settings > Displays > [display] > Device Control.
- If DDC Control is absent, open Add or Remove Controllers… and use Add beside DDC Control if available. An unavailable choice means this display is not eligible for that controller. The usual DDC path is for non-Apple physical displays; an ordinary DisplayLink video connection is not interchangeable with a native DDC connection.
- Open DDC Control > Configure Controls… > Detect DDC Capabilities…. Wait for detection to finish. Review the connection results and the reported Brightness (Hardware), Volume and Mute features. Use Show Detailed Report… when offered to see VCP codes, ranges and read results.
- Keep this first pass manual. In the individual feature sections, enable only the features you have reason to test. Preserve known-working mappings. An empty DDC control code(s) (comma delimited hex values) field uses the built-in mapping; an empty ranged minimum/maximum uses 0–100. Change a mapping or range only when the report or reliable information for your exact monitor establishes it. A placeholder number in an empty field is a default hint, not a saved override.
DDC channel: Available and DDC communication: Supported describe the connection checks. They do not prove that the monitor will change brightness or volume. Likewise, Read failed, Read unsupported or a missing capabilities report does not by itself rule out a working write. Keep those outcomes separate in your notes; see why a DDC command can work when reading its value fails.
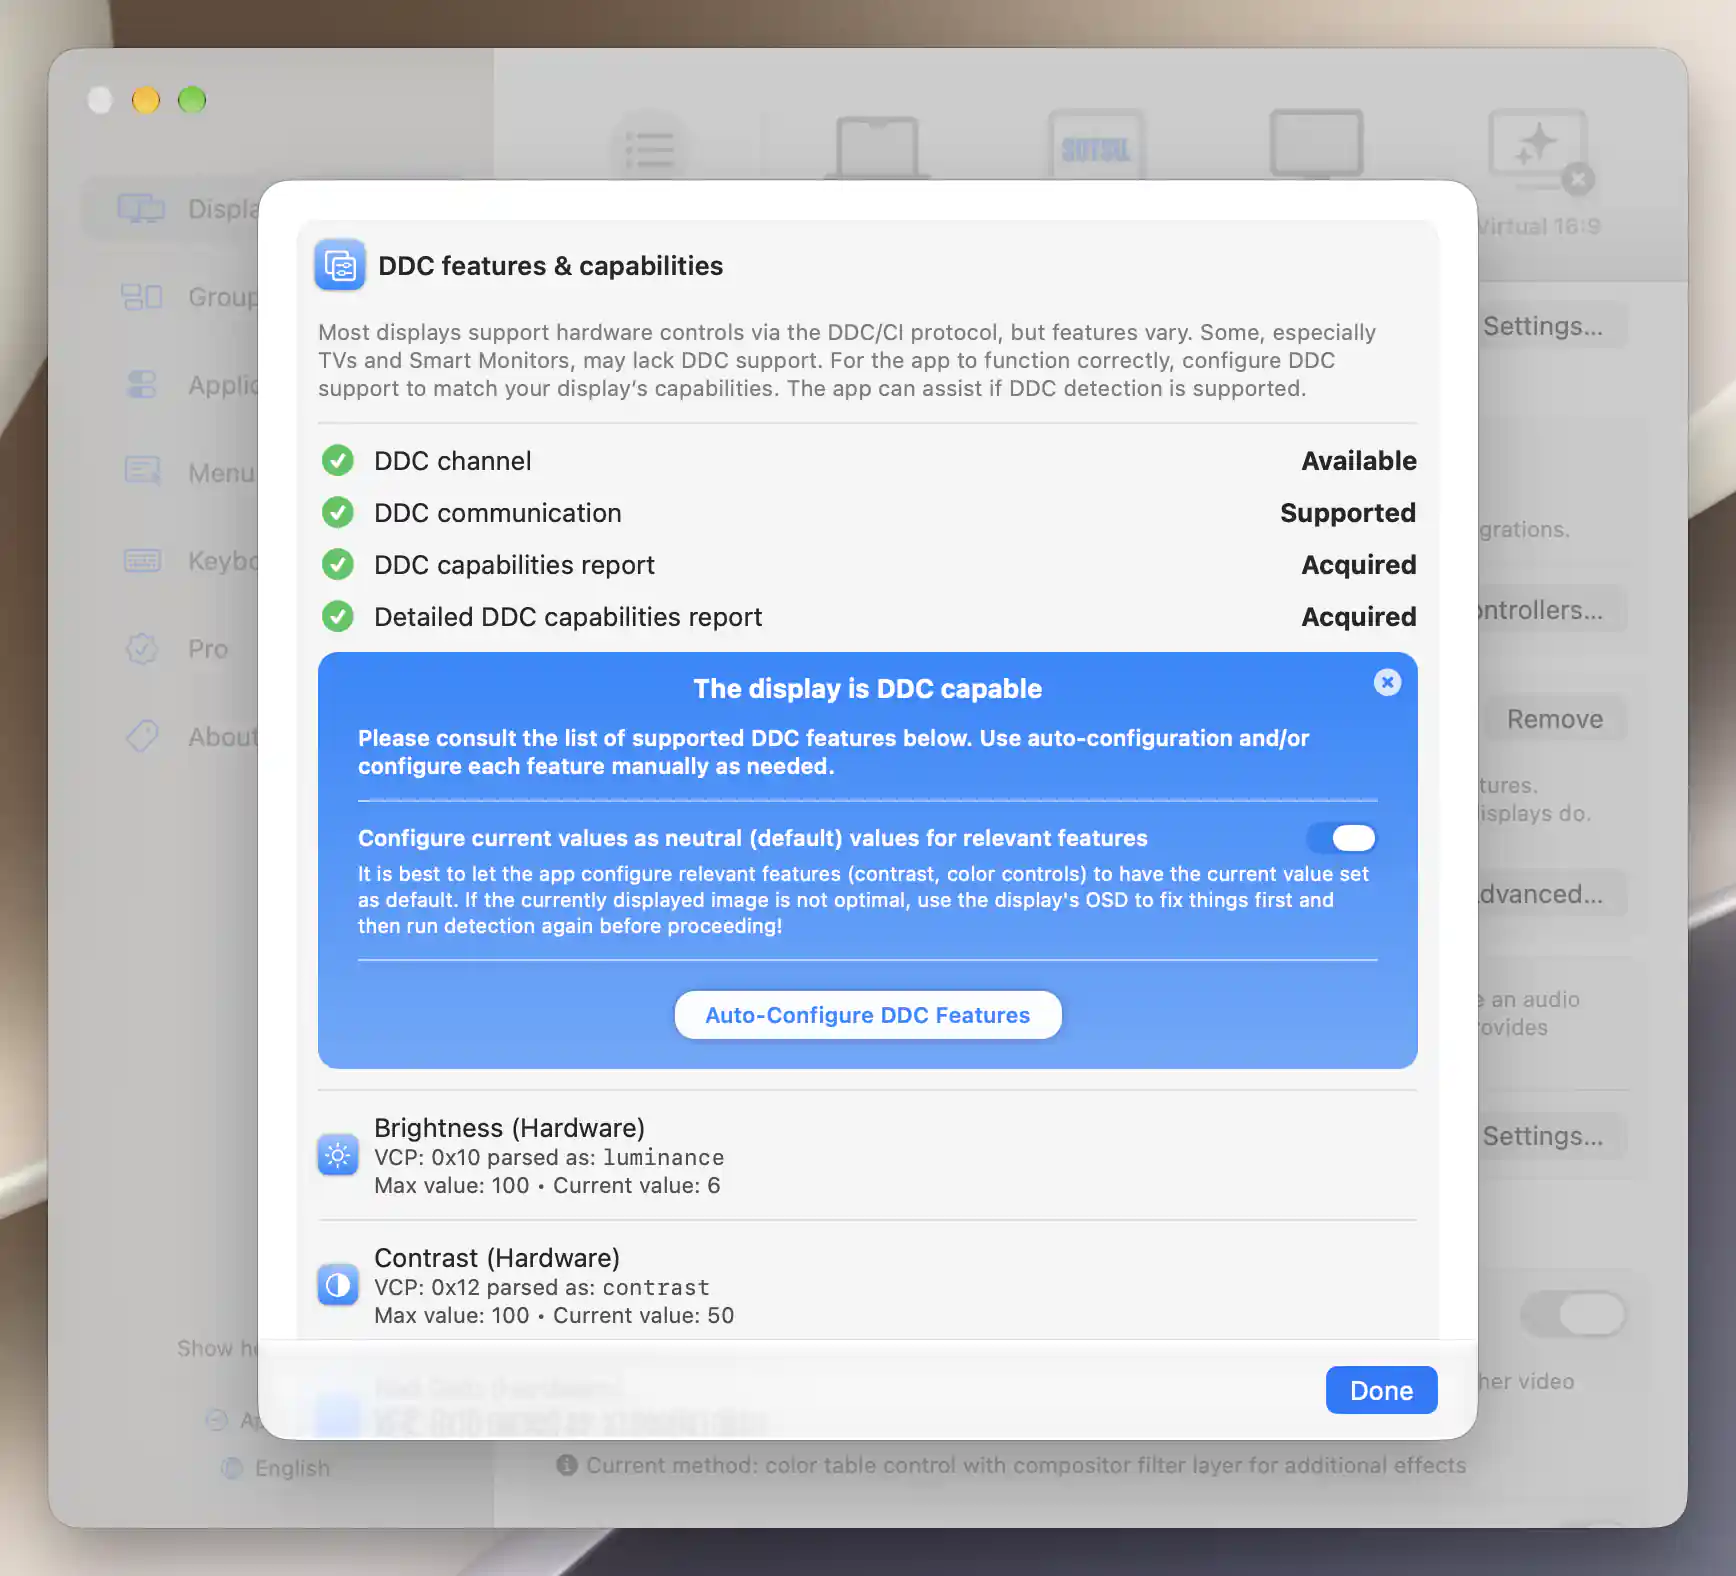
Inspect the acquired DDC reports and the returned brightness values before applying configuration; this display’s detailed report marks Volume and Mute unsupported.
Test the monitor rather than the slider
- To isolate hardware brightness, open Device Control > Device Control Settings… and confirm Prefer hardware brightness control is on. Under Image Adjustments, temporarily turn Combined brightness off if it is shown and enabled. These options are normally on. This removes the combined slider’s software-dimming component from the test.
- Open the monitor’s section of the App Menu. Find Brightness (Hardware); expand more options if necessary. The app may remember a value or assume a default rather than know the monitor’s current level. Choose a comfortable test level based on the verified range and the monitor’s actual starting setting, then make a small change and wait for it to respond. Compare its own brightness setting and visible output, then restore the starting level. A slider labeled Brightness (Software) or Brightness (Combined) is not the isolated hardware test.
- For DDC speaker volume, open Settings > Displays > [display] > Device Control > Volume Control…. Keep Associate this display with an audio device that has native volume controls off; this is its default. Check Feature Availability and the Controller row. A native association or another controller taking precedence means the menu is using a different path.
- Do not assume the app’s volume value reflects the monitor’s current level: it can be a saved or default value. Pause playback, set a suitably low test volume within the verified range using its Volume slider in BetterDisplay, then resume quiet sound and make a small adjustment. Volume is normally under more options. Listen for the change, compare the monitor’s own volume indication if it has one, and return to the starting level. Test mute and unmute separately at a low level; working volume does not establish a separate mute command.
The DDC feature sheet warns when another controller takes precedence or native audio association makes DDC volume inaccessible. Resolve that choice before attributing a result to DDC. If the monitor has no supported volume adjustment, enabling the feature cannot create one. See brightness working while volume does not.
Compare the dock, one monitor at a time
- Move the same monitor to the dock, keeping the downstream connection and monitor settings the same where possible. Wait for configuration to settle and reselect the intended audio output if reconnecting changed it.
- Repeat detection, the isolated hardware-brightness adjustment and the audible volume test. Record each result separately: report acquired, readback usable, brightness changed, volume changed and mute worked. Recheck the selected display and controller after reconnecting.
- With several dock-connected monitors, test each alone. Then connect them together and repeat small adjustments on each, checking that only the intended monitor changes. Restore each test value before proceeding.
- If a suitable alternative dock port or adapter is already available, compare it as a separate trial. Record the whole path. A different DisplayPort/HDMI arrangement may behave differently, but no connector type guarantees independent DDC routing.
If both features work directly but only brightness works through the dock, keep the working brightness path and investigate volume independently. If a command affects the wrong monitor, prioritize routing evidence over timing changes. A separate USB hub cable does not automatically provide a second BetterDisplay DDC path around the video connection.
Keep the working path and add keyboard use
DDC feature and communication preferences save as you edit them; there is no separate Apply or reboot step. Once the hardware tests work, restore Combined brightness if you want a unified hardware/software slider. Its movement can include software dimming, so retain the isolated hardware result in your notes.
- Under Settings > Displays > [display] > General Settings, make sure Keyboard control affects this display is on.
- Open Settings > Keyboard. Enable Brightness control using native brightness keys and/or Listen to native audio keys for the keys you want BetterDisplay to handle. Both are enabled by default. Follow the permission setup offered there and restart the app when requested. On macOS 26, this is Set up Accessibility Permissions…; on macOS 27 and newer, the app offers Set up Device Control and Data Access…. The native keyboard reference explains the permission and restart states.
- For an unambiguous one-monitor test, choose Screen with the mouse pointer under Brightness Keys, Video Adjustment Shortcuts Affect: and Volume Control Affects:. Move the pointer onto the intended monitor before pressing a key. Window-focus targeting is another choice; All suitable screens deliberately affects several displays.
- Check Native Audio Key Settings… as well as the target choice. Its default engagement rule is Current audio device matches a controllable display's name. To handle keys whenever a display with volume adjustment is connected, select There is at least one controllable display connected. This changes when the app takes over; it does not choose the recipient.
- Repeat the small brightness and audible volume changes with the keyboard. Confirm the intended monitor responds. A changed OSD or sound from the Mac’s speakers is not proof of monitor volume success. Handle devices with native volume control, normally on in the audio-key settings, can send an otherwise unhandled adjustment to the current native audio output.
Apple’s app-permission instructions explain adding an app and changing its permission in Privacy & Security. Use BetterDisplay’s offered setup for the permission name on your macOS version.
If you prefer audio-output matching, retain its targeting/engagement rules and set Matching audio device name in the monitor’s Volume Control… sheet. With the intended output selected, Copy Current Device Name copies its name; hold Option while clicking to copy its identifier instead. This matching field helps keyboard routing even while native audio association is off. See target displays and Volume Control.
Check the result
You have a useful setup when you know which path supplies each feature and can reproduce its effect through the dock. Check the monitor’s actual brightness and audible volume with menu adjustments first, then with keys. With multiple monitors, confirm independent targeting. Compare supported readback with the monitor’s own setting, but keep a working write distinct from an unavailable read.
Repeat the check in your normal picture mode and after a normal reconnect or wake. For HDR, return to Device Control Settings…. Allow hardware brightness control in HDR mode is off by default and appears for HDR-capable displays when hardware brightness is preferred. Enable it only for a monitor that supports that adjustment, then test again. Permission to use this path does not make the monitor accept the command. On displays with macOS SDR peak-brightness adjustment, the usual HDR brightness path can differ from ordinary DDC hardware brightness.
Troubleshooting
Direct works but the dock does not
Compare the same feature, port, cable, input and mode, and check each monitor alone versus together. Consult your exact monitor’s documentation for DDC/CI or mode restrictions rather than guessing menu settings. A visible picture or an available controller is not a successful command. Use the dock troubleshooting FAQ to separate routing, firmware and readback limitations.
- For a reproducible communication problem, open Settings > Displays > [display] > Device Control > DDC Control > Advanced…. Record the current choices, including empty fields. Change one setting, repeat the same test, then keep it only if the result improves.
- When several monitors interfere, try turning Use dedicated queue off for all affected displays as one coordinated trial. It defaults to on for Apple silicon and off for Intel. The shared queue can improve compatibility; it cannot repair an unsupported feature or wrong routing.
- If symptoms instead suggest command timing, test an individual delay, repeat or retry setting. Defaults are 2 sends, 10 milliseconds between commands, 4 retry attempts, 5 milliseconds extra wait after failure and 10 milliseconds waiting for a read response. Increasing them can make adjustments slower. Ignore checksum check error on read is a read-validation compatibility option, not a general write fix.
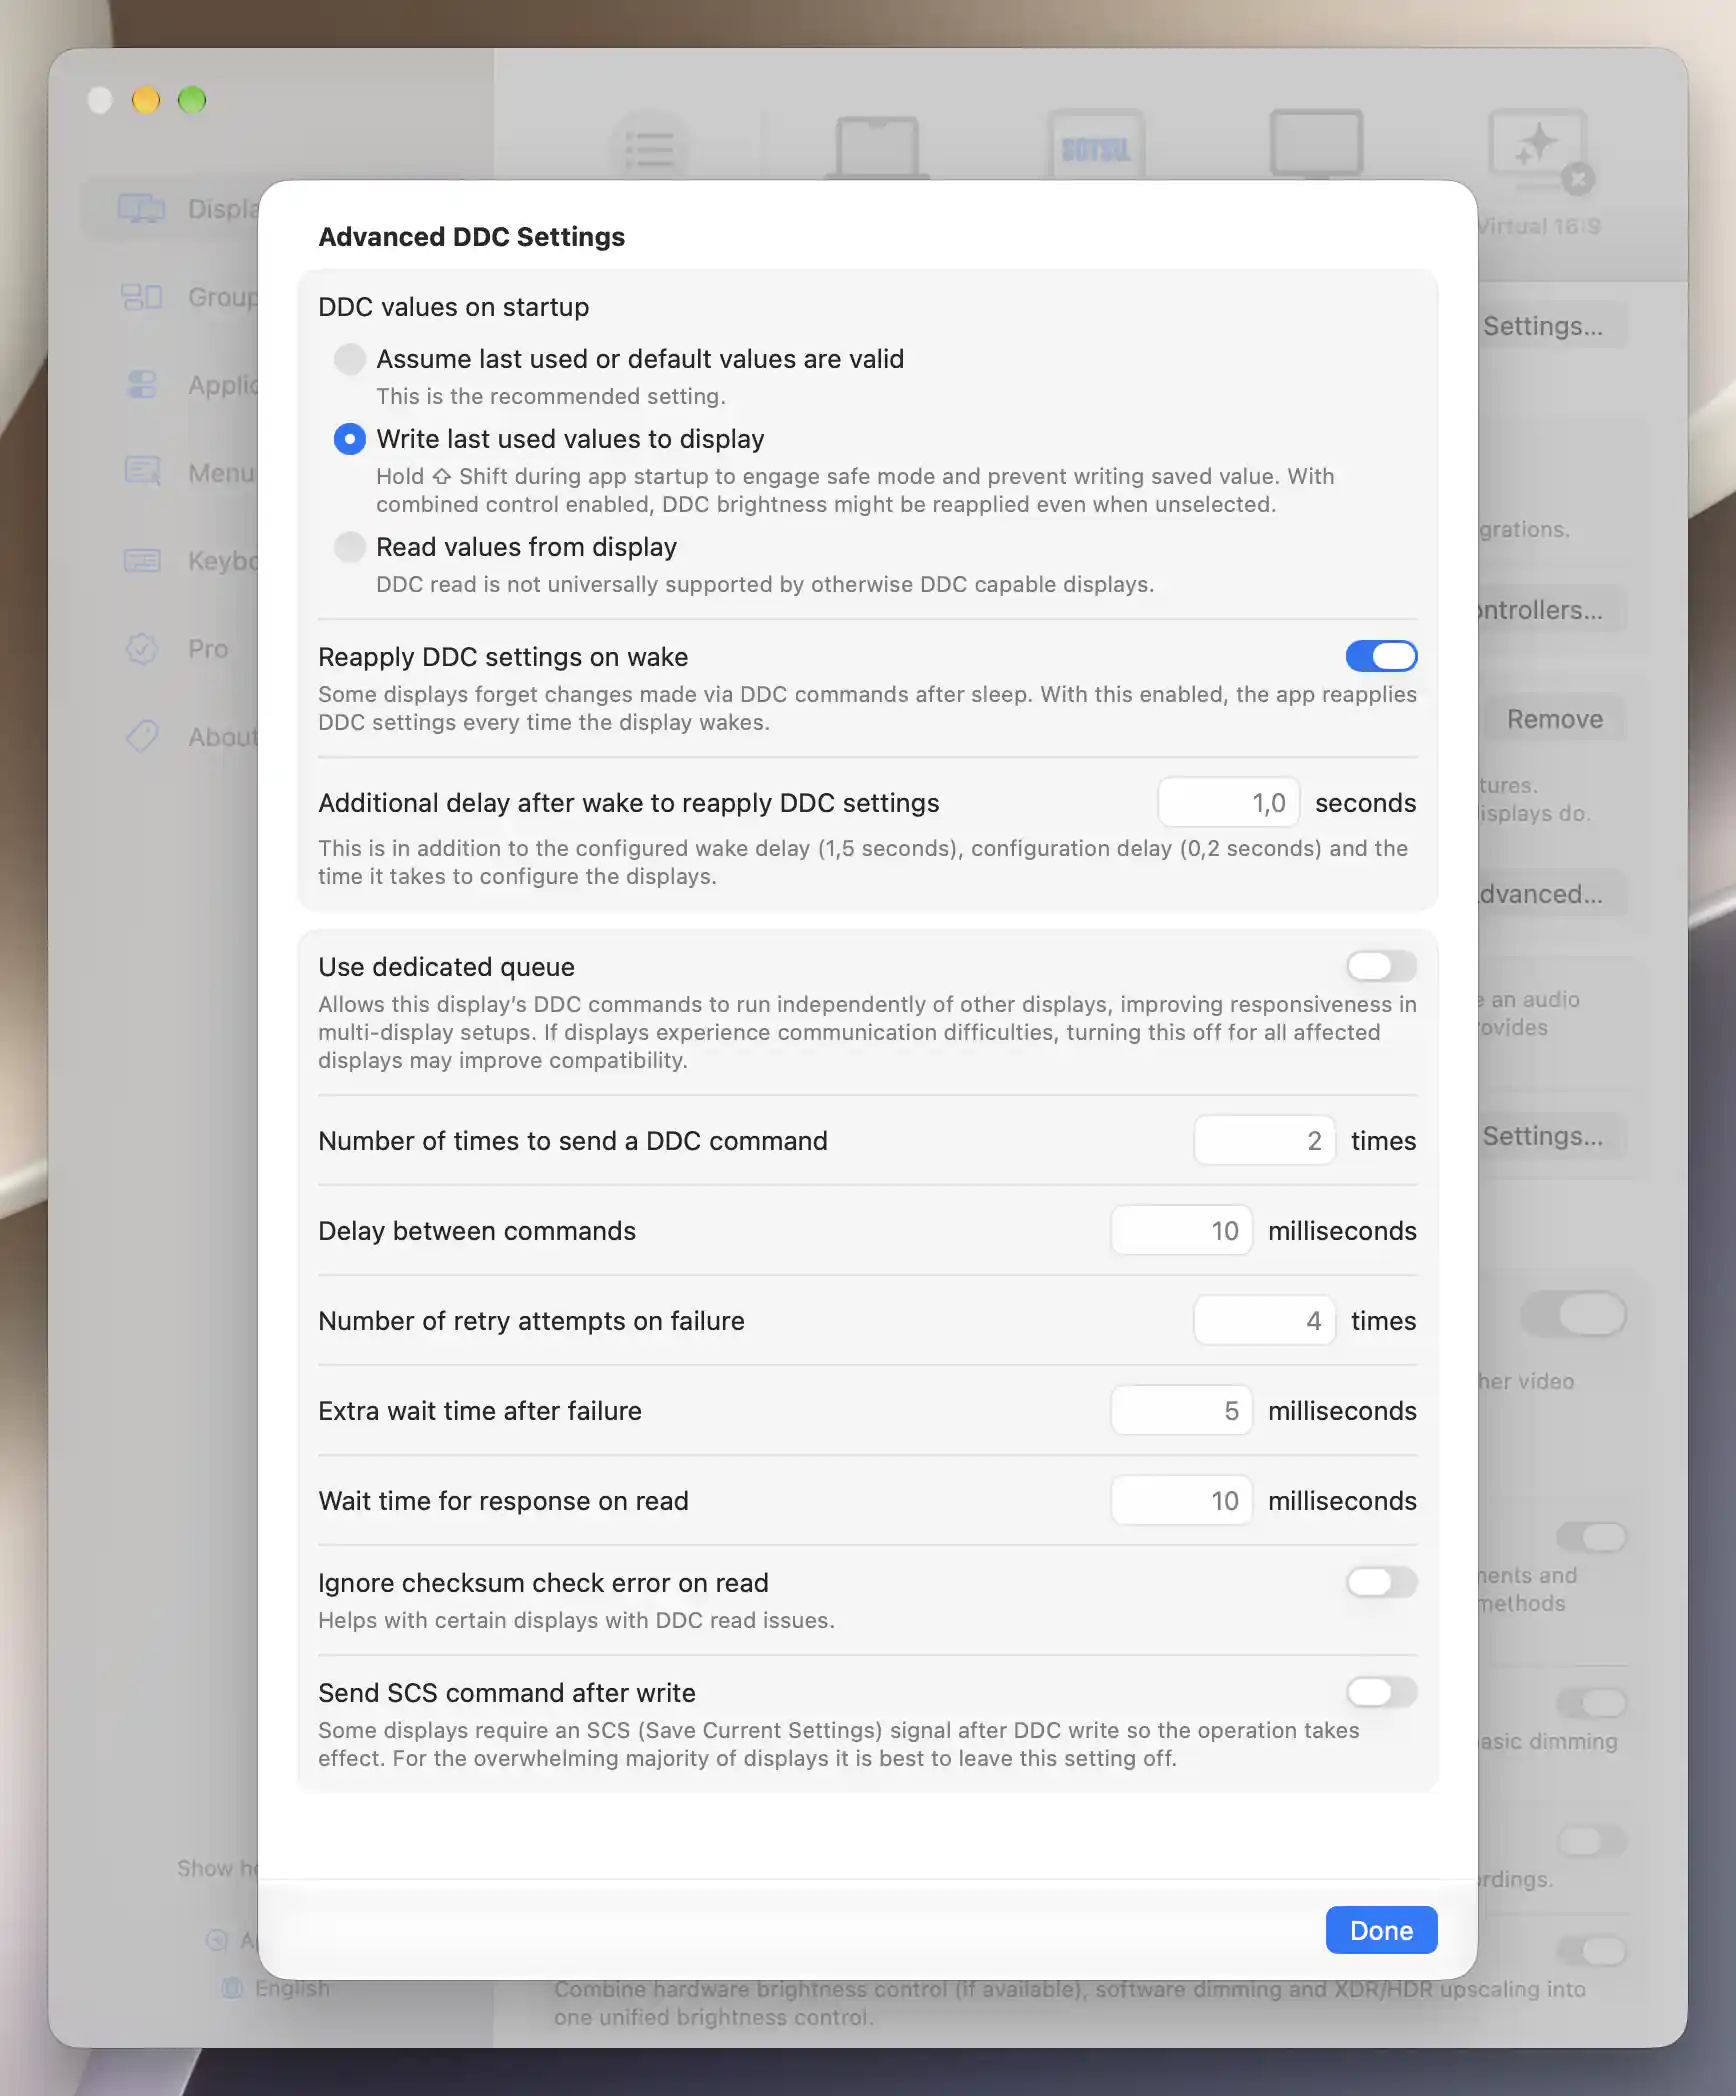
Use a shared DDC queue for this compatibility configuration; the existing startup-write and wake-reapply policies remain enabled, and the empty timing fields show default hints.
Leave Send SCS command after write off for this workflow. The current app saves that preference but does not use it to send the extra command. Likewise, startup writes, periodic reading and wake reapplication solve different problems; they are not prerequisites for an ordinary manual adjustment. Periodic reading and Reapply DDC settings on wake start off. See advanced DDC settings before changing them.
Brightness works but volume or keys do not
Test audible volume from the BetterDisplay slider before changing keyboard settings. Check the controller, native audio association, actual output and per-feature DDC support. A disabled macOS Control Center volume slider describes that output’s native volume capability; enabling DDC in BetterDisplay does not turn it into a DDC slider.
If manual volume works, revisit permission/restart status, the display’s keyboard eligibility, the target choice and audio-key engagement rule. For troublesome mute behavior, Volume Control… offers separate mute, unmute and zero-volume methods. When a DDC mute command is unavailable, the controller can lower volume instead. Test the sound at a low level and retain only a method your monitor actually handles.
Use a fallback while hardware support is unresolved
For image dimming, enable Settings > Displays > [display] > Image Adjustments > Enable software-based video adjustments, then turn Prefer hardware brightness control off in Device Control Settings…. In SDR, the main brightness slider can then use Brightness (Software). This changes the image and does not establish that the monitor’s own brightness setting changes. Restore the recorded software brightness too when returning to hardware use; see software image adjustments.
For audio, use the supported adjustment on the real speakers/headphones, or associate a genuine audio device that offers native volume adjustment through Volume Control…. Image dimming supplies no audio fallback. If the monitor offers a supported alternative controller, use Add or Remove Controllers… and its own setup instructions; a smart-monitor label alone does not establish compatibility.
Collect a comparable support report
- Open Settings > Displays > [display] > Display Information… and use Export Display Information… to save a report for the working direct path and the failing dock path. Include the detected features and the exact tested feature.
- Open App Menu > Tools > Show Console, enable Logging, and reproduce one small adjustment in each arrangement. Preserve comparable logs and note which run used which connection, then return Logging to its original state. The App console tutorial explains collection and privacy.
- Describe the actual picture/sound change, the selected audio output, the controller, the dock ports/cables and whether other monitors were connected. Remove private identifiers from anything you publish. Keep failed reads distinct from failed physical adjustments.
Undo the test settings
Restore only the settings changed during this test: per-feature switches, mappings, ranges, native association and matching name, combined/software brightness, hardware preference, HDR exception, communication options and keyboard target/engagement choices. Clear optional fields that were originally blank instead of entering their displayed fallback numbers. Restore explicit original values where they existed. Re-enable only the automatic rules you paused, with their original settings, after restoring the tested brightness and audio levels.
Restore the original monitor input, picture mode, SDR/HDR state, audio output and connections. DDC adjustments can remain in the monitor after the app closes; use its own menu if the return path no longer works. Turning a feature off prevents future app use and does not revert the monitor’s last setting.
If you added DDC Control solely for the test and it was originally off, restore the monitor’s physical levels first, then use that controller’s Remove button. Restore only other controller choices you actually changed; do not remove an existing working path.
Forget All DDC Stored Values and Reset All Settings are broad actions and do not restore your recorded configuration. Neither resets the monitor itself. If you choose Auto-Configure DDC Features as an optional shortcut, first record every DDC feature: it can change availability, ranged limits, neutral points and stored values across the whole detected set. Restore those individual originals if you undo it; restoring only brightness and volume is not sufficient. If a stored value was originally untouched or absent, entering the displayed neutral value does not recreate that state. Preserve your original settings record/backup and note any exact restoration that cannot be completed through individual settings; do not use a broad reset as a substitute.
Related pages
- DDC detection, feature configuration and communication preferences
- Why hardware brightness can work directly but fail through a dock
- Why brightness support does not establish volume support
- Working DDC commands with failed readback
- Native keyboard permissions and engagement and target displays
Additional information
This section explains feature availability and the hardware conditions for this workflow.
Features requiring Pro license
The predefined DDC brightness, volume and mute features, their detection and configuration, ordinary sliders, basic software dimming and native keyboard setup described here do not themselves require Pro. Custom DDC features require Pro; alternative controllers and integrations have their own requirements in the linked references.
Platform compatibility
BetterDisplay requires macOS 26.3 or newer. The ordinary DDC, software-dimming and keyboard features described here are available on both Apple silicon and Intel Macs when the display, audio device and connection provide the needed capabilities. DDC normally applies to non-Apple physical displays. Dedicated-queue defaults differ by architecture; the setting is available on both.
HDR brightness and permission setup depend on the display and macOS version. Neither a working video connection nor a processor family establishes dock/DDC compatibility. Menu adjustments do not need the native-key permission, while native keyboard handling does.