Give a headless Mac a comfortable virtual desktop for remote access
Give your headless Mac a desktop with readable text and enough room for your work, then view it from another Mac using Apple Screen Sharing. BetterDisplay supplies the virtual screen; Screen Sharing carries its image and your input over the network. Keeping those two jobs separate makes it easier to choose a useful desktop size and diagnose connection problems.
Before you begin
The Mac you work on remotely is the host. Install and run BetterDisplay there, in the user account whose existing desktop you intend to share. The Mac you sit at is the client; it runs Apple's Screen Sharing app. Start with both Macs on a working network, preferably a wired local network for the first test. Internet access, VPN setup and remote-editing performance need their own network and application checks.
This recipe uses Standard screen sharing to view the host's desktop. A connection to a different user's separate remote login session is a different arrangement: macOS can supply a session display instead of the console user's physical and BetterDisplay-created screens. A BetterDisplay virtual screen behaves like an added display, rather than a private desktop assigned exclusively to the account that created it. Do not create screens from a secondary remote account expecting them to leave the console user's desktop untouched.
Have a tested recovery route before you change the display setup: for example, a physical monitor and keyboard that you or someone at the host can use. Verify that route actually reaches the host desktop. A second connection that shows the same virtual screen is not independent recovery if that screen disappears. You do not need to disconnect a physical screen through BetterDisplay to use this tutorial; keep it available during setup.
Save your work and record the host's existing display modes, arrangement and main display, virtual-screen connections and associations, and any Configuration Protection settings. Record their saved values as well as enabled switches. Also note the current login-launch and advanced virtual-screen policies so you can restore them later.
Establish a working Screen Sharing connection
- On the host, open System Settings > General > Sharing, open the information panel for Screen Sharing and enable it. Screen Sharing and Remote Management cannot be enabled together; if Remote Management already serves your setup, resolve that choice before changing it.
- Under Allow access for, choose Only these users and add the host account you will use. This account's credentials authorize the connection. The optional VNC password setting is for other VNC viewers; it is not required for this Mac-to-Mac recipe. Follow Apple's Screen Sharing setup instructions for managed or permission-restricted hosts.
- On the client, open Screen Sharing from Applications > Utilities. Choose New Connection, enter the host's hostname and connect. Sign in with the host account that owns the desktop you intend to share. If Select Screen Sharing Type appears, choose Standard.
- Confirm you can open a harmless window and type on the host's existing desktop. If you are observing rather than interacting, use View > Request Control Mode. Resolve access or authentication problems before adding the virtual desktop.
Creating and connecting a virtual screen does not need BetterDisplay's Screen Recording permission. That separate permission is used when BetterDisplay itself captures a screen for its streaming or Picture in Picture features. Apple Screen Sharing has its own host access settings; granting BetterDisplay a permission does not authorize a remote connection.
Create a desktop sized for your client
Choose the size of the workspace first. A resolution of 1920 × 1080 gives you that much logical desktop space. In HiDPI, macOS renders it using a 3840 × 2160 backing image. The doubled pixel dimensions improve rendering detail; they do not make windows half as large. A bigger logical desktop fits more windows but makes everything smaller when the client scales the whole desktop into the same viewing area.
- On the host, open BetterDisplay Settings > Displays > Overview > Create New Virtual Screen….
- Select Pre-configured settings (recommended) and choose 16:9 - HD/4K/5K/6K for the worked example. Choose a different preset if your desired workspace has another aspect ratio. These values describe the desktop's shape, not its final selected resolution.
- Choose Create Virtual Screen. This saves a disconnected definition and selects it in Settings. Keep the definition unassociated: matching and associating it with a temporary physical monitor could later disconnect your remote desktop when that monitor is unplugged.
- In Settings > Displays > [virtual screen], optionally set Virtual screen name to Remote Desktop. Otherwise, the example's generated name is Virtual 16:9. Leave Use custom resolution list, Rotated orientation, Enable HDR support and Custom refresh rate list off for the first connection. The normal advertised refresh rate is 60 Hz; that does not guarantee a 60-frame-per-second remote connection.
- Open Additional Resolution Settings… and keep Enable HiDPI resolutions on, its default for a new definition. Leave Reported diagonal size blank and range limits unchanged. Close the sheet, then enable Connect this virtual screen.
- Open the BetterDisplay app menu, expand [virtual screen] > Virtual Screen Mode and select the 1920 × 1080 entry with the sparkle HiDPI indicator. Select the actual mode rather than assuming the new desktop already uses it. If it is unavailable on your Mac, start with an offered smaller HiDPI mode and check the result.
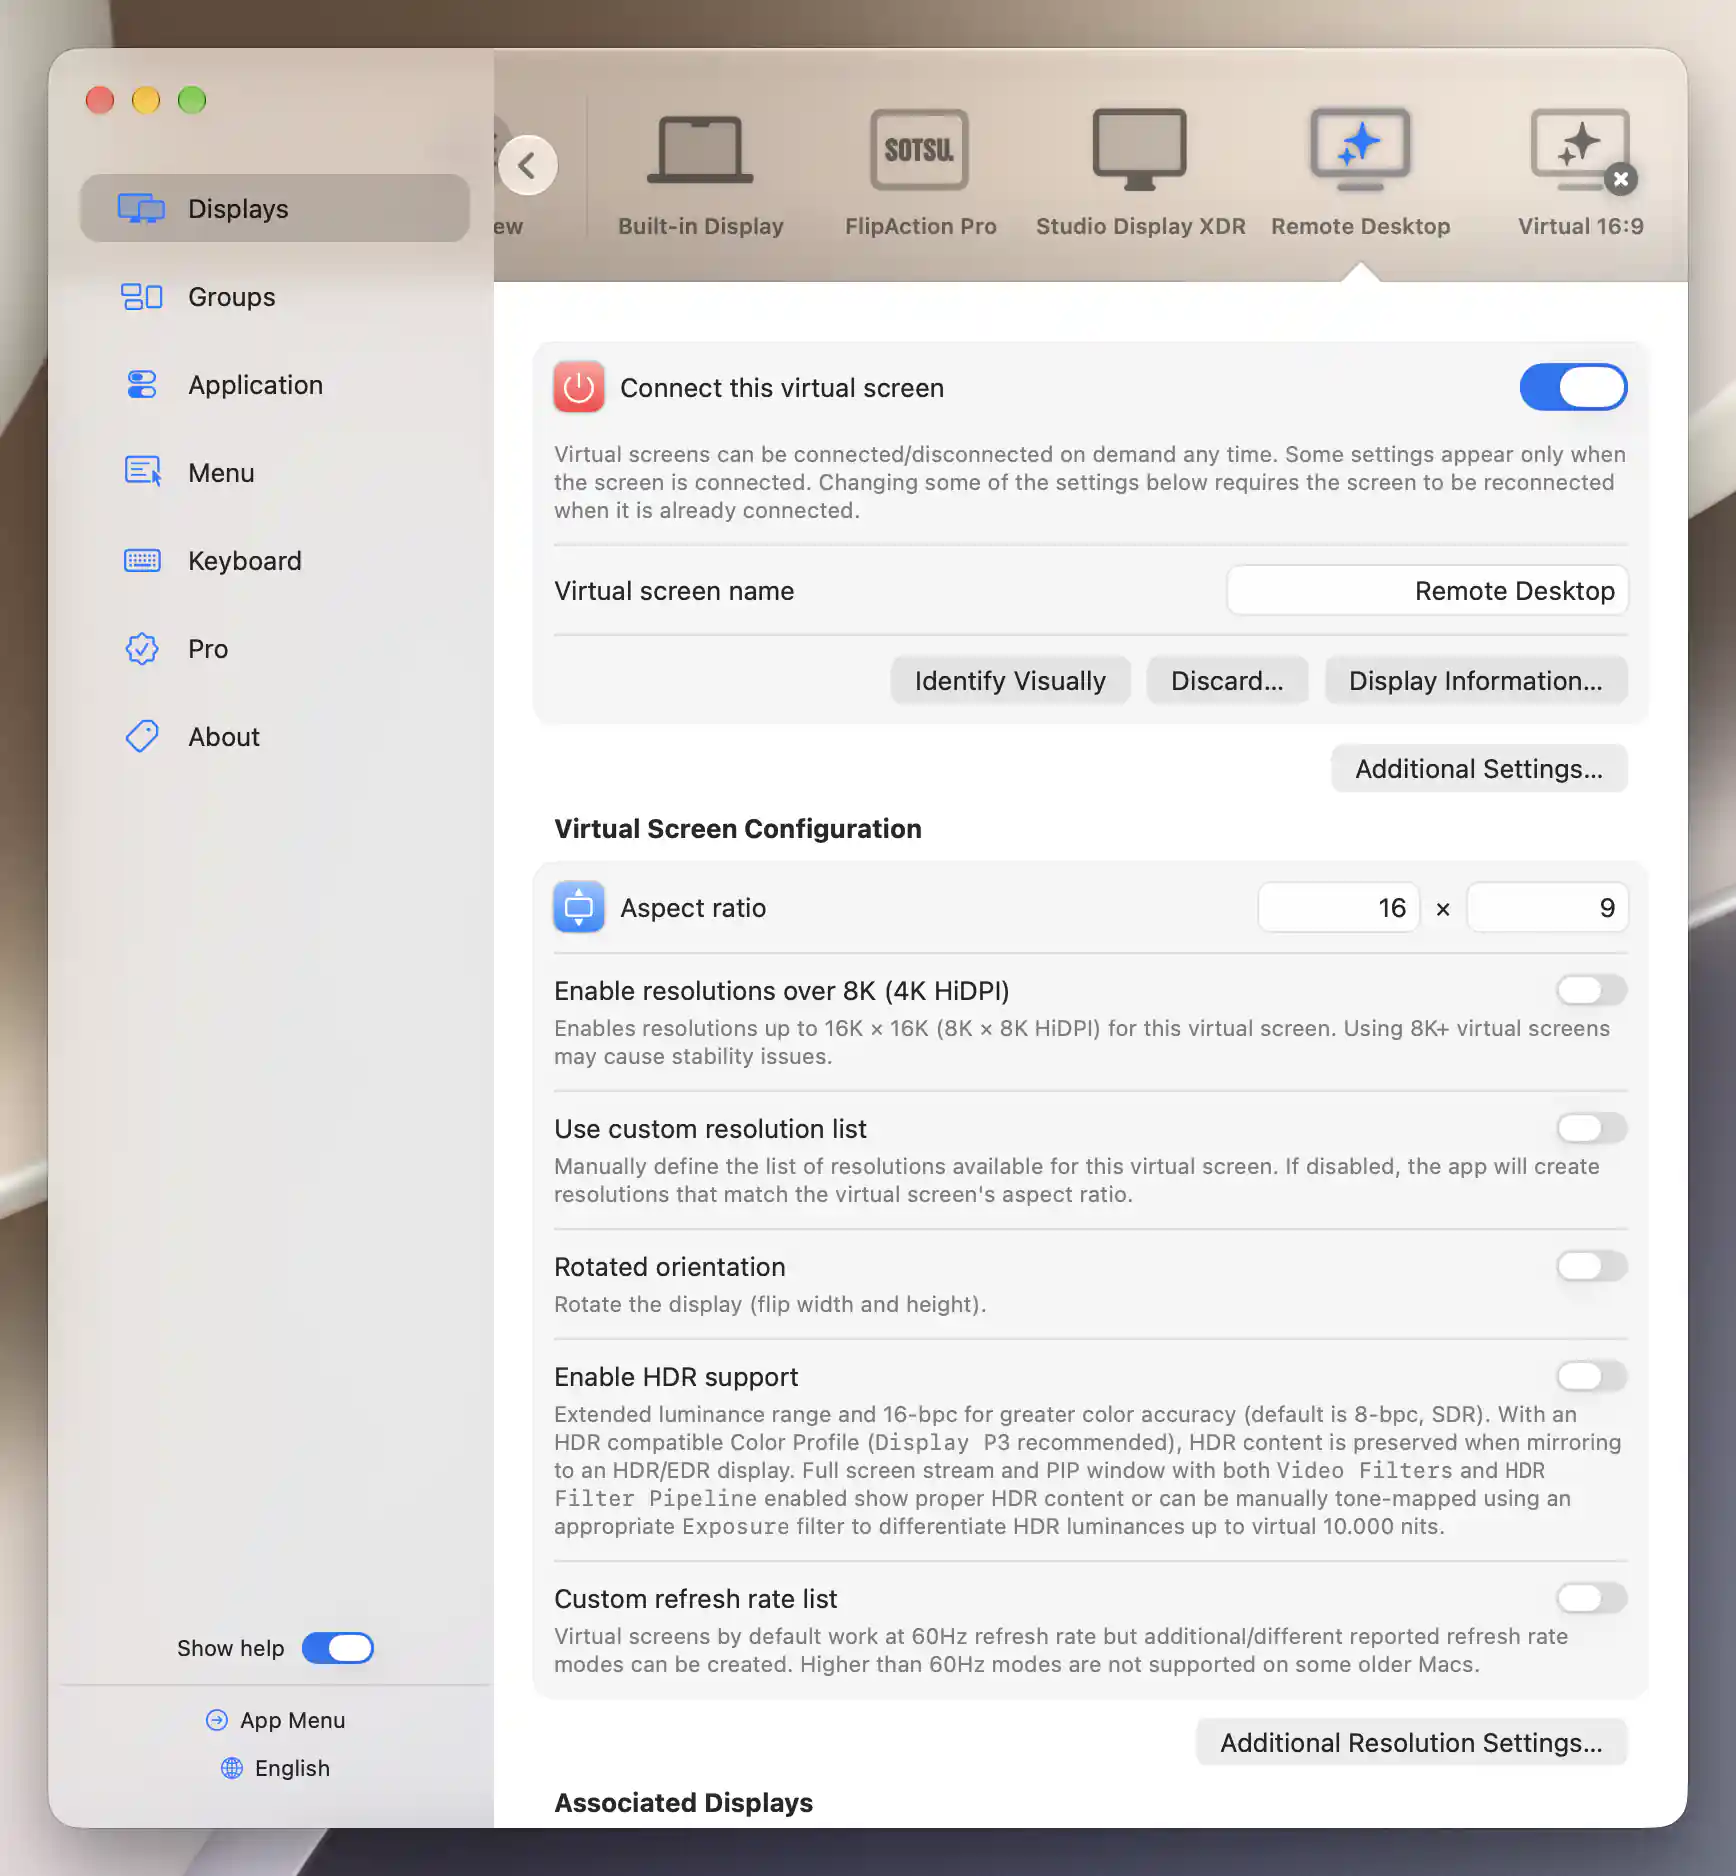
Keep the remote desktop independent of a physical monitor’s connection.
If you need a fixed list instead of the generated range, enable Use custom resolution list and enter the desired logical width and height using Add Custom Resolution. The starting row is already 1920 × 1080; retain or edit it rather than adding a duplicate. Keep HiDPI enabled and check for Resolution entry accepted. An accepted row still needs to produce an offered, usable mode after connection. See custom resolution lists for validation and size limits.
Changes to a connected definition can require recreation. If the red banner appears, Reconnect briefly removes the desktop and applies the changes; Dismiss saves them for the next connection. Move important windows to the recovery desktop first. Selecting an already offered mode requests that mode without recreating the definition; this workflow does not require an override activation, a separate Apply action or a Mac restart.
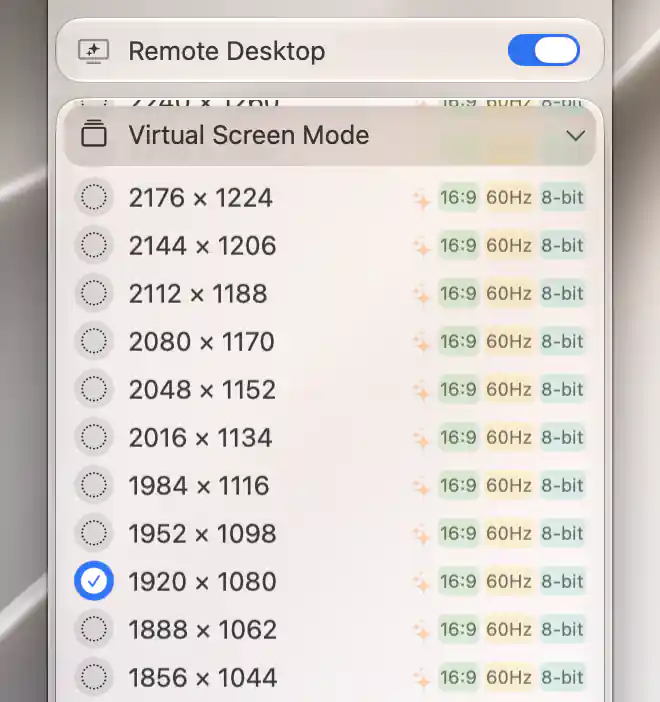
Select the logical desktop size; the sparkle marks its HiDPI rendering.
Keep the desktop available between connections
Disconnecting the client session and disconnecting the virtual screen are different actions. Leave Connect this virtual screen on when you finish remote work. Closing the viewing session does not require removing the host's desktop, so applications can continue using it while BetterDisplay remains running.
- On the host, open BetterDisplay Settings > Application and enable Automatically launch on login. Check that it stays enabled and that macOS permits the login item. This starts BetterDisplay after user login, rather than at the FileVault unlock stage.
- Keep using the same saved virtual-screen definition. On a normal app launch, BetterDisplay restores saved definitions and attempts to reconnect those whose saved connection state is on. BetterDisplay Safe Mode deliberately starts them disconnected. macOS chooses the current mode for the display layout, so saved connection state alone is not a guarantee of the same resolution.
- Open Settings > Displays > Overview > Advanced Virtual Screen Settings…. For the initial headless setup, leave Disconnect virtual screens upon lock or screen saver and connect when returning to the desktop off. Turning it on removes the connected virtual desktops during lock; it can remove the very desktop you need for remote access.
- Leave Reconnect virtual screens after wake and Reconnect all remaining connected virtual screens after disconnecting one off initially. Both default to off and can interrupt desktops by recreating them. Use a workaround only for a symptom you can reproduce, with recovery available. The mirrored-screen sleep workaround is not needed for this unmirrored recipe.
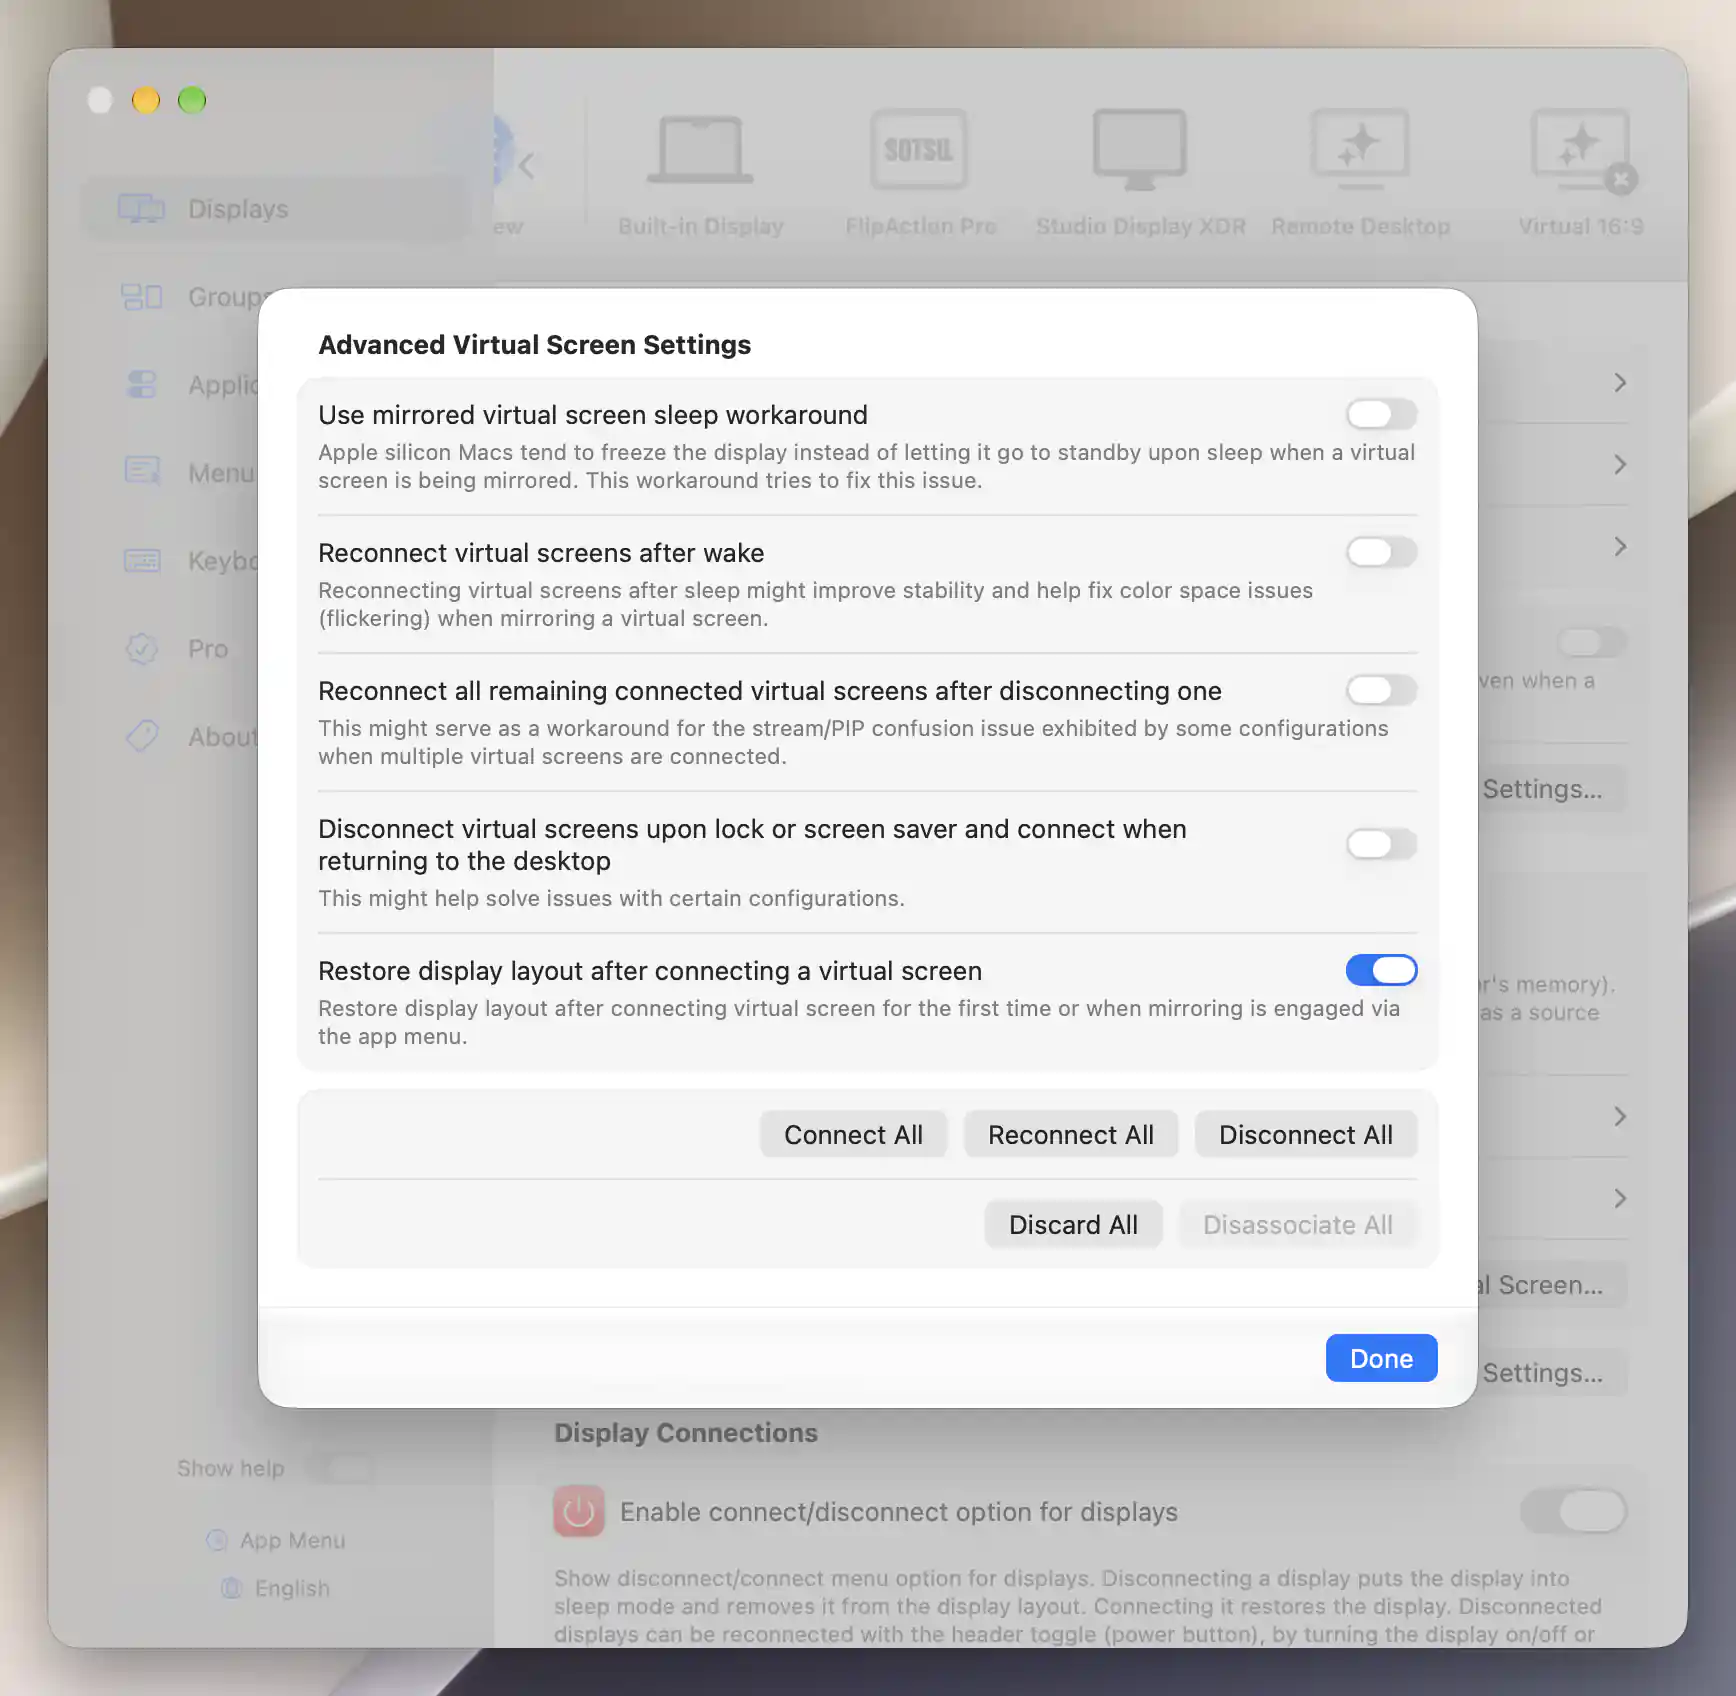
Leave disruptive connection workarounds off until a specific symptom calls for one.
If the resolution changes on later connections, first select the desired mode again. To ask BetterDisplay to retain it, enable [virtual screen] > Configuration Protection > Resolution in the app menu after selecting the working mode. This saves the current resolution as the protection target. It does not keep the app running or make the desktop available before login. Protect only what you need, and record an existing target before replacing it.
Choose the virtual desktop in the client
- Reconnect the client's Standard session if the new desktop has not appeared. In Screen Sharing, open View > Displays and select the BetterDisplay desktop when the host offers multiple displays. If only one is present, there may be no choice to make. On the host, Identify Visually in the virtual-screen settings can help you recognize it.
- Move a harmless work window onto that desktop. Use View > Turn Scaling On to fit the desktop into the client window, or Turn Scaling Off to see it at full size and scroll if necessary. Client scaling changes how you see the host desktop; it does not select another BetterDisplay mode.
- If text is too small with the whole desktop fitted, select a smaller logical HiDPI mode on the host and compare. Resizing the client window alone is not a replacement for choosing the host workspace size in this Standard session.
Apple's Screen Sharing guide describes the client display selector, scaling and input modes.
Check the result
- Readable workspace: confirm the selected desktop has enough room for your work, and that text remains comfortable at the client window size you actually use. Verify the selected logical size and HiDPI status in BetterDisplay.
- Correct input: click a harmless button near the center and near each corner, drag a window, scroll and type. The host must respond at the intended location; the client's visible pointer by itself does not establish accurate input.
- Client reconnection: disconnect the Screen Sharing session while leaving BetterDisplay and the virtual screen connected. Reconnect as the same host user, select the same display and repeat the input checks. Confirm your work window remains reachable.
- Session lifecycle: with recovery available, separately check lock/unlock and any sleep/wake behavior your host uses. Before testing app relaunch, logout or a Mac restart, save work and arrange recovery: the desktop disappears when BetterDisplay quits and is only recreated when the app runs again. Confirm launch-on-login, connection and selected mode after login.
Once these checks work, you can unplug the temporary setup monitor while leaving the virtual screen connected, then reconnect the client and repeat the checks. Keep the monitor available for recovery. A successful session does not establish calibrated color, video-editing latency or uninterrupted access after every restart.
If you prefer High Performance screen sharing
Apple's High Performance option creates one or two remote-session virtual displays. It is a useful alternative when you want its audio and low-latency video features, but it is not the same as selecting the persistent BetterDisplay desktop in Standard mode. Pre-creating three BetterDisplay screens does not extend Apple's two-session-display choice.
Apple's High Performance requirements specify that both Mac computers need Apple silicon and macOS Sonoma 14 or later, sufficient bandwidth and low latency. The documented session-display limit is 4K backing pixels, or 1920 × 1080 HiDPI. One active High Performance session is supported per Mac. Sharing as the logged-in user blanks the host's hardware displays and prevents simultaneous local use.
Dynamic Resolution can resize a single High Performance session display with the client window. That belongs to Apple's session setup, so use its display settings for that workflow. Verify what a concurrent viewer actually sees rather than assuming it shares those displays. Restore the Standard connection when returning to this tutorial's BetterDisplay desktop.
Troubleshooting
The client shows a different desktop
Check the host user, Standard session type, virtual screen's actual connection state and client display selection. A separate remote user session or Apple's High Performance displays can explain why you see a session-created desktop instead. A remote-client-created system virtual display is not necessarily a definition managed by your BetterDisplay instance. Do not disconnect an unfamiliar virtual display to force the selection.
Clicks miss or the pointer disappears
First verify input mode and permissions. If the host responds at the wrong location, keep the same displays and resolutions and compare a side-by-side layout or shorter stack in System Settings > Displays > Arrange, then reconnect the client. Restore the recorded arrangement if the comparison does not help. This tests a coordinate-space problem; it is not a rule that three displays or a particular total height must fail. Follow remote-click troubleshooting for the useful details to record. A missing pointer alone is a separate observation: check whether clicks and dragging still reach the intended targets before changing the layout.
The desktop disappears after lock, wake or login
Use your recovery route to check that BetterDisplay is running, the definition still exists and Connect this virtual screen is on. Inspect login-item permission, BetterDisplay Safe Mode and the advanced lock/wake policies. If you reused an associated definition, check its Associated Displays: automatic connection tied to an absent physical display can remove the virtual desktop.
For a login form hidden by a BetterDisplay full-screen stream, see hidden login screen troubleshooting. Its temporary lock-disconnect workaround has different consequences on a host whose sole desktop is virtual; do not enable it without a way to unlock and reconnect independently.
The host cannot be reached after restarting
Distinguish network reachability, FileVault unlock, user login and BetterDisplay launch. A virtual screen does not solve those earlier stages. Apple's FileVault documentation describes a separate SSH unlock option after restart on Apple silicon with macOS 26 or later, already enabled Remote Login and network access. It is not provided by BetterDisplay or by this Screen Sharing recipe. Keep your tested recovery method and FileVault settings; do not turn encryption off to troubleshoot desktop geometry.
Stop or remove the virtual desktop
- To end remote viewing while preserving the workspace, disconnect the client session and leave BetterDisplay and Connect this virtual screen on.
- Before removing the desktop, restore a working physical or other independent desktop and verify viewing and input there. Move needed windows and save work. Disable only the Resolution protection or automatic policies you added; restore any original protection targets before reenabling them.
- In Settings > Displays > [virtual screen], turn off Connect this virtual screen to remove its desktop while retaining the definition. Check the global reconnect-remaining policy first: if enabled, disconnecting this screen can briefly recreate other virtual screens too.
- To delete the definition, choose Discard… > Discard Virtual Screen and confirm. The separate Discard & Remove Color Profile option, when available, also removes the generated profile and needs administrator authorization; ordinary discard is sufficient here. Avoid bulk discard or preference reset.
- Restore the recorded display modes, arrangement, main display, existing definitions and connection policies, login-launch setting and any Screen Sharing access changes you made. If remote access is still needed, verify the replacement route before turning Screen Sharing off.
Related pages
- Virtual Screen — definition, offered modes and reconnection.
- Advanced Virtual Screen Settings — global sleep, wake and lock policies.
- Configuration Protection — retain selected display settings.
- Remote clicks and stacked displays — compare arrangements while keeping other variables fixed.
- Virtual screen or HDMI dummy plug? — choose between software and a physical output connection.
- Hidden login screen — distinguish running-session presentation from startup access.
Additional information
This section explains the licensing and platform requirements for the workflow.
Features requiring Pro license
Creating a screen with Pre-configured settings (recommended), connecting it, ordinary mode selection, login launch and the described global virtual-screen policies do not require Pro. The preset starts with HiDPI enabled. Custom naming, changing HiDPI configuration, custom resolution lists and Configuration Protection require Pro. The optional custom-list and protection refinements can be omitted. See Pro licensing for activation and trial details.
Platform compatibility
The BetterDisplay virtual-desktop and Standard Screen Sharing workflow is available on Apple silicon and Intel Macs, subject to working macOS sharing and supported virtual modes. This documented BetterDisplay build requires macOS 26.3 or later. Neither a physical video port nor a brightness controller is needed for the virtual desktop. Apple's High Performance alternative requires Apple silicon and its own network/session conditions; creating a BetterDisplay screen does not add High Performance support to an Intel client.