Switch between laptop-only, home-desk, and office-desk setups
Create three named Shortcuts that request the displays and main display you want at each workplace. Pair them with display groups whose membership selects the appropriate layout protection and optional synchronization rules. The Shortcuts change connections; enabling a group does not connect its members.
The example keeps your MacBook open and its built-in display connected in all three setups. This gives you a visible way to check a destination before removing another desktop. The saved sequences request repeatable states, but they are not an atomic transaction or an automatic rollback if an action fails.
Before you begin
- Use a working open MacBook and supported physical home and office monitors. Connect each monitor to this Mac at least once so BetterDisplay knows its identity. In the steps below, “Home display” and “Office display” mean your actual selected displays, not names you must type or create.
- Check that each monitor can be connected and disconnected through BetterDisplay while another usable physical screen remains. Keep connection safeguards enabled, including the restriction against disconnecting all screens. Do not enable an M3 built-in-disconnection override for this workflow.
- Privately record original connection states, the main display, display modes, orientation, desktop positions and window locations. Record group membership, enabled/active states, priority order and layout/sync rules. Record Configuration Protection targets separately from the current values; they may differ.
- Keep BetterDisplay available in your Mac's user session. These Shortcuts run on this Mac; choosing a monitor remembered from another location cannot connect hardware that is unplugged. A powered-off monitor may still be present to macOS, so its power-strip state is not a reliable disconnection trigger.
- Open Settings > Displays > Overview > Display Connections > Connection Management Settings…. If available, record and turn off Disconnect built-in display when an external display is connected. A Shortcut's connection request does not provide the same temporary exception as reconnecting the built-in display from the App Menu; this policy could disconnect your recovery screen again.
- Record and temporarily pause only existing rules that would fight this trial, such as a different protected main display, automatic presets or overlapping group layout rules. Keep the original rule targets and enabled states for undo. Do not change base connection-management safeguards to expose an unavailable option.
Default connection recovery remains useful: reconnection on app startup and quit, and when no eligible physical display remains, starts enabled. Leave these safeguards in place. Optional keyboard launch uses macOS Shortcuts; the main recipe needs neither BetterDisplay's native-key permissions nor Screen Recording permission.
Plan the three setups
Start with one external monitor per desk. Add explicit actions for additional known monitors only after this smaller setup works.
| Shortcut | Requested connected displays | Main display | Requested off |
|---|---|---|---|
| Laptop Only | Built-in display | Built-in display | Home and Office displays |
| Home Desk | Built-in and Home displays | Home display | Office display |
| Office Desk | Built-in and Office displays | Office display | Home display |
Use explicit On and Off values. Leaving the connection action's optional Toggle field unspecified makes it toggle instead, so running the same Shortcut twice could undo the previous result. A remembered absent monitor may remain selectable with a disconnected suffix; its action can make no change while the hardware is absent.
Build the connection Shortcuts
- Open Apple's Shortcuts app, use the add button to create a new shortcut, and name it Home Desk. Search the action list for BetterDisplay. Add Connect or Disconnect a Display, select your built-in display in Display, and set Toggle to On. See Apple's custom shortcut instructions for the editor.
- Add another Connect or Disconnect a Display for the actual Home display, also On. Keep these connection requests above every Off action.
- Add Apple's Show Alert action next. Give it a message such as “Check that the built-in and Home displays are visible and usable. Choose Done only when ready; otherwise Cancel.” Include its Cancel option. This is a deliberate readiness pause: inspect the actual screens rather than treating an action's Boolean result or a fixed delay as proof that the monitor is ready.
- Below the alert, add BetterDisplay's Set Screen as Main with the Home display selected. Add Connect or Disconnect a Display for the Office display with Toggle > Off as the final action. Review all five actions in order before running them.
- Create Office Desk with the same five-action sequence: built-in On, Office On, a readiness alert for those two screens, Set Screen as Main for Office, then Home Off.
- Create Laptop Only with built-in On, a readiness alert for the built-in display, Set Screen as Main for built-in, Home Off, then Office Off. It also has five actions. None of the three Shortcuts turns the built-in screen off.
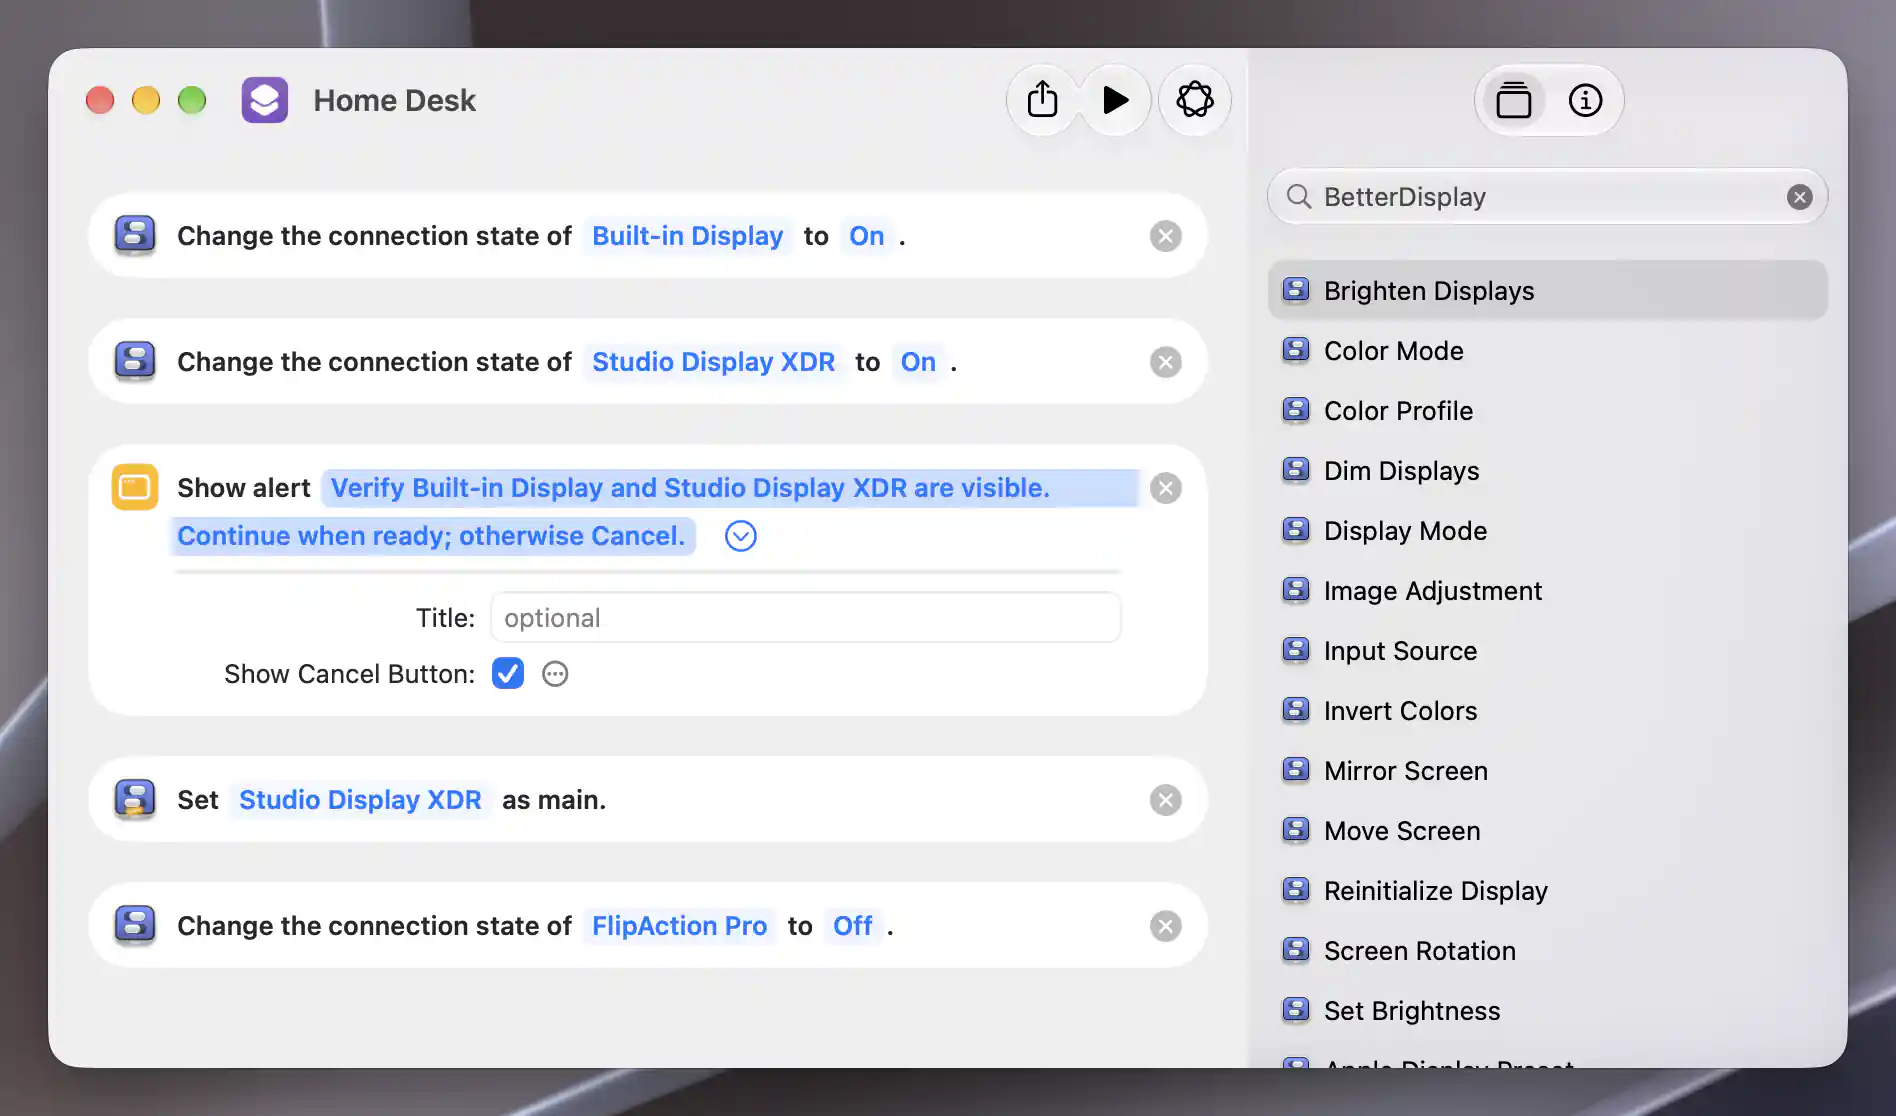
Connect the recovery screen and destination first, then check them before any Off action.
Shortcuts runs actions from top to bottom. Done in Show Alert continues; Cancel stops before the main-display and Off actions, but does not undo the connection requests already made. Keep this pause when you use the presets. Apple's Show Alert guide explains those choices, and the BetterDisplay action reference explains the underlying feature requirements.
Let the connected desk select its group
Create separate Home Layout and Office Layout groups. Leave both enabled once configured; their actual members and activation conditions choose which one can run. Laptop Only can use its main-display action without a separate group.
- Open Settings > Groups > Overview > Create New Display Group…. Enter Home Layout and select Create Display Group. Select the new group and turn Enabled off immediately while configuring it. A fresh group starts enabled, includes all currently connected displays and is assigned the highest priority; it can temporarily make existing lower-priority groups inactive. Record existing group order and status first.
- Under Group Membership, turn Treat all currently connected displays as group members off. Select only the built-in and actual Home displays in Member displays. Use Show currently not detected displays in list if needed to select a known absent member. Do not include Office or a virtual screen just to make the group appear active.
- Open Settings > Groups > Home Layout > Activation > Configure Activation Rules…. Choose All configured group member displays are connected. Keep Only group members can be present and Exclusive display group on for this two-screen example, then select Done. The group will wait until its two members are connected and other connected displays are gone.
- Create Office Layout, disable it immediately, and repeat with only built-in and Office as members. Use the same activation rules. If you deliberately retain an extra recovery display, include it in the applicable membership or turn Only group members can be present off; do not assume an unrelated connected display is ignored.
- Open Settings > Groups > Overview > Change Activation Priority…. Use the arrow buttons to place the desk groups above any intended lower-priority fallback group. Higher-priority exclusive groups can block lower ones; review every existing overlapping group before enabling the new groups. In this example, Home and Office cannot both qualify at once, so their relative order does not choose the desk.
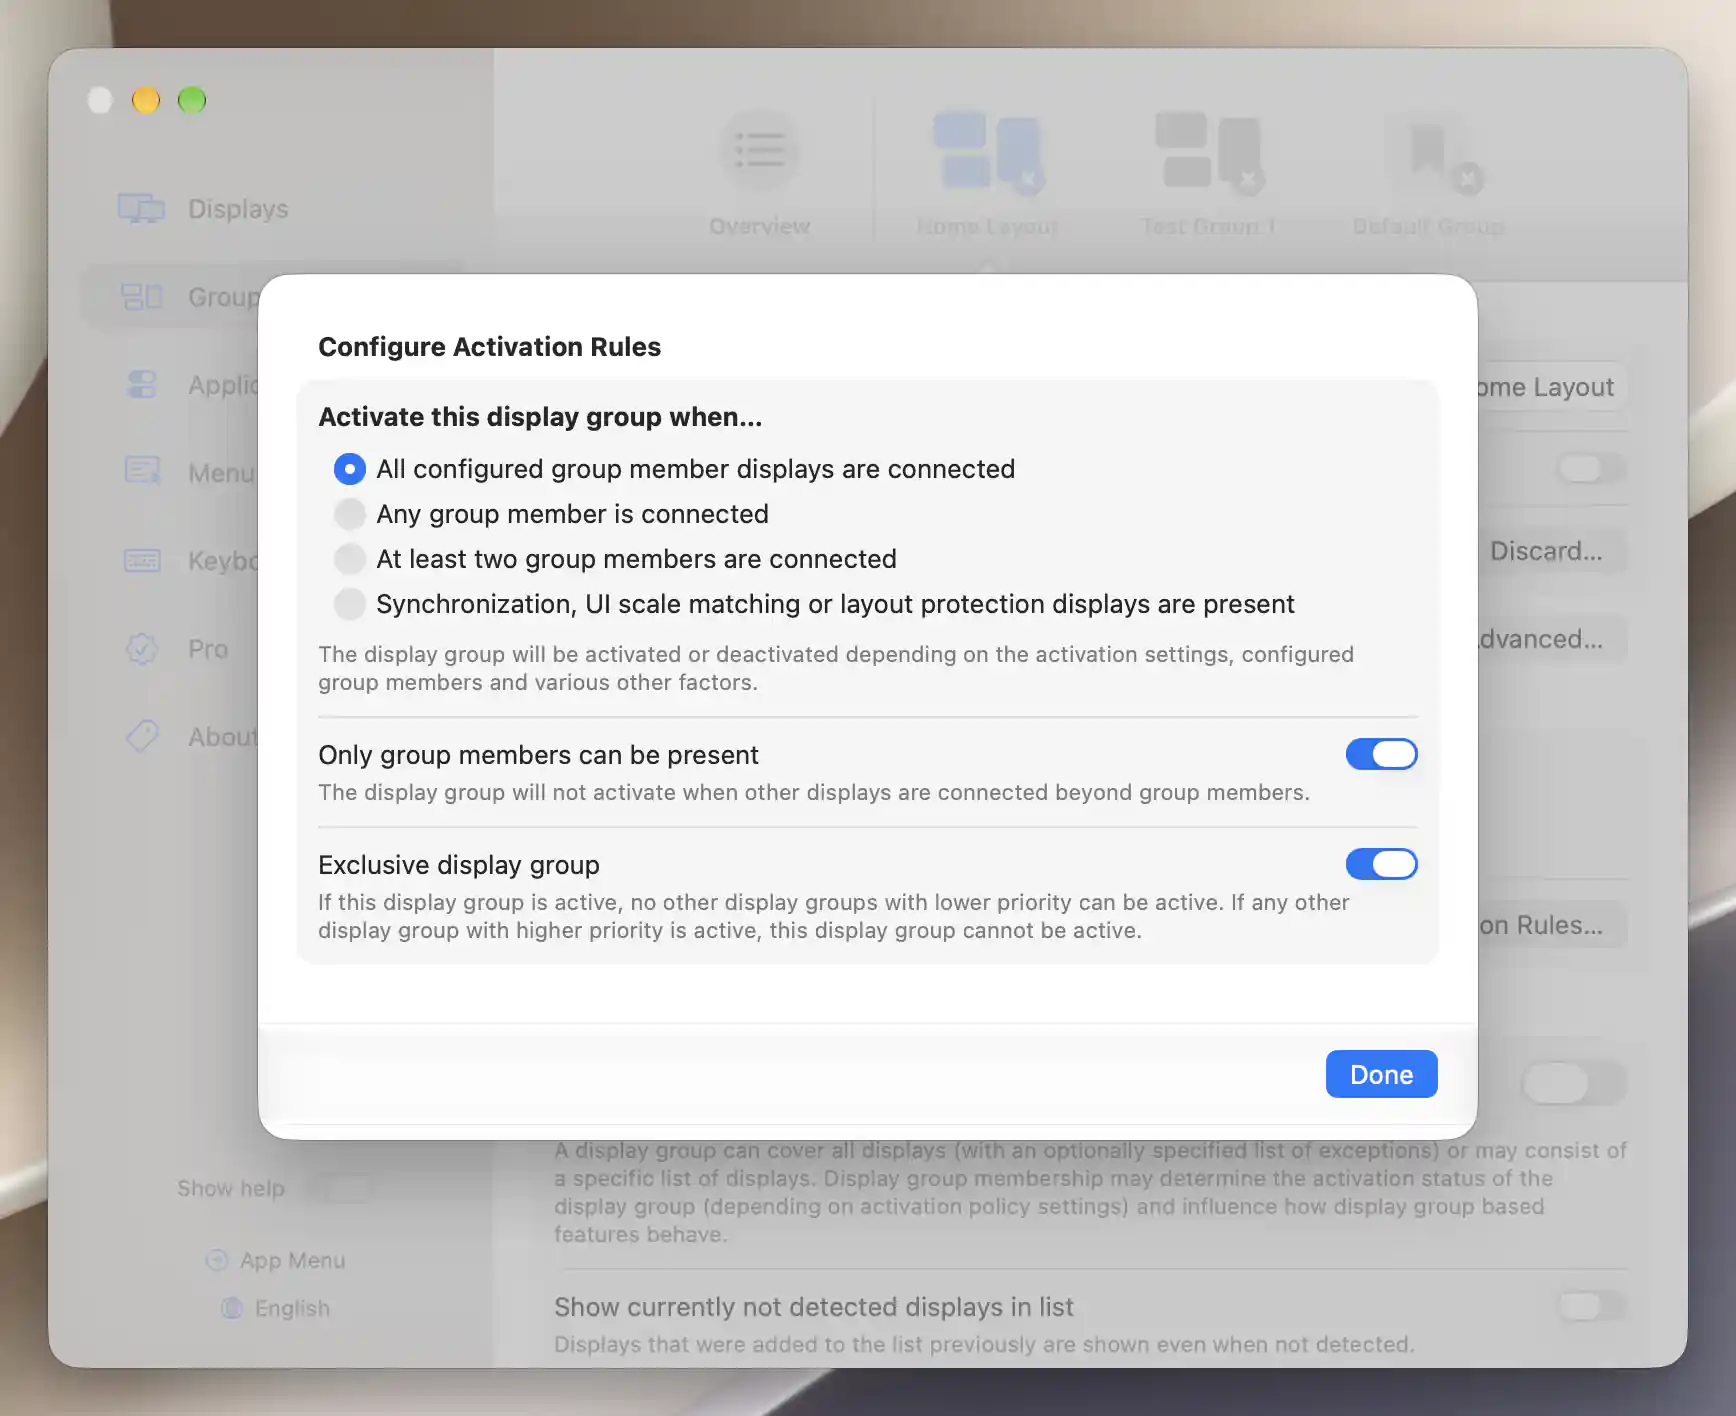
Require both Home Layout members, exclude other displays and make this group exclusive before enabling it.
If you add an optional Laptop Layout group, give it only the built-in member, the same all-members/only-members conditions, and a priority below both desk groups. Do not create a rule that makes it compete with the intended desk's main-display choice. An enabled group can still be inactive; its Activation section explains why.
Add a layout rule for each desk
Choose relationships that match your real desk. This example puts Home to the right of the laptop and Office to its left, with centered edges. These rules describe the desktop arrangement; they do not store app windows, arbitrary display modes or color profiles.
- With the Home display physically available, run Home Desk. At the readiness alert, continue only after both requested screens are visible. Inspect the connection states and main display after completion. Keep Home Layout disabled while editing its rule.
- Open Settings > Groups > Home Layout > Layout Protection. Turn Enable layout protection on. Choose Add New Protection… > [Home display] with no modifier held to create the ordinary orientation-independent rule.
- Leave Protect the position of [Home display] on. Set Arrange [Home display] next to to the built-in display and Position of [Home display] to Right of [built-in display]. Leave Adjust anchor point offsets off for the centered example. Use the back arrow to return to the layout overview.
- Set Protect main display status to the Home display, matching the Home Desk Shortcut. Enable the finished group with its Enabled switch. Confirm Home Layout is active before applying its layout.
- Open App Menu > Tools > Groups > Apply All Protections and check the actual arrangement. This applies eligible rules across all active groups, not just the group selected in Settings. Resolve conflicting active rules first. The positional rule needs both members connected and a defined side; an orientation-specific rule must also match the display's current orientation.
- At the office, run Office Desk, then configure Office Layout in the same way with Office next to built-in, Left of [built-in display], centered offsets and Office as the protected main display. Enable the finished group and apply/check the eligible rules. Leave the other desk group enabled so it can qualify when you return there.
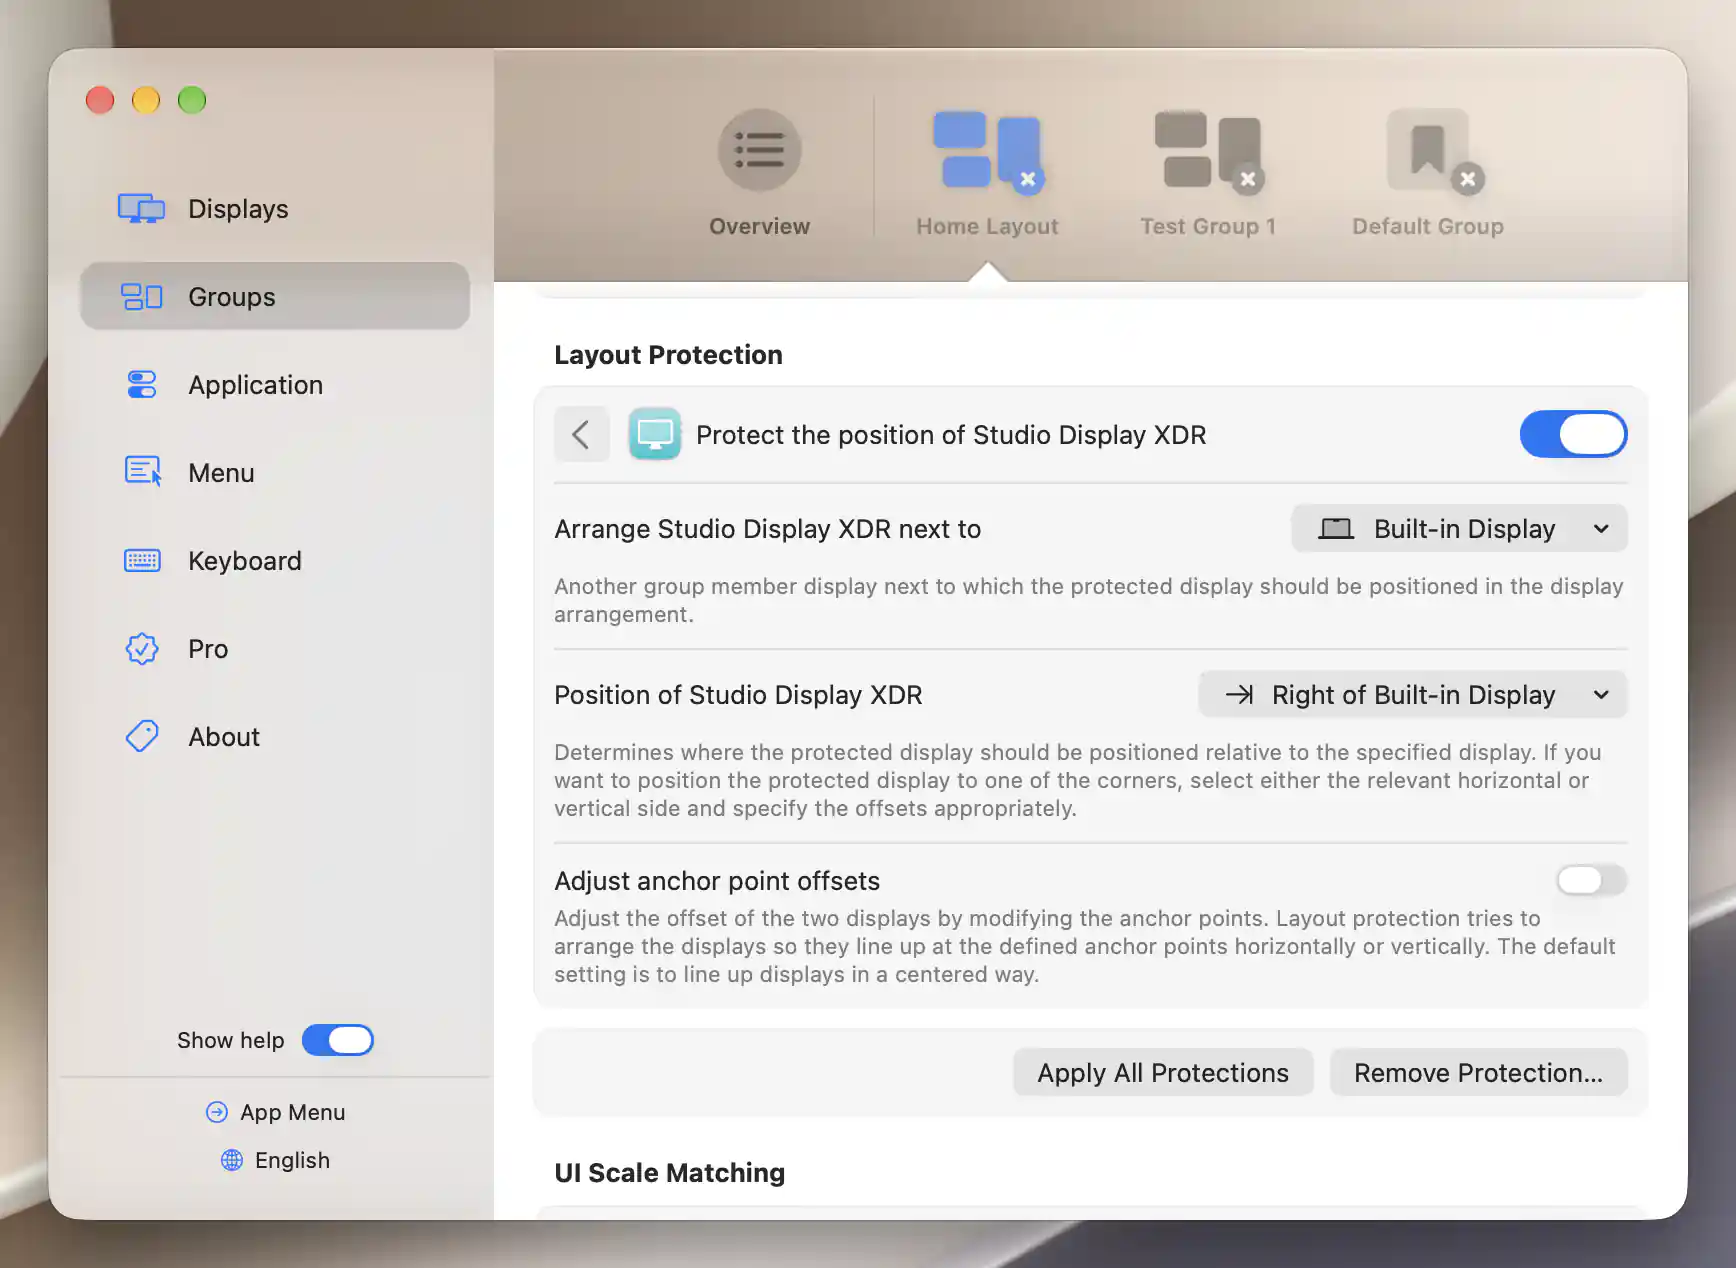
This disabled Home Layout is configured to place Studio Display XDR to the right of Built-in Display, without custom anchor offsets.
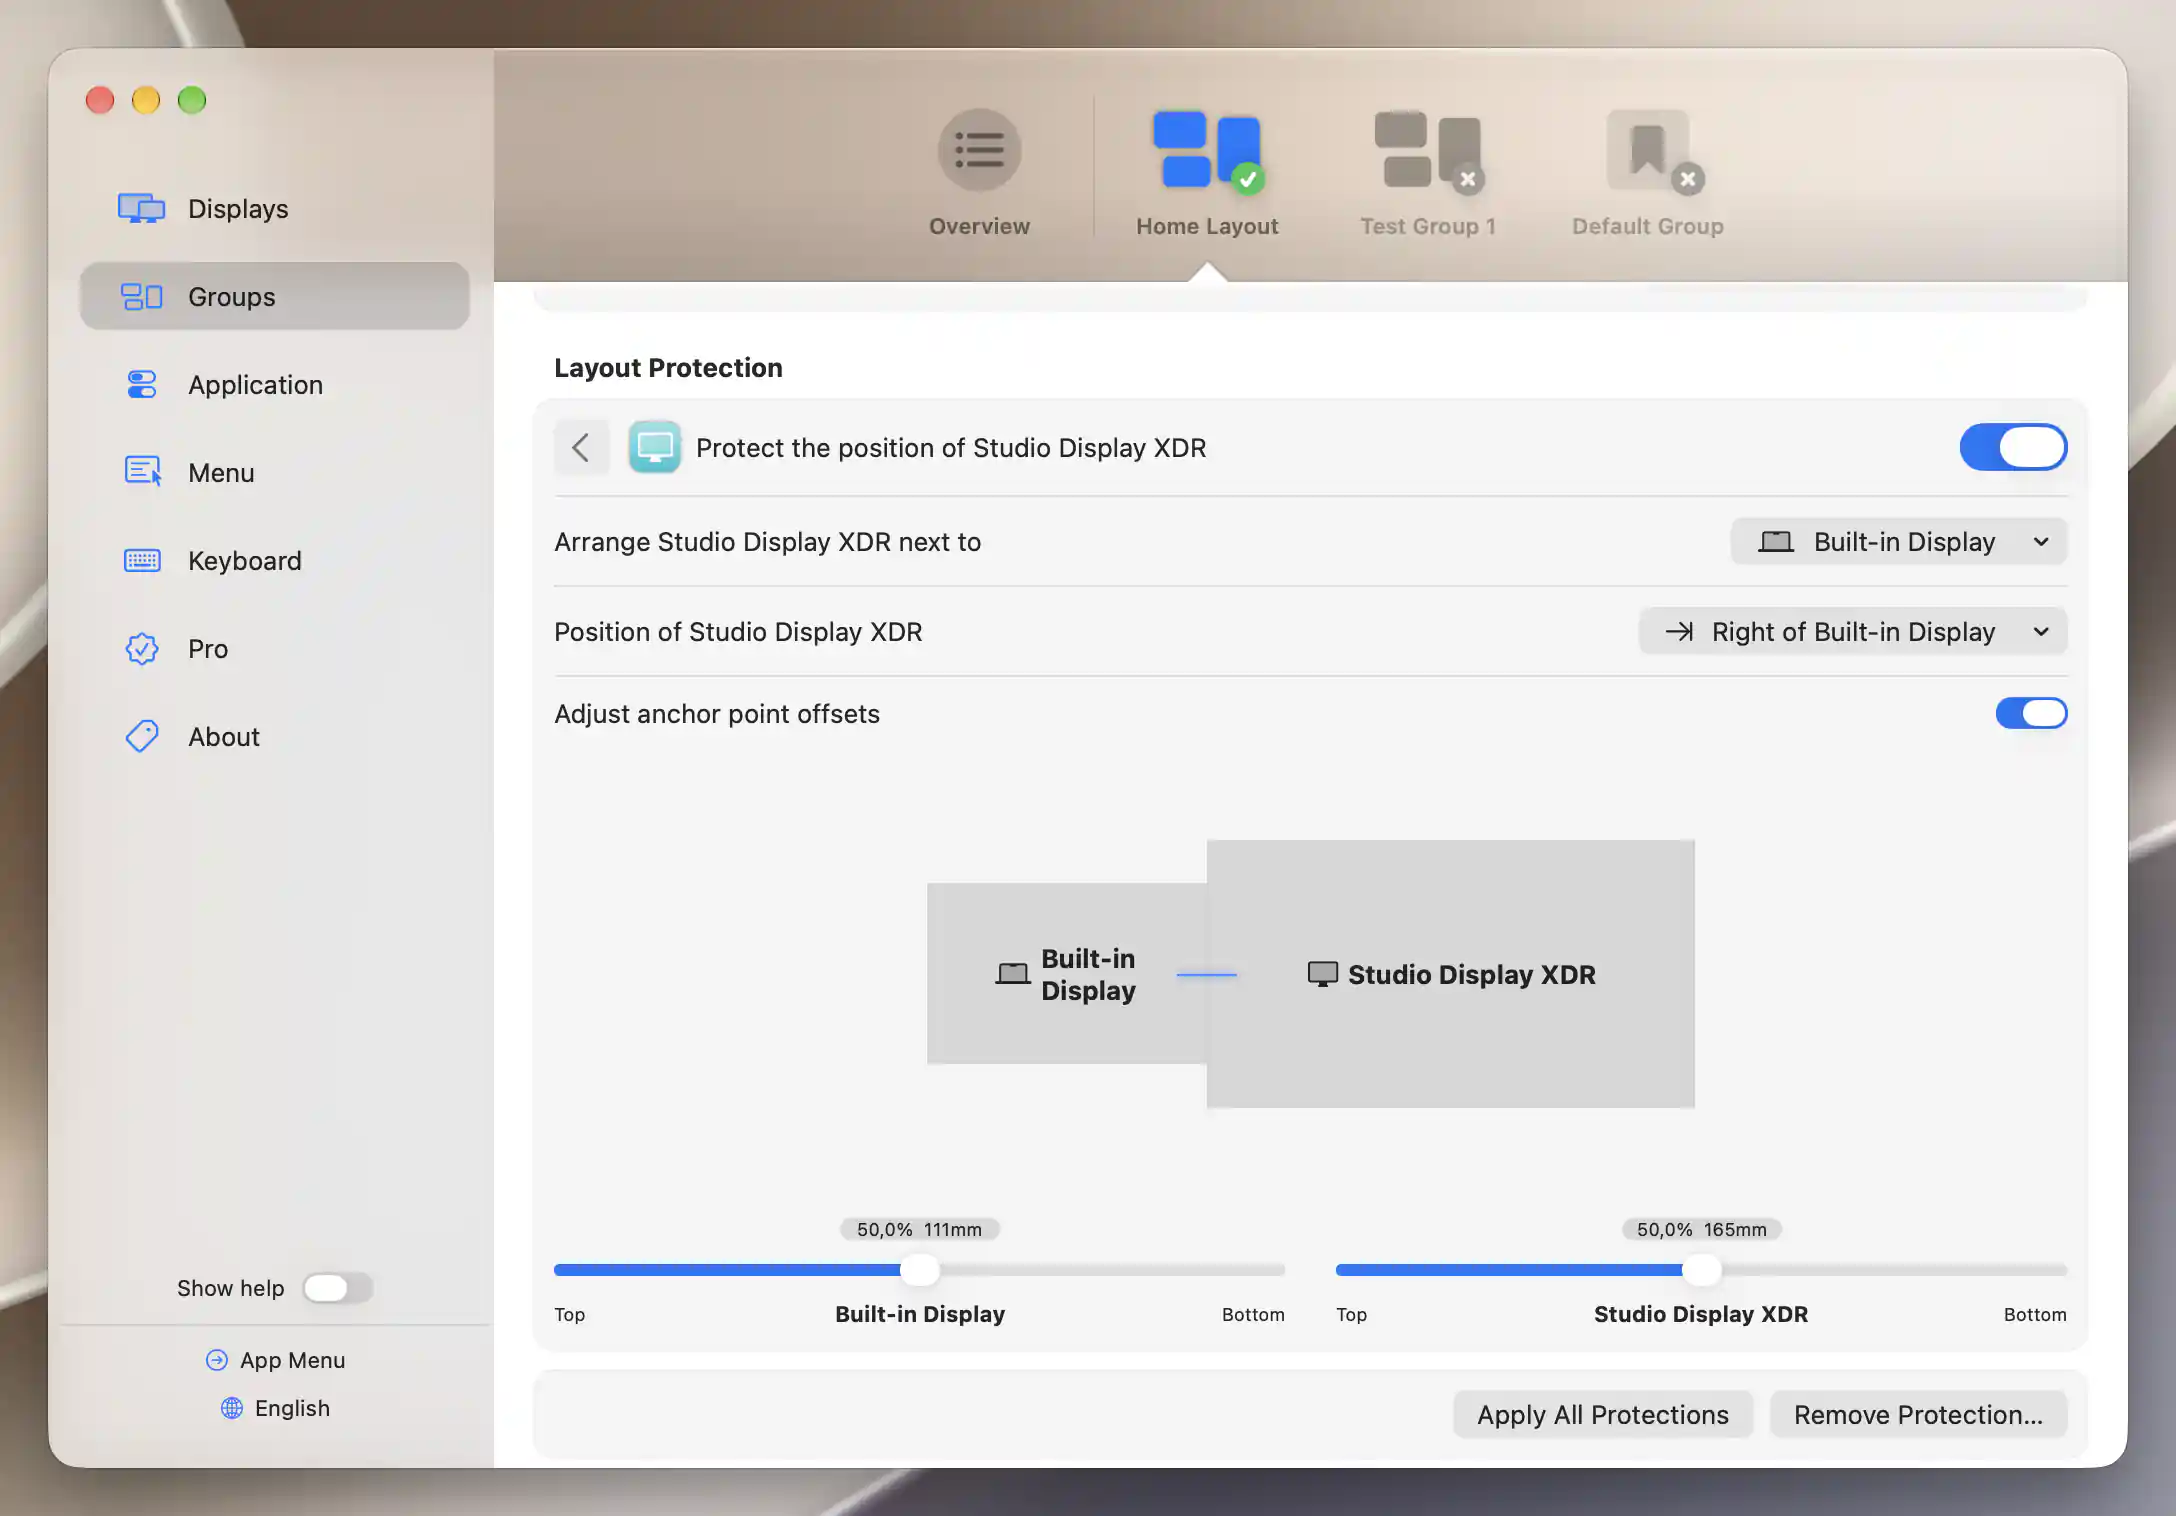
With only the two Home Layout members connected, the enabled group applies the protected layout.
Later display reconfiguration evaluates group activation and eligible layout protections. Apply Automatically in App Menu > Tools > Groups starts off and covers group changes made through that menu. It does not turn Settings edits or Shortcut execution into a different automatic-apply mechanism. When needed, check the active group and use Apply All Protections explicitly. See group layout switching for the distinction.
Optional synchronization at each desk
First verify the connection and layout presets with synchronization off. If a desk's displays support the brightness control you want to share, add a rule under Settings > Groups > [desk group] > Synchronization Settings > Add New Synchronization…. Choose the actual control, limit sources and targets to the intended members, then turn on Enable synchronization for this display group. A target still needs a configured controller that can perform the adjustment; a group is not proof of monitor support.
For a built-in-to-external brightness rule, follow Make external monitors follow your MacBook's automatic brightness within the appropriate desk group. For matching levels, follow Match brightness across different monitors. Record the original values and rule choices first, use a comfortable test adjustment, and check the physical result. Do not enable a broad all-members rule merely to make a profile look complete.
Check the result
- Run Laptop Only while the MacBook is open. At the alert, verify its screen is visible before continuing. Check built-in is connected/main and every known external requested off is removed from the active desktop. Run it again and verify it requests the same state.
- At home, connect the real Home monitor and run Home Desk. Confirm both requested screens before Done, then check Home main, Office off or absent, Home Layout active and the intended arrangement. Repeat at the office with the corresponding values and Office Layout.
- Before undocking, move any needed windows onto the built-in desktop, run Laptop Only and verify its result. Undock and check usable pointer and windows. On arrival at the other desk, attach its actual monitor and run that desk's Shortcut. An absent remembered display is normal; do not select Done for a desk whose required physical screen is missing.
- Test Cancel at a readiness alert. It should stop before any Off action, leaving earlier connection requests in place. Check what actually changed and restore manually if needed; cancellation is not rollback.
- Test your normal apps and repeat the transitions. Check active-group reasons, main display, layout, window placement and any optional brightness synchronization separately. Do not infer a working screen or exact window restoration from the Shortcut's result alone.
After these checks, you can use the Shortcuts editor's details button and Add Keyboard Shortcut to assign an unused combination to each preset. Keep the readiness pause. Apple's keyboard launch instructions explain reserved combinations and removal; Shortcuts privacy settings explains any per-shortcut data prompts. No universal permission grant is required by this recipe.
Troubleshooting
A destination remains blank or cannot connect. Keep the built-in screen visible and cancel at the readiness alert. Check the actual cable/dock/monitor availability and supported connection management. Selecting a remembered display cannot bring unplugged hardware online. Connection requests are software connection changes, not a guarantee of physical power or completed handshake. On Intel, disconnecting can also dim through the selected brightness method rather than put the panel fully to sleep.
The built-in screen disconnects again. Recheck the recorded global built-in auto-disconnect policy. For a different workflow that deliberately uses automatic built-in disconnection, a physical monitor's Ignore for built-in display auto-disconnect option excludes only that monitor as an automatic trigger. It does not define a connection profile, and another eligible external may still trigger the rule. Leave per-monitor exceptions unchanged for this tutorial's globally disabled policy; see Display Connections.
The correct group is enabled but inactive. Read its Activation reason. Check explicit membership, absent members, unexpected connected nonmembers and higher-priority exclusive groups. Changing a group cannot fix an unplugged display. See connection presets versus groups.
Main display or layout changes back. Keep each group's protected main display consistent with its Shortcut. Check other active layout or Configuration Protection rules. Apply All Protections affects all eligible active groups; Apply Automatically only follows group changes through the App Menu. See Layout Protection.
Undo the trial
- Stop any running trial Shortcut. Keep the MacBook open and reconnect a known usable physical desktop before removing rules or changing other connections. Move needed windows there; keep recovery visible throughout.
- Disable only the new trial groups before restoring connections and layout, so their rules cannot reapply. Remove any keyboard combinations assigned to the three trial Shortcuts, then delete only those Shortcuts if you no longer want them. Keep pre-existing automation intact.
- Restore each original connection state, main display, mode, orientation and desktop/window position from your private record. Reconnect original destinations and verify them before disconnecting another screen. Restore original brightness values if Intel disconnection or optional synchronization changed them.
- Use Settings > Groups > [new trial group] > Discard… > Discard to remove only Home Layout, Office Layout and any newly created optional Laptop Layout. Restore the original existing groups' priority order, memberships, enabled states and specifically paused rules; new-group activation can renumber priorities even when their relative order is preserved.
- Restore original saved protection targets separately from current values before enabling each paused rule. If a current value differed from its protected target and the normal interface cannot recreate both independently, leave only that affected protection off, preserve your original record or backup, and record the precise restoration limit. An absent saved field is not restored by entering its displayed fallback. Do not use a global Reset or Forget action.
- Restore only connection-policy, menu-apply and per-shortcut permission choices you actually changed. Restore the original built-in auto-disconnect choice last, after a usable physical destination is present and cleanup is safe; an originally enabled policy can remove the built-in view again. Keep the safety overrides unchanged.
Related pages
- Can a display group switch between laptop-only and multi-monitor setups?
- How can I switch between displays at two desks using one Mac? — manual alternatives and their scope.
- Why does switching display groups not restore their saved layout?
- macOS Shortcuts — action parameters, optional values and results.
- Keep your monitor arrangement and main display consistent after wake — detailed position and main-display rules.
Additional information
This section explains licensing and platform requirements for the setup.
Features requiring Pro license
Supported display connection management, custom display-group creation/activation, group layout protection and advanced synchronization features require Pro or an active trial. Basic brightness synchronization in the Default Group has separate free availability; it does not make this custom-group workflow free. Set Screen as Main has no Pro gate of its own.
Platform compatibility
Shortcuts and the described group features are available on Apple silicon and Intel Macs, subject to the requested display connection and adjustment capabilities. Built-in automatic disconnection is an Apple-silicon feature; this workflow keeps the built-in display connected. Intel soft disconnection can dim the display rather than fully sleep it. The documented app requires macOS 26.3 or later. Native connection/layout actions do not require Screen Recording permission.