Sliders
Use the sliders to make a display more comfortable to look at, adjust its audio volume, or choose how much workspace fits on the screen. The main sliders cover brightness, contrast, volume and resolution. Each device has its own set, based on the control methods (called controllers) that are active for it.
Where to find it: App Menu > device. Brightness and Resolution normally appear in the first level of the device menu. Open more options for Volume; Contrast is hidden by default. In Settings > Menu, you can change these placements and choose whether labels, values and markers appear.
The display must be connected, and each adjustment needs an available controller. If a slider is missing, check whether its control is available and enabled, and whether Menu settings hide it.
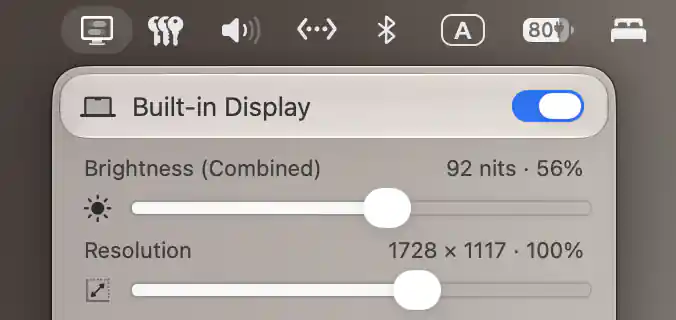
Built-in Display’s combined brightness slider reports nits and percentage above the resolution slider.
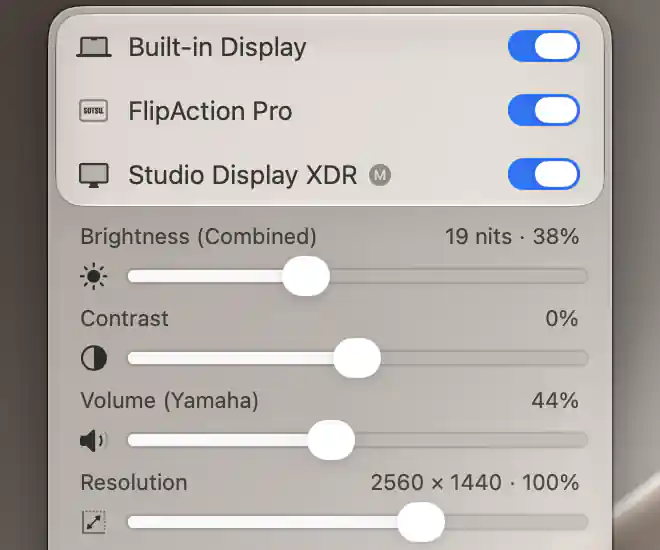
The primary sliders show combined brightness, software contrast, Yamaha volume and resolution.
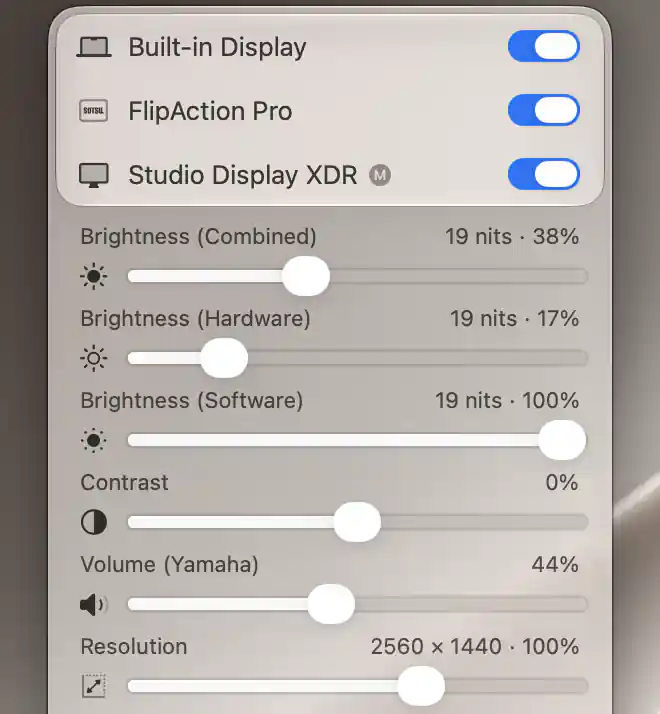
Separate hardware and software subsliders reveal how combined brightness is applied.
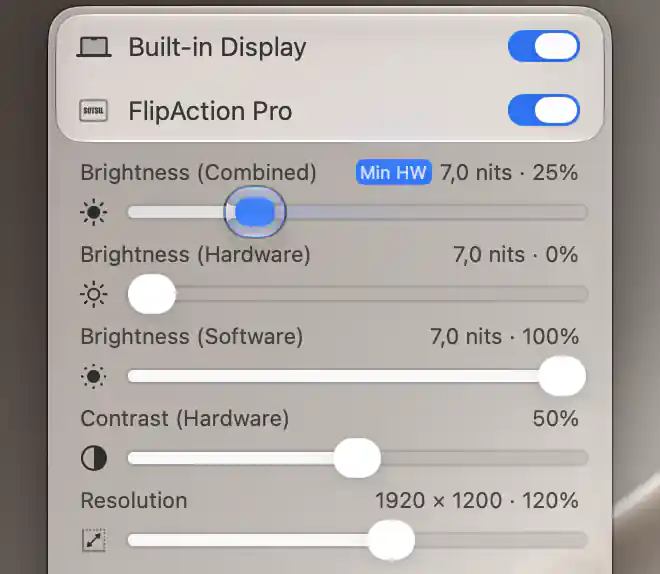
The Min HW marker identifies the boundary between hardware adjustment and software dimming.
Adjust a value
Drag the knob until you reach the value you want. Brightness, contrast and volume respond as you drag, so you can judge the result while making the adjustment. Resolution works a little differently: you choose a size first, then release the knob to apply it. None of these sliders needs an Apply button.
BetterDisplay remembers control values. What happens after reconnecting a display or restarting the app depends on the controller's restore and readback settings: it may reapply a saved value or refresh the value by reading the device. The number shown during an adjustment is the requested value; slow hardware may take time to respond, and some devices adjust only in fixed steps.
Small markers help you find useful positions, such as an unadjusted value or a boundary in the brightness range. As you move close to an interior marker, the knob snaps to it. Markers normally appear while you interact with the slider; Menu settings can keep them visible all the time.
Adjust with a scroll or swipe
Slider scrolling is off by default. Enable it in Menu settings if you would like to scroll or swipe over a brightness, contrast or volume slider instead of dragging its knob. The resolution slider does not accept scroll adjustments.
Brightness controllers can set a safety floor for scrolling to help prevent an accidental gesture from dimming the screen further toward black. Dragging still reaches the full configured range, so take care near its lowest end.
Brightness
Start with the main brightness slider when you want a brighter or dimmer image. Depending on the display, BetterDisplay can adjust a setting in the hardware, change the image through software, or bring both methods together in one slider. Understanding those three methods makes the labels and markers easier to read.
Hardware, software and combined brightness
Hardware brightness sends an adjustment through the display's selected hardware controller. The available range comes from that control and its configuration. For example, a monitor may reach the lowest setting its hardware brightness control can provide while still looking too bright for a dark room.
Software brightness changes the image. It can provide further dimming below that hardware limit. On a setup that supports brightness upscaling, it can also offer a range above the ordinary, unadjusted level. The Neutral marker identifies that unadjusted point on the software brightness scale.
Combined brightness brings hardware and software adjustment into a single range. You can move one knob through the available brightness levels while BetterDisplay coordinates the two parts. At the dim end, software dimming can continue where hardware dimming reaches its configured boundary. With supported upscaling, the range can extend at the bright end as well.
The markers show where those parts meet. Min HW marks the hardware-dimming boundary. Max HW, when present, marks the upper hardware boundary before the additional upscaling range. A slider labeled Brightness (Combined, Upscaling) includes that extended range.
You can enable separate hardware and software sub-sliders beneath combined brightness in Menu settings. They let you see and adjust the components of the same display's brightness. The available ranges and labels depend on the controller, brightness mode and calibration, so a brightness slider does not necessarily stop at 100%.
Read the value
A brightness percentage tells you where you are on that control's configured scale. It is useful for returning to a setting you liked, but 50% on one monitor does not establish the same luminance as 50% on another.
Optional nits readouts express brightness as luminance. To show them, enable both the menu preference and per-display reporting, and use a brightness control with available telemetry. Depending on the display setup, the nits value may be reported by the controller or derived from the configured brightness range.
Which brightness control appears?
When hardware brightness is allowed, the main slider prefers combined brightness, then hardware brightness. Otherwise it uses software brightness. This selection lets the main slider follow the methods available for the display without requiring you to choose a controller each time you adjust it.
Contrast and volume
Contrast and volume use the same dragging gesture as brightness, but adjust different parts of your setup. Their availability depends on the display's controllers, and Volume is normally found under more options.
Contrast
The contrast slider uses software contrast when you have explicitly preferred it and it is available. Otherwise, BetterDisplay chooses hardware contrast, falling back to software contrast when needed. Hardware and software contrast act at different stages of the image, so the same percentage can produce different results. Adjust while looking at the image rather than expecting a number to transfer unchanged between methods.
Volume and mute
The volume slider uses the volume controller associated with this display. That might control the monitor's audio or a matched native audio device. A controller-specific label can identify a network device, such as an LG or Yamaha device. The slider's presence means there is a control available; audio does not have to be playing through that device at the time.
When the controller supplies a mute control, click the volume icon to toggle mute. An icon without an associated toggle has no additional click action. Starting a volume adjustment clears the slider's mute toggle so you can resume adjusting the level.
While muted, the knob can appear at minimum while the app retains a previous volume for restoration. The display's Volume Control settings determine the exact mute, unmute and zero-volume method. This matters because some devices use a separate mute command, while others rely on changing the volume level.
Resolution and magnification
The Resolution slider helps you choose a balance between workspace and comfortable text size. A larger logical desktop gives windows more room, while a smaller logical desktop makes interface elements appear larger on the same display. If a display offers both 1920 × 1080 and 2560 × 1440 logical desktops, for example, the latter provides more room and generally makes the same interface elements smaller.
The width × height value describes that logical desktop size. It does not always count the pixels used to draw the image: HiDPI modes can render more pixels than the logical dimensions suggest. You are selecting a supported display mode from the slider's list.
For the rendering background and a practical comparison, see choosing a comfortable macOS scaling mode.
Choose a desktop size
Drag the knob to the size you want, then release it. BetterDisplay waits briefly before requesting the selected mode, applies layout protection and updates active picture-in-picture and stream views. This lets you choose a position without switching the display mode at every step of the drag.
Read resolution percentages and magnification
The slider can express your choice as a percentage as well as dimensions. In resolution-percentage mode, it compares the selected logical size with the display's default-size basis. A higher resolution percentage represents more desktop workspace relative to that basis.
Magnification presents the choice from the opposite direction: how large the interface appears. Enabling it reverses the slider direction, and its percentage uses the display's native-size basis. Moving toward greater magnification chooses a larger-looking interface and less logical workspace. App-managed virtual screens use a size derived from their available modes as the basis instead.
The label remains Resolution in either presentation. A magnifying-glass icon identifies magnification mode, and Menu settings can show the numeric dimensions alongside the percentage to help you relate the two.
Understand the choices and markers
The slider offers a compact selection for everyday size changes. It always keeps the current resolution. Alternatives are filtered to fit the current refresh rate and bit depth, a compatible HiDPI mode, your configured size limits and, normally, the display's native aspect ratio. A virtual display is not constrained by that same native-aspect-ratio filter.
Unsafe alternatives are excluded. By default, alternatives below 720 pixels in logical height are also excluded; the minimum-height and invalid-mode preferences can change which choices appear. For choices beyond this compact list, use the Display Mode menu. The slider itself is omitted for mirror targets and whenever fewer than two suitable resolutions remain.
Markers help you recognize familiar sizes. Current shows the active size while you drag, Default identifies the default size, and Native identifies a native-size choice. Numbered Favorite markers identify saved favorite sizes.
When more than one marker could describe a size, Favorite takes precedence if its size and HiDPI state match. Otherwise, Current takes precedence over Default, and Default over Native. Default and Native markers are not supplied for app-managed virtual screens.
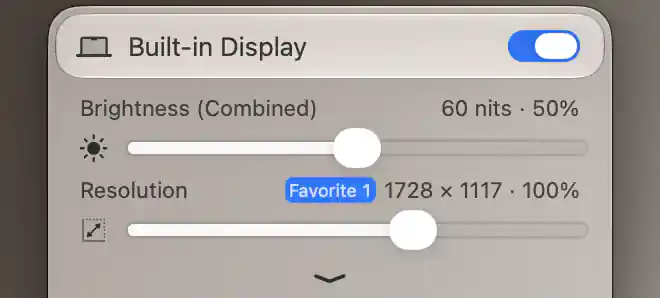
Resolution mode expresses the selected resolution as a percentage of the default size.
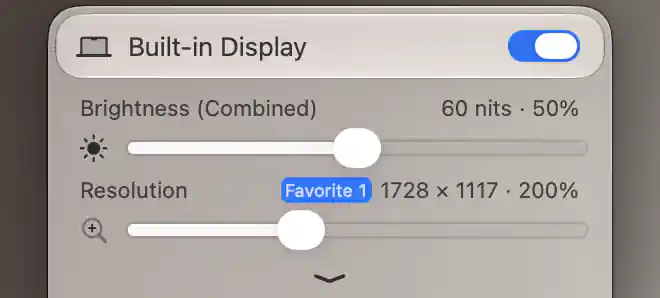
Magnification reverses the scale and expresses the size of interface elements relative to native resolution.
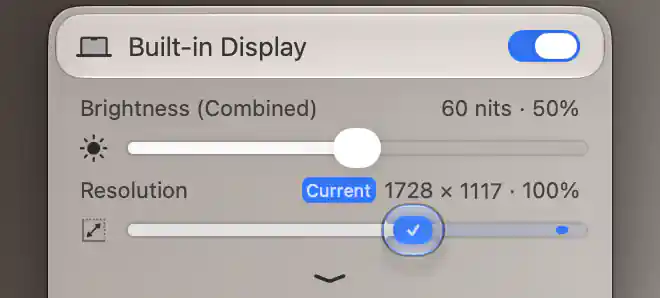
During a drag, Current identifies the resolution that was active when you started.
See App Menu for visibility and navigation, and Device header and connection for connected-state requirements.
Additional information
This section explains which features require Pro and how availability differs between Mac platforms.
Features requiring Pro license
- Brightness upscaling, including software HDR/XDR upscaling and Direct XDR Upscaling.
- Numbered resolution Favorite markers.
- Custom display groups and group synchronization of contrast, volume or separately selected hardware/software brightness controls. Basic Brightness synchronization in the default group remains available without Pro.
- Automatic UI scale matching and group layout protection during resolution changes.
Ordinary brightness, contrast, volume and resolution sliders remain available without Pro. A slider specifically marked with a Pro badge is disabled when Pro features are unavailable.
Platform compatibility
The ordinary brightness, contrast, volume and resolution sliders are available on both Apple silicon and Intel Macs when the display has a suitable control method.
- Software HDR/XDR brightness upscaling: the color-table method requires Apple silicon. On Intel Macs, displays using color-table brightness cannot use this upscaling; a compatible software-overlay setup is needed instead. Both platforms still need suitable HDR/XDR capabilities and an available upscaling range.
- Direct XDR Upscaling: requires a compatible built-in Apple XDR display with supported presets and direct brightness control. Processor type alone does not establish whether this feature is available.
Available controls and ranges vary by display and controller, even between Macs using the same processor family.