Fix an output-range mismatch and keep a working color mode
Match the Mac’s output range to the monitor’s input setting, compare supported color modes, then protect the format that works on the physical screen. This workflow helps separate a range mismatch from lost color detail or another image-quality problem before you make the choice persistent.
Before you begin
The main procedure needs an Apple-silicon Mac and a natively connected external monitor or TV with connection-mode information available. A DisplayLink, Sidecar or virtual screen is not a substitute for that connection. Intel Macs use the separately qualified software-EDID branch below.
Keep another usable screen or a known-working connection available. Save your work: changing a format or HDR state can briefly blank the display while it resynchronizes. Do not begin an experiment on your only usable screen without a practical way back to its known-working mode.
Have the monitor’s manual available for its input-range option. Its names and available choices vary by model and input; do not assume that a label such as “Low”, “High” or “Auto” means the same thing on every monitor. Prepare familiar desktop text, fine colored edges and tonal steps near black and white. Use the same content and viewing conditions throughout each comparison.
Record the starting configuration
- Open App Menu > [display] > Color Mode, usually under the display’s more-options chevron. Record the active row’s encoding, chroma sampling, range, connection bit depth and SDR/HDR tag. The star marks the system’s preferred format; it does not by itself identify the active format.
- Record the current resolution and refresh rate, including whether the rate is variable. For more detail, open Settings > Displays > [display] > Display Information… and inspect the current connection information. Keep the current report distinct from the preferred mode and from the framebuffer depth.
- Record the monitor’s selected input, picture mode and input-range setting. Also record the current brightness, contrast, software dimming or upscaling, color profile, Night Shift and True Tone. These can affect a visual comparison without changing the connection format.
- Open App Menu > [display] > Configuration Protection. Record both the enabled items and their displayed saved targets. Temporarily turn off only protections that would interfere with the test, including Color Mode, HDR Color Mode, and any relevant HDR Status, Refresh Rate or Resolution protection. Record and pause any applicable group actions that would reverse your test changes.
Record the original Show Mixed Modes and Allow Forced HDR switch states before changing them. Keep this record until you finish the undo steps. Selecting formats in BetterDisplay can update an existing color-mode protection target; turning a protection back on later saves the then-current format. A record of the switch positions alone is therefore insufficient.
Match range and compare supported formats
RGB and YCbCr describe different encodings. YCbCr 4:4:4 keeps full chroma detail; 4:2:2 and 4:2:0 reduce color-detail samples and can affect fine colored edges. RGB is a useful comparison when offered, but the encoding label alone does not diagnose faded colors. Range, sampling, bit depth and HDR are separate properties of the whole format.
- Start in the SDR or HDR state you normally use. Read the active row’s Full Range or Limited Range tag, then check the monitor’s manual and input menu. If its range is explicitly selectable, make it agree with the Mac’s actual output. If the monitor expects full range, you can instead choose an offered Full Range format. Recheck both ends after the change.
- Select an ordinary supported row in Color Mode. Keep resolution, rate, bit depth and SDR/HDR encoding the same where comparable choices allow it; change one property at a time. To investigate colored-edge detail, compare RGB and YCbCr 4:4:4 before attributing the difference to all YCbCr formats.
- Allow the picture to return and settle, then reopen the menu and verify which row is active. A selection applies immediately; there is no separate Apply step for this menu. Record the resulting format even if it differs from the one you requested.
- If the desired format is absent, record the current list, select an offered lower App Menu > [display] > Refresh Rate, then inspect Color Mode again. The list follows the current connection dimensions and rate. Higher rates and deeper formats can leave fewer combinations available through the signal path. Compare the complete resulting mode before deciding whether the tradeoff is worthwhile.
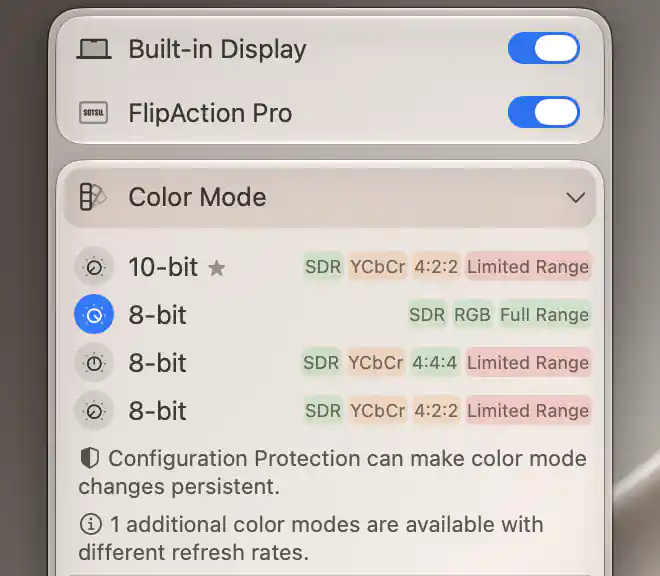
The active 8-bit SDR RGB Full Range format differs from the preferred 10-bit YCbCr row; 8-bit YCbCr 4:4:4 Limited Range is also offered at this timing.
Do not adjust brightness or contrast to hide a known range mismatch. Match the two ends first, then assess the picture. Full range sent to a receiver expecting limited range can lose dark or bright detail; limited range interpreted as full range can reduce apparent contrast. A correctly interpreted limited-range signal is not automatically faulty.
Check the result
Look at the physical monitor after each change. Check that near-black and near-white tonal steps remain distinguishable in appropriate test content, that familiar images have sensible contrast, and that fine colored text or edges retain detail. Compare against the starting configuration using the same content. A screenshot or a reported RGB Full Range row cannot show how the panel interprets the signal.
If you also use HDR, repeat the comparison separately in a regular HDR state using suitable HDR content and ordinary desktop content. Selecting a regular HDR row can enable HDR; selecting a regular SDR row can disable it. An HDR change may also reconfigure software brightness upscaling and, depending on the app setting, turn Night Shift and True Tone off or restore them. Account for those changes before judging the result.
Keep a format only when the reported state, the monitor’s range setting and the visible result agree. If matching the range makes no useful difference, you have not established a range-mismatch diagnosis; investigate the other causes below.
Protect the verified format
- With the verified non-HDR format active, open App Menu > [display] > Configuration Protection > Color Mode and turn it on. Check the saved format shown beneath the item.
- If you use HDR, enter its verified state, select and physically check its working format, then turn on Configuration Protection > HDR Color Mode. This saves a separate HDR-format preference. The inactive-state item can be disabled when it has no existing protection to remove.
- Return to your normal state and leave BetterDisplay running. During a subsequent normal wake or reconnection, inspect the active Color Mode and physical result again. Do not deliberately select a bad format as a protection test: an app-made selection can update the protected target.
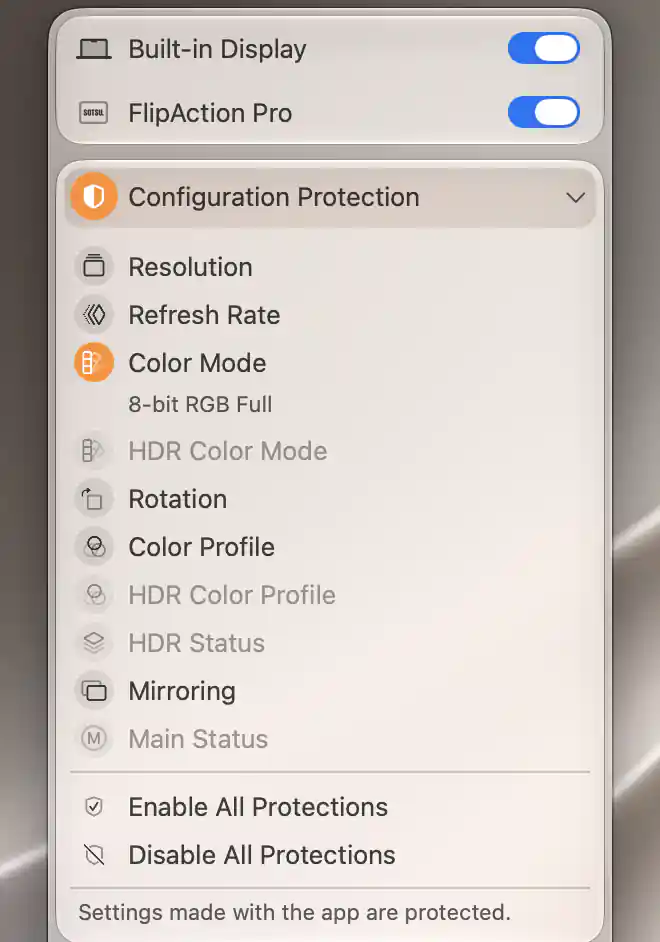
Protect the verified SDR format as 8-bit RGB Full; the separate HDR format and HDR-status targets stay off and disabled on this connection.
HDR Status protects whether HDR is on; HDR Color Mode protects the format used while HDR is active. They are independent. Enable only what your setup needs.
Configuration Protection attempts to restore a matching available format. It cannot supply RGB, bit depth, range or HDR combinations absent from the current connection, and its saved text is a preference rather than proof of the active output. A correction can briefly blank the screen. BetterDisplay must be running for this restoration; protection is not a persistent change to macOS’s default format that works with the app closed.
Advanced: Intel software-EDID branch
Intel Macs do not offer this Color Mode selector. For an eligible external display, a carefully prepared EDID derived from that display’s own data can be installed through its model-level system configuration. This changes capabilities macOS perceives, and can also remove HDR, resolution or refresh-rate choices. It does not guarantee RGB or a better physical result.
Use this branch only when you already have a reviewed binary for your exact display and a tested recovery screen. The app loads EDID data; it does not edit the individual capability fields for you. Do not copy another model’s blob or remove capabilities by following an old recipe without understanding the effect. Changes apply to every display with the same vendor and model identifiers.
- Record the original model settings, the Display EDID override switch, whether custom bytes are absent, and any existing custom binary. Export existing custom data privately through its loader before replacing it. Resolve unrelated pending system-configuration edits first: the shared Apply and Undo actions cover pending model changes, not just this EDID.
- Open Settings > Displays > [display] > System Configuration and Flexible Scaling. Enable Edit the system configuration of this display model if necessary, then Display EDID override > Load Custom EDID… > Load EDID Data…. Load the reviewed binary and inspect the decoded identity and any warning. Stop if the data cannot be interpreted or the identity is unexpected.
- Close the loader and use the shared Apply action. Complete helper or administrator authorization and check for errors. Loading or closing the sheet alone does not install the override. On Intel, save your work and restart the Mac to activate the installed configuration; the Apple-silicon Activate shortcut is unavailable.
- Check the offered resolution and rate, the monitor’s own signal information where available, and the physical tonal and colored-edge result. If required capabilities disappear or the picture is worse, restore the specific override using the undo steps below.
Use the loader reached through System Configuration and Flexible Scaling. Write EDID to Device is a different operation that alters device memory and is not part of this procedure. See Intel EDID overrides and the system-override loader for the owning references.
Troubleshooting
- Color Mode is missing: check for Apple silicon, a connected native display and available connection-mode information. Built-in panels can have a single fixed internal format. Intel’s Color Depth submenu, when available, changes framebuffer depth; it is not the same selector.
- The desired RGB/HDR/depth combination is missing: inspect the list at a supported lower rate and compare the actual connection path. A dock, adapter, cable, input or changed connection state may expose a different list. Protection cannot manufacture the missing mode. See switching from YCbCr to RGB.
- The format changes after wake: compare the active row against the saved SDR/HDR target and check that BetterDisplay is running. If the target is no longer offered, first restore the connection’s capabilities. See keeping a preferred color mode.
- The image is still faded with matching range: check the monitor’s picture processing, color profile, HDR state, software dimming/upscaling and system color features separately. Do not assume that selecting RGB diagnoses or repairs every color problem. See washed-out colors.
- A change produces unusable output: use the recovery screen to turn off the affected protection and return to the recorded ordinary mode, HDR state and rate. If protection keeps interfering, quit BetterDisplay and hold Shift while starting it to use Safe Mode. This suppresses protection enforcement; it does not uninstall an Intel system override. Restore that override through its model settings and Apply/restart path.
Undo the changes
- Turn off only color-mode protections added for this task. Keep relevant original protections paused while restoring the recorded connection, resolution, rate, SDR/HDR format and monitor input-range/picture settings. Turning a protection off removes its saved target; it does not restore the previous format.
- Restore each original protection deliberately. For a recorded SDR target, select that original format in SDR before enabling Color Mode; do the corresponding HDR step for HDR Color Mode. Restore any changed HDR Status, rate or resolution targets in their correct active state before enabling them. Check the displayed saved values rather than merely the switches. If an original target is unavailable, leave the affected protection off until the connection and target can be restored. If the original current mode differed from its saved target, selecting that different mode after enabling protection can replace the target again. Normal menu actions cannot preserve both values exactly in that case; keep the affected protection off and record the remaining restoration work.
- For an Intel override, restore the original custom binary if one existed, or use Delete Data in the system-override loader only when the stored data was originally absent. Restore Display EDID override to its original state. If you enabled model editing solely for this task and there were no other model edits, restore that master switch too; otherwise leave the unrelated overrides intact. Use Apply and restart to restore the installed configuration. Deleting bytes or turning a switch off alone does not remove its installed effect.
- Restore any changed brightness, software dimming/upscaling, HDR-related Night Shift/True Tone state, profile, Show Mixed Modes and Allow Forced HDR switches, and paused group actions, then check the physical result. Do not use Disable All Protections, a broad preference reset or removal of all model overrides to undo one format experiment.
Related pages
- Color Mode — supported formats and conditional advanced choices.
- Configuration Protection — saved targets and automatic restoration.
- Why does my external monitor look washed out?
- Use HiDPI and a high refresh rate together — compare complete modes when bandwidth choices interact.
- Display EDID — stored data, software application and separate device-writing actions.
Additional information
This section explains the license and platform requirements for the procedures above.
Features requiring Pro license
Configuration Protection, Intel Display EDID override, and color-mode selections whose SDR/HDR encoding differs from the current connection require Pro. This includes switching between distinct HDR encodings. The row’s Pro badge identifies that requirement. Ordinary choices retaining the same SDR/HDR encoding have no separate Pro requirement. Display Information and the basic recording/comparison steps do not require Pro.
Platform compatibility
Color Mode selection and SDR/HDR color-mode protection require Apple silicon and supported connection information. The software-EDID branch described here is for eligible external displays on Intel and requires helper/admin authorization, Apply and restart. Neither architecture guarantees a particular display format or physical result. The documented app build requires macOS 26.3 or later.