Find a sharp HiDPI setup without sacrificing more refresh rate than necessary
Find a comfortable HiDPI desktop and the highest refresh rate that works reliably with it. Compare complete display modes, then check what the Mac actually renders and sends to the monitor; a higher rate is useful only if it keeps the desktop size and clarity you want.
Before you begin
Use a natively connected display through HDMI, DisplayPort or USB-C. Start with a working picture and a cable, adapter or dock suitable for the intended output. A DisplayLink desktop or a virtual screen has a different presentation path; its mode list does not establish the physical monitor's timing.
If you have not yet enabled the desktop sizes you need, follow Set up a fully scalable HiDPI desktop first and finish its Apply and activation steps. This tutorial compares the resulting modes; it does not require further model overrides. Selecting an existing mode needs no administrator helper or Screen Recording permission.
Save your work, keep another usable Mac screen available for unfamiliar combinations, and record a complete mode that returns this monitor to a working picture. Do not rely on an automatic confirmation countdown: BetterDisplay requests mode changes directly. Start with the current extended desktop rather than a mirror target.
Record a working baseline
- Open Settings > Displays > [display] > Display Information…. Record the current connection, other connected displays and their modes, and whether HDR is on. Use Export Display Information… if you want a comparison record; reports can contain device identifiers, so review them before sharing.
- Under Current Display Mode, record Logical width, Logical height, HiDPI, Pixel width, Pixel height, Bits per sample and Refresh string. The logical dimensions describe desktop space; the pixel dimensions describe the backing image rendered for that mode.
- When present, record Dimensions, Refresh Rate, Bit Depth and HDR/SDR Mode under Current Display Mode (Connection Level). These describe the physical output. Also inspect Link Information and Capabilities; the latter can include Horizontal GPU resolution limit and Allocation limits - horizontal/Allocation limits - vertical. Missing rows mean the system did not supply that information.
- Open App Menu > [display] > Configuration Protection and record every enabled protection and its saved value, especially Resolution, Refresh Rate, HDR Status, Color Mode and HDR Color Mode. A protected target can differ from the current picture. Temporarily turn off only those protections that would interfere with your comparison, keeping their targets for restoration.
- Review applicable groups in Settings > Groups. UI scale matching can change other displays during a mode change, while layout protection can reposition them. Record group states and arrangement before temporarily pausing an interfering feature. Range-slider synchronization is a separate feature; use Display Mode to compare complete modes.
For example, a 3008 × 1692 HiDPI desktop normally renders at 6016 × 3384, then scales to a 3840 × 2160 output on a 4K monitor. The cable carries the output image, but the Mac must also render the larger desktop. See how desktop, rendering and output resolutions differ.
Compare complete HiDPI modes
- Open App Menu > [display] > Display Mode, using the more-options chevron if needed, then select Filter…. The default filter follows the current rate, aspect ratio and bit depth, so a short list does not prove other combinations are absent.
- Select the HiDPI filter and a rate you want to compare, keeping the same aspect ratio and bit depth initially. An ordinary filter click replaces the other choices of that type; hold Option while clicking another rate tag to include both. Release Option before selecting a mode. Leave Show All off: it also reveals unsafe or invalid modes.
- Select a listed HiDPI mode at a comfortable desktop size and a known-working rate. The sparkle symbol marks HiDPI rows; each row also shows its rate and bit depth. Selecting a mode requests the change without Apply; wait for the picture and layout to settle. Reopen Display Information after the change to get a fresh report.
- Try the same logical size at another listed rate, then check HiDPI: Yes, backing pixels and connection timing again. If only a LoDPI variant exists at that rate, choosing identical width and height still changes the rendering method. A high rate elsewhere in the list does not mean every desktop size can use it.
- If the preferred combination is absent or unreliable, compare a slightly smaller HiDPI desktop at the desired rate, or keep the size and try a lower rate. Return to the last working complete mode between comparisons. Note the size, HiDPI state, rate, bit depth, HDR state and connection for each successful combination.
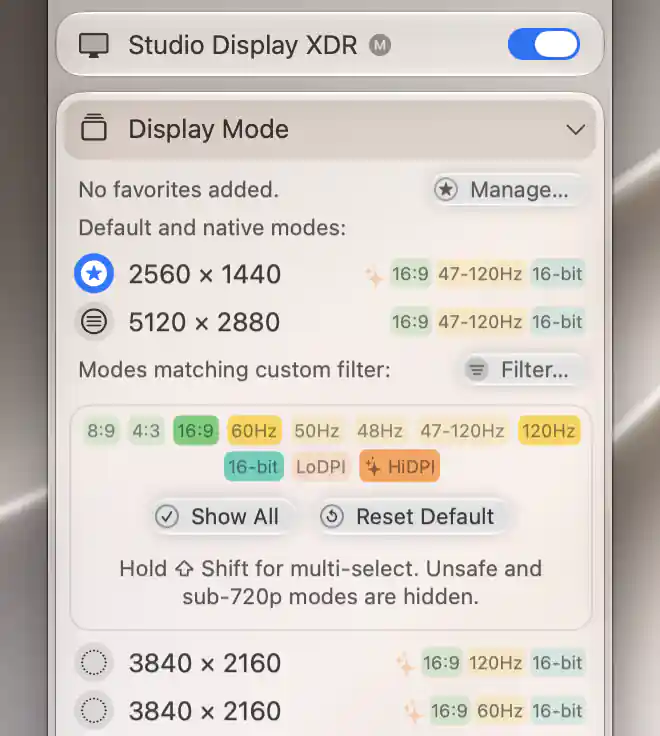
Filter HiDPI modes to 16:9 with both 60 and 120 Hz selected; the offered example rows use 16-bit framebuffer modes.
Compare HDR and the connection separately
- If ordinary HDR is available, compare the same working desktop with App Menu > [display] > Enable HDR Mode off and on. Reopen Display Mode and Display Information after each change: HDR availability and timing can change together. Record the original HDR state, Night Shift and True Tone first; the app can temporarily disable the latter two when entering HDR. Restore the original state after this comparison.
- On Apple silicon, inspect App Menu > [display] > Color Mode if a rate or HDR choice differs. Its connection color mode, bit depth, encoding and chroma subsampling can affect the available choices. Keep the original color mode for the first comparison; a lower-bandwidth format can also affect text or colors. Use ordinary SDR/HDR choices; do not enable or select forced or mixed modes for this comparison. If your current setup depends on either, skip this comparison until you have a known-working ordinary baseline and a record of the original settings.
- If a dock is involved, return to the working baseline, then compare a suitable direct Mac-to-monitor connection with the same other displays connected. Record the modes offered and actual output again. Reconnect the original path afterward. Changing the path may change several capabilities, so it identifies a connection difference rather than proving a particular cause.
- If connecting another display removes the desired rate, compare with that additional display temporarily disconnected, then reconnect it and repeat the check. Keep a usable recovery screen and any needed keyboard or power connection. Restore the original arrangement and compare in the setup you intend to use every day.
Link bandwidth limits the signal carried by the connection; rendering and allocation limits constrain the desktop the Mac can produce. A better cable cannot remove a rendering limit. Display Stream Compression (DSC) can reduce transport bandwidth when supported and active, but its availability does not guarantee a larger HiDPI desktop. VESA describes DSC's transport role, and Apple explains cable, adapter and display-count limitations.
Try additional connection rates only if needed
This optional Apple-silicon path can sometimes keep a working HiDPI desktop at a rate the ordinary mode list does not expose. It does not create a missing desktop size, and an offered connection rate can still produce a blank, green or distorted picture. Keep the recovery screen and recorded return mode ready; skip this experiment if you cannot safely restore them.
- Select the desired HiDPI desktop at a working lower rate first, with ordinary HDR and color settings. Confirm that the size actually works before continuing.
- Open App Menu > [display] > Refresh Rate normally. If available, extra connection-level choices appear in a separate group with waveform icons. This submenu itself is conditional on alternative rates at the current desktop mode; absence of the submenu or extra group is a reason to use the ordinary mode comparison.
- Try one offered waveform-marked rate. Fractional values such as 119.88Hz can differ from 120Hz; use only a value actually offered by your connection. Reopen the report and check both the retained HiDPI desktop and Current Display Mode (Connection Level) > Refresh Rate. The ordinary desktop-mode rate can differ from the connection rate after this operation.
- If the picture, size or colors are wrong, return to the recorded complete mode and ordinary HDR/color settings from the recovery screen. A selected menu item alone is not success. If it works, continue with the checks below before considering protection; another mode change may discard the extra rate.
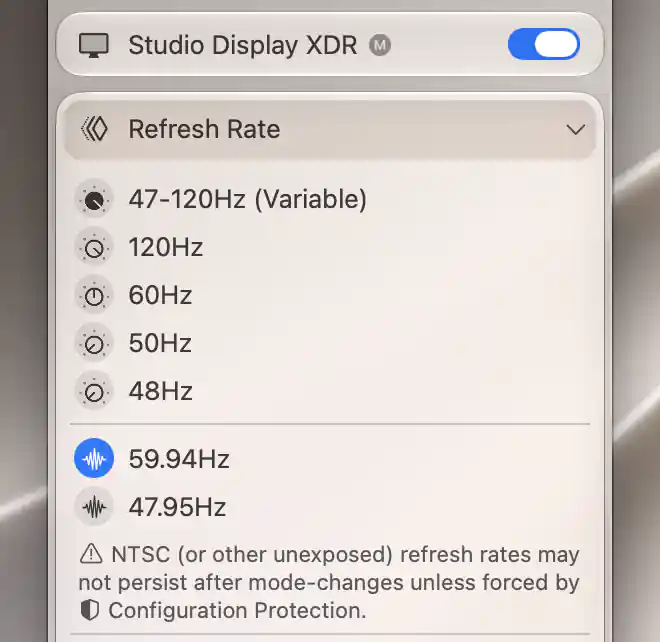
Select the offered 59.94 Hz waveform rate; the native warning explains that unexposed rates may not persist after mode changes without Configuration Protection.
Check the result
- Reopen Display Information and confirm the intended logical size, HiDPI: Yes and backing dimensions. On connections exposing the data, verify the intended physical output dimensions, rate and HDR/SDR format too. Compare the monitor's own signal-information page if it has one.
- Read normal text and scroll a document at your usual viewing distance. Check for blur, incorrect colors, stretching, flicker or blackouts. A larger rendered desktop on the same panel is not guaranteed to look sharper than a mode with direct pixel mapping.
- Test with all the displays and the connection path you plan to keep. Then save work and test sleep/wake and a normal reconnect. Success before reconnect does not establish that the combination survives it.
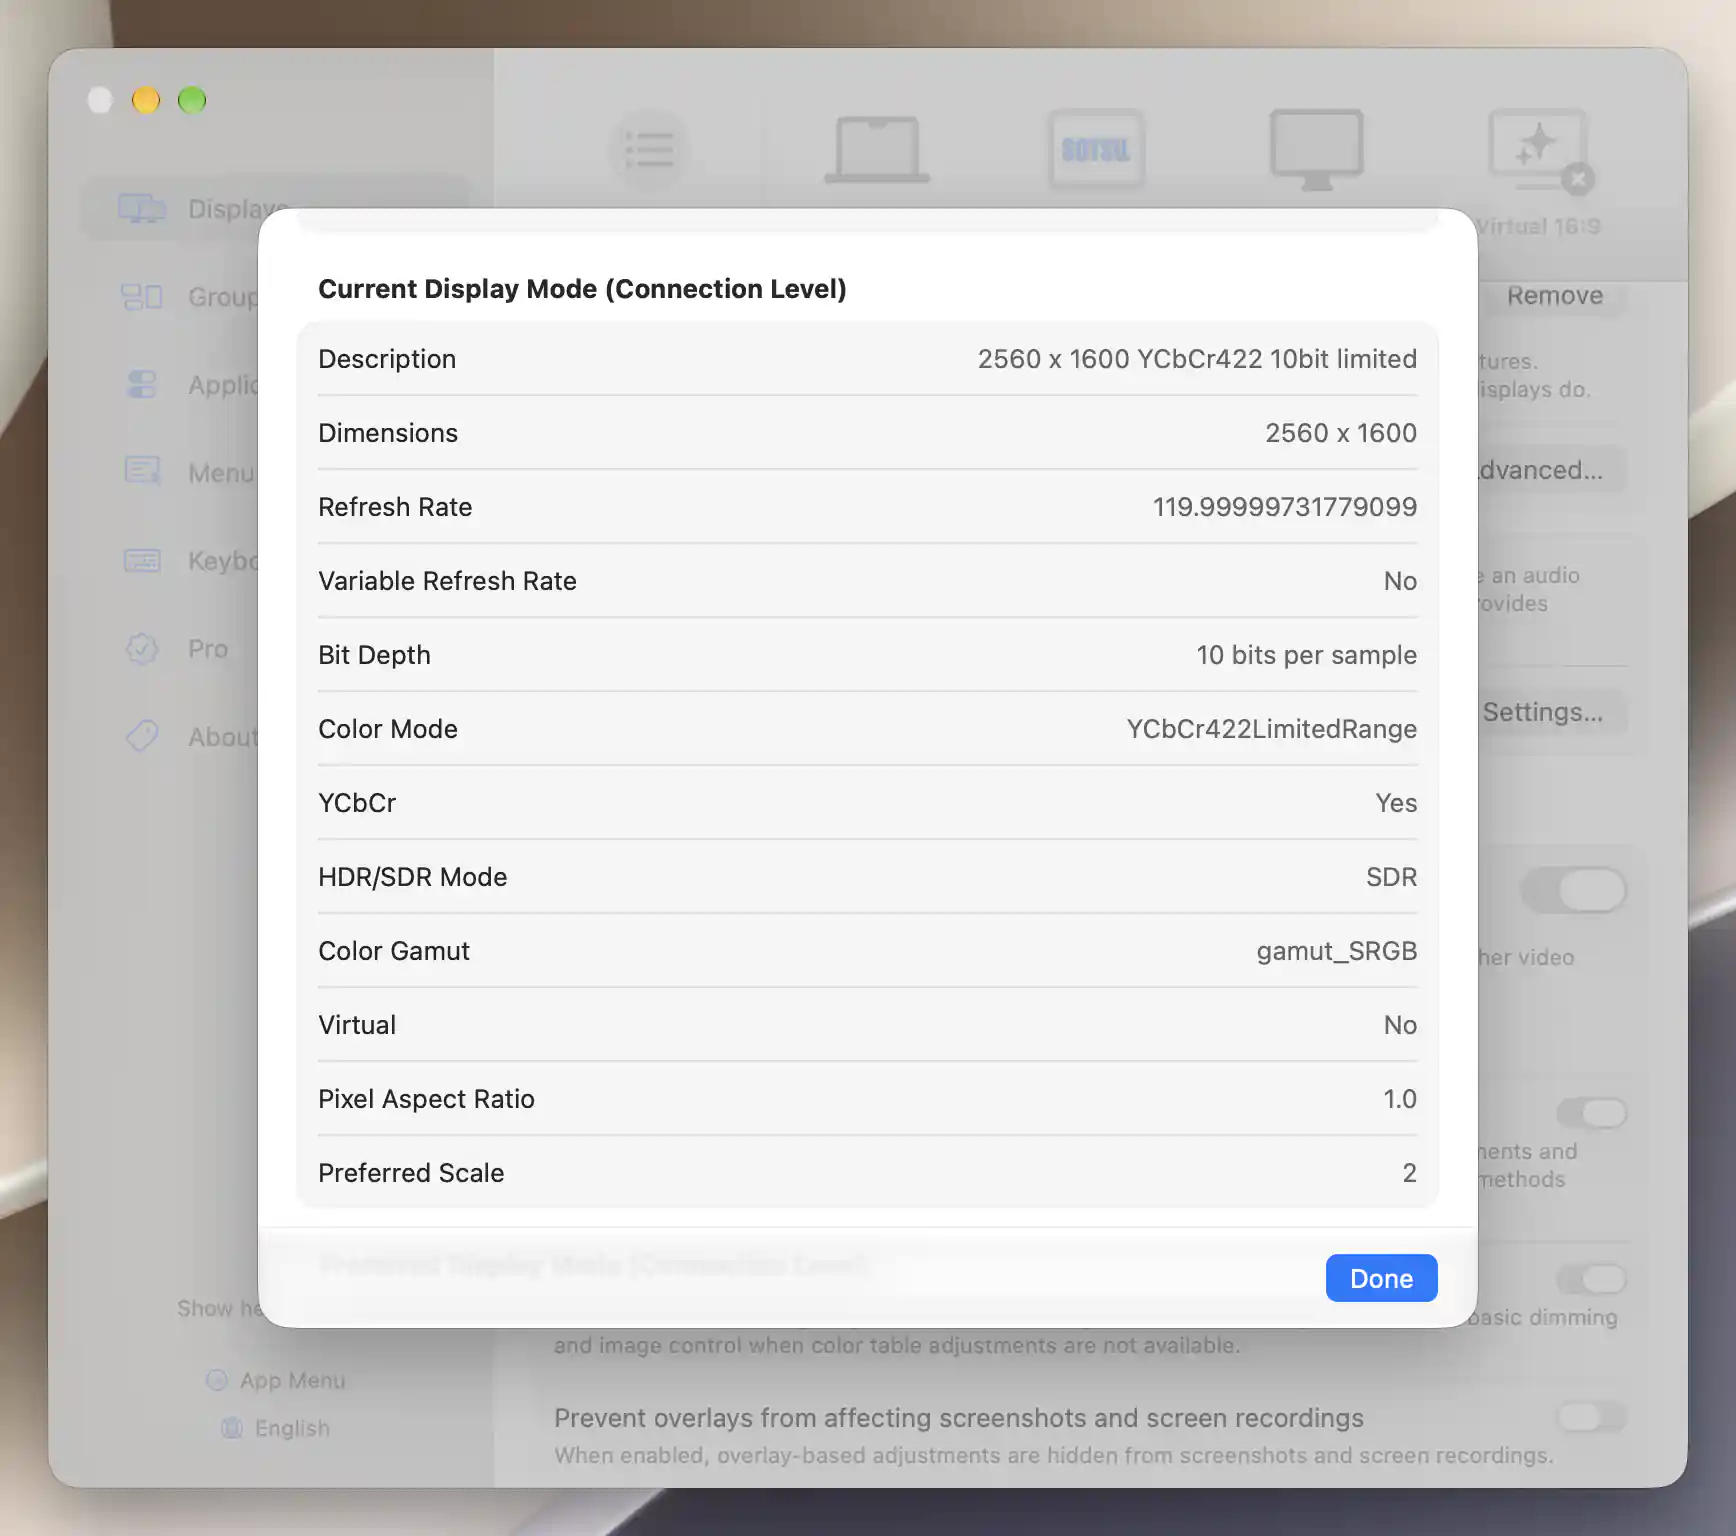
Check the connection separately from the HiDPI desktop: this display reports 2560 × 1600 at about 120 Hz, 10-bit limited-range YCbCr 4:2:2, and SDR.
For a timing cross-check, hold Option while opening Refresh Rate to show Measured refresh rate:, Reported actual refresh rate: and Reported nominal refresh rate:. Option also broadens the ordinary list, so use it here to inspect rather than choose new modes. These readings observe software timing; they do not measure the panel or guarantee application frame rates.
Protect only the tested settings
Once the combination works, open Configuration Protection and enable only what you need: Resolution for desktop size/HiDPI, Refresh Rate for timing, and optionally HDR Status and the relevant Color Mode or HDR Color Mode. Check every saved value. Configuration Protection starts off and does not make an unsupported mode valid.
BetterDisplay mode changes update existing resolution/rate protection targets; connection color-mode changes can update existing SDR/HDR color targets. Retest after enabling protection, and remember that a later manual change can become the new protected choice. Do not use Enable All Protections simply to retain one rate.
Troubleshooting
The same dimensions become blurry at a higher rate
Check HiDPI and backing pixels, not dimensions alone. The higher-rate row may be LoDPI. Select the last working HiDPI mode, then try a smaller HiDPI desktop or lower rate. See HiDPI refresh-rate limits and resolutions available only in LoDPI.
HDR or the desired rate is missing
Check the filters first, then compare ordinary SDR and HDR at a smaller desktop or lower rate. Missing choices are not evidence that every rate/size/HDR combination should exist. See HDR and HiDPI mode limits. Forced HDR is a separate compatibility experiment, with its own risk of corrupted or blank output.
The rate changes when another display connects or after wake
Repeat the report comparison in the complete daily setup. Check your exact Mac model's MacBook Pro or Mac mini display-support combinations; physical output specifications do not promise every scaled HiDPI desktop. If protection is active, inspect its saved rate and follow refresh-rate protection troubleshooting. Protection cannot restore a mode that the new connection no longer offers.
The report lacks connection data or other screens change
Connection-level modes require Apple silicon and a native physical display. Use ordinary mode information on Intel; do not substitute Preferred Display Mode (Connection Level) for the current output. If another screen's desktop size or position changed, review the recorded group scale-matching and layout settings before repeating the test.
Undo the comparisons and restore your setup
- From a usable screen, turn off only protections added for this experiment, and temporarily pause relevant pre-existing protections before restoring modes. Restore the recorded connection path, attached displays and display arrangement.
- Select the original complete Display Mode, including its HiDPI/LoDPI state and rate. Restore the original HDR state and, where applicable, original SDR and HDR color modes. Reopen Display Information to confirm the return; check Night Shift and True Tone as well if you tested HDR.
- Restore the recorded protection targets and enabled states, rather than protecting the last test. To recreate a target through the menu, select its recorded working state before enabling its corresponding protection and verify the saved value. Selecting that target changes the current picture, and the restored protection can enforce it again. If the original targets differed from the active baseline, restore and verify the intended targets explicitly; do not assume one click recreates that earlier configuration. Keep a protection off if its original target is no longer available.
- Restore group scale-matching/layout switches and the original arrangement. Restore any filter choices you changed; Reset Default resets only Display Mode's filter presentation, so use it only if the original filter was default. It does not restore the display mode, HDR state or protections.
If you separately enabled flexible scaling for this task, follow that tutorial's undo steps to restore only the changed model settings and complete Apply/activation. Do not remove unrelated overrides or reset all app preferences to undo a mode comparison.
Related pages
- Set up a fully scalable HiDPI desktop
- Display Mode, Refresh Rate and Color Mode
- Display Information
- Configuration Protection
- Why does choosing a HiDPI desktop reduce the available refresh rate?
- Why is my preferred resolution available only in LoDPI?
- Why does HDR disappear at some HiDPI resolutions or refresh rates?
Additional information
This section explains feature access and platform requirements for the comparisons above.
Features requiring Pro license
Flexible scaling, Configuration Protection, group UI scale matching/layout protection, and BetterDisplay's HDR switch require Pro or an active trial. Color Mode choices that change the HDR/SDR format also require Pro. Choosing existing ordinary modes and refresh rates, additional connection rates when available, filtering, Display Information and the refresh-rate reporter do not themselves require Pro.
Platform compatibility
Use BetterDisplay on macOS 26.3 or later. Ordinary mode/rate selection and reporting work on Apple silicon and Intel. Connection-level reporting, Color Mode and additional direct connection rates require Apple silicon, a connected native physical display and modes exposed by that connection. HDR and variable refresh remain capability-dependent; this tutorial establishes no universal maximum by chip generation, port type or monitor specification.