Create one-key Work and Evening display presets
Create named Work, Evening and Restore shortcuts that apply explicit display modes, brightness and color-temperature values to two monitors. Assign a key combination to each, and you can move between a roomy work desktop and a dimmer, warmer evening setup without adjusting every display separately.
A preset is a sequence of instructions you choose. It does not take a snapshot of every BetterDisplay setting or remember what was active before you ran it. Build Restore first, using your own normal settings, so you have a tested way back.
Before you begin
- Keep BetterDisplay running and both displays connected as an extended desktop, with a separate desktop area on each monitor. This example calls them Desk Display and Side Display; select your actual displays in every action. You do not need to rename them.
- Use macOS Shortcuts on the same Mac. Search its action list for BetterDisplay. The current app requires macOS 26.3 or later; older Shortcuts recipes may describe earlier app releases.
- Check that brightness works from each display's App Menu and that App Menu > display > Image Adjustments offers Color Temperature. Availability depends on the active controller. Hardware brightness through DDC needs a compatible monitor and connection; software dimming can be an alternative.
- If software adjustments are disabled, review Settings > display > Image Adjustments > Enable software-based video adjustments and the processing-method settings. Record any setting you change. Leave Suspend Image Adjustments off while testing these presets, and record its original state. The full warmer-evening recipe needs Pro or an active Pro trial for Color Temperature; the availability section explains the simpler free variant.
If a display lacks Color Temperature, omit its temperature action from all three shortcuts. If you only want brightness presets, omit both mode actions too and leave the desktop configuration unchanged. You can similarly keep just the mode actions if brightness is unavailable. The main example below assumes all three adjustments are available.
These actions do not need a shell script, CLI access or Screen Recording permission. If Shortcuts asks permission to use an action, review and allow the intended request. Keep any existing system color effects, including Night Shift, consistent while choosing the example values.
Record your normal setup
- Open App Menu > display > Display Mode for each monitor. Record its current resolution, HiDPI or LoDPI scaling, refresh rate and color depth. Choose your Work and Evening modes from complete combinations actually available for that display. Separate lists of resolutions and refresh rates do not mean every combination is supported.
- For this ordinary-brightness example, start from normal brightness values within 0–100%. Record each monitor's normal brightness, the brightness method and whether Brightness Upscaling is active. Record Color Temperature from Image Adjustments. For a normalized value suitable for a shortcut, you can run a temporary Get Image Adjustment Value action with Feature set to Color Temperature; its result uses a scale from
0to1. - Review Settings > Groups > group > Synchronization Settings. Synchronization can make a change on one display adjust another, including a display outside this pair. For independent values, record and temporarily turn off the applicable Synchronize [control] entries in every active group affecting these displays. Keep those entries off while using independent presets.
- Record the enabled items and saved targets under App Menu > display > Configuration Protection, and any active group Layout Protection or UI Scale Matching. Keep applicable group rules active only if both presets agree with their intended modes and layout. Otherwise, record and temporarily turn off Enable layout protection or Enable UI scale matching in the corresponding Layout Protection or UI Scale Matching settings; keep the group itself active. A mode change can update an existing protected resolution or refresh-rate target; group rules can also affect other displays or their arrangement. Restore those policies separately when you finish.
Here is a worked example for two displays that offer the listed modes. Use your recorded choices if these combinations are absent. The smaller Evening desktop makes text larger; the reduced brightness and warmer tint are separate adjustments.
| Shortcut | Desk Display | Side Display |
|---|---|---|
| Restore — example normal setup | 2560x1440, HiDPI, 60 Hz, 8-bit; brightness 55%; temperature 50% | 1920x1080, HiDPI, 60 Hz, 8-bit; brightness 45%; temperature 50% |
| Work | 2560x1440, HiDPI, 60 Hz, 8-bit; brightness 60%; temperature 50% | 1920x1080, HiDPI, 60 Hz, 8-bit; brightness 50%; temperature 50% |
| Evening | 1920x1080, HiDPI, 60 Hz, 8-bit; brightness 25%; temperature 65% | 1600x900, HiDPI, 60 Hz, 8-bit; brightness 20%; temperature 65% |
The brightness entries above use Range includes software brightness upscaling turned off. The temperature entries are Shortcuts values, not the percentages shown in BetterDisplay's menu.
Understand the two percentage scales
Set Brightness accepts 0 to 1 (0–100%). Its Range includes software brightness upscaling option starts on. When on, the action maps that range across the selected brightness control's entire current span, including an available upscaling region. With a brightness span of 0 to 2, for example, 60% requests 1.2; with the option off, it requests 0.6. The checkbox changes value interpretation; it does not enable upscaling. If your normal setup deliberately uses values above 100%, adapt Restore separately: keep the option on there and enter the fraction of the full brightness span that reproduces your recorded normal value (for example, 120% in a 0–200% span becomes 60% in Shortcuts). Test that Restore action before changing the setup.
For the table’s ordinary-brightness setup, turn that option off in every brightness action. This makes 60% request the ordinary value 0.6 rather than 60% of an expanded span. Keep the brightness method, range settings and HDR state consistent: BetterDisplay chooses the appropriate brightness control, which can change with configuration. A percentage is not a measured luminance, and equal percentages need not look equally bright on different monitors.
Image Adjustment always maps 0–100% onto its feature's range. For Color Temperature, 50% (0.5) is neutral and appears as 0% in BetterDisplay's menu. The example's 65% (0.65) is a modest warm adjustment and appears as 30% there; it is not 65% warmth or a temperature in kelvin. To convert a normal menu value to the shortcut percentage, use 50 + menu percentage / 2. For example, menu −20% becomes Shortcuts 40%.
Build and test Restore first
- In Shortcuts, click the toolbar's Add button and name the shortcut Restore. Search the action list for BetterDisplay; double-click actions to add them, or drag them into order. Apple's custom-shortcut instructions explain the editor.
- Add Display Mode for Desk Display, then another for Side Display. Set Resolution, Scaling, Refresh Rate and Color Depth to each display's recorded normal combination. Choose actual listed values. Unspecified leaves a component out of the request; it does not restore a saved normal value.
- Add Set Brightness for Desk Display, then Side Display. For the table’s ordinary-brightness setup, turn Range includes software brightness upscaling off in both actions. If your recorded normal brightness exceeds 100%, use the separate full-span Restore mapping explained above instead. Enter your normal values; the example uses 55% (
0.55) and 45% (0.45). - Add Image Adjustment for Desk Display, then Side Display. Set Feature to Color Temperature and Value to your recorded normalized value. The example uses 50% (
0.5) for both. Use the normalized or percentage presentation offered by your editor. - Check all six display selections. Run Restore from the editor, wait for the displays to settle, then compare each mode, brightness and temperature with your notes. Test again after a small reversible brightness or temperature change; Restore should recover the recorded values. Do this before building the other presets.
Putting mode actions first expresses the intended dependency: choose the desktop configuration before applying its appearance. BetterDisplay queues mode changes, so an action can return before the display finishes changing. If brightness or temperature does not survive a mode transition, insert Shortcuts' Wait action after the mode actions, start with two seconds and test a longer interval if your displays need it. A fixed delay is a practical timing adjustment, not confirmation that the hardware has completed a change.
Create Work and Evening
- Return to All Shortcuts, select Restore and choose Edit > Duplicate. Name the copy Work.
- Keep the two explicit display targets and the six-action order. Set each Display Mode action to its Work combination, brightness to 60% (
0.6) and 50% (0.5), and both temperature values to 50% (0.5). Keep both brightness-range options off. - Run Work and inspect both displays. If you substituted modes or brightness values, write down the final choices so the shortcut and your notes agree.
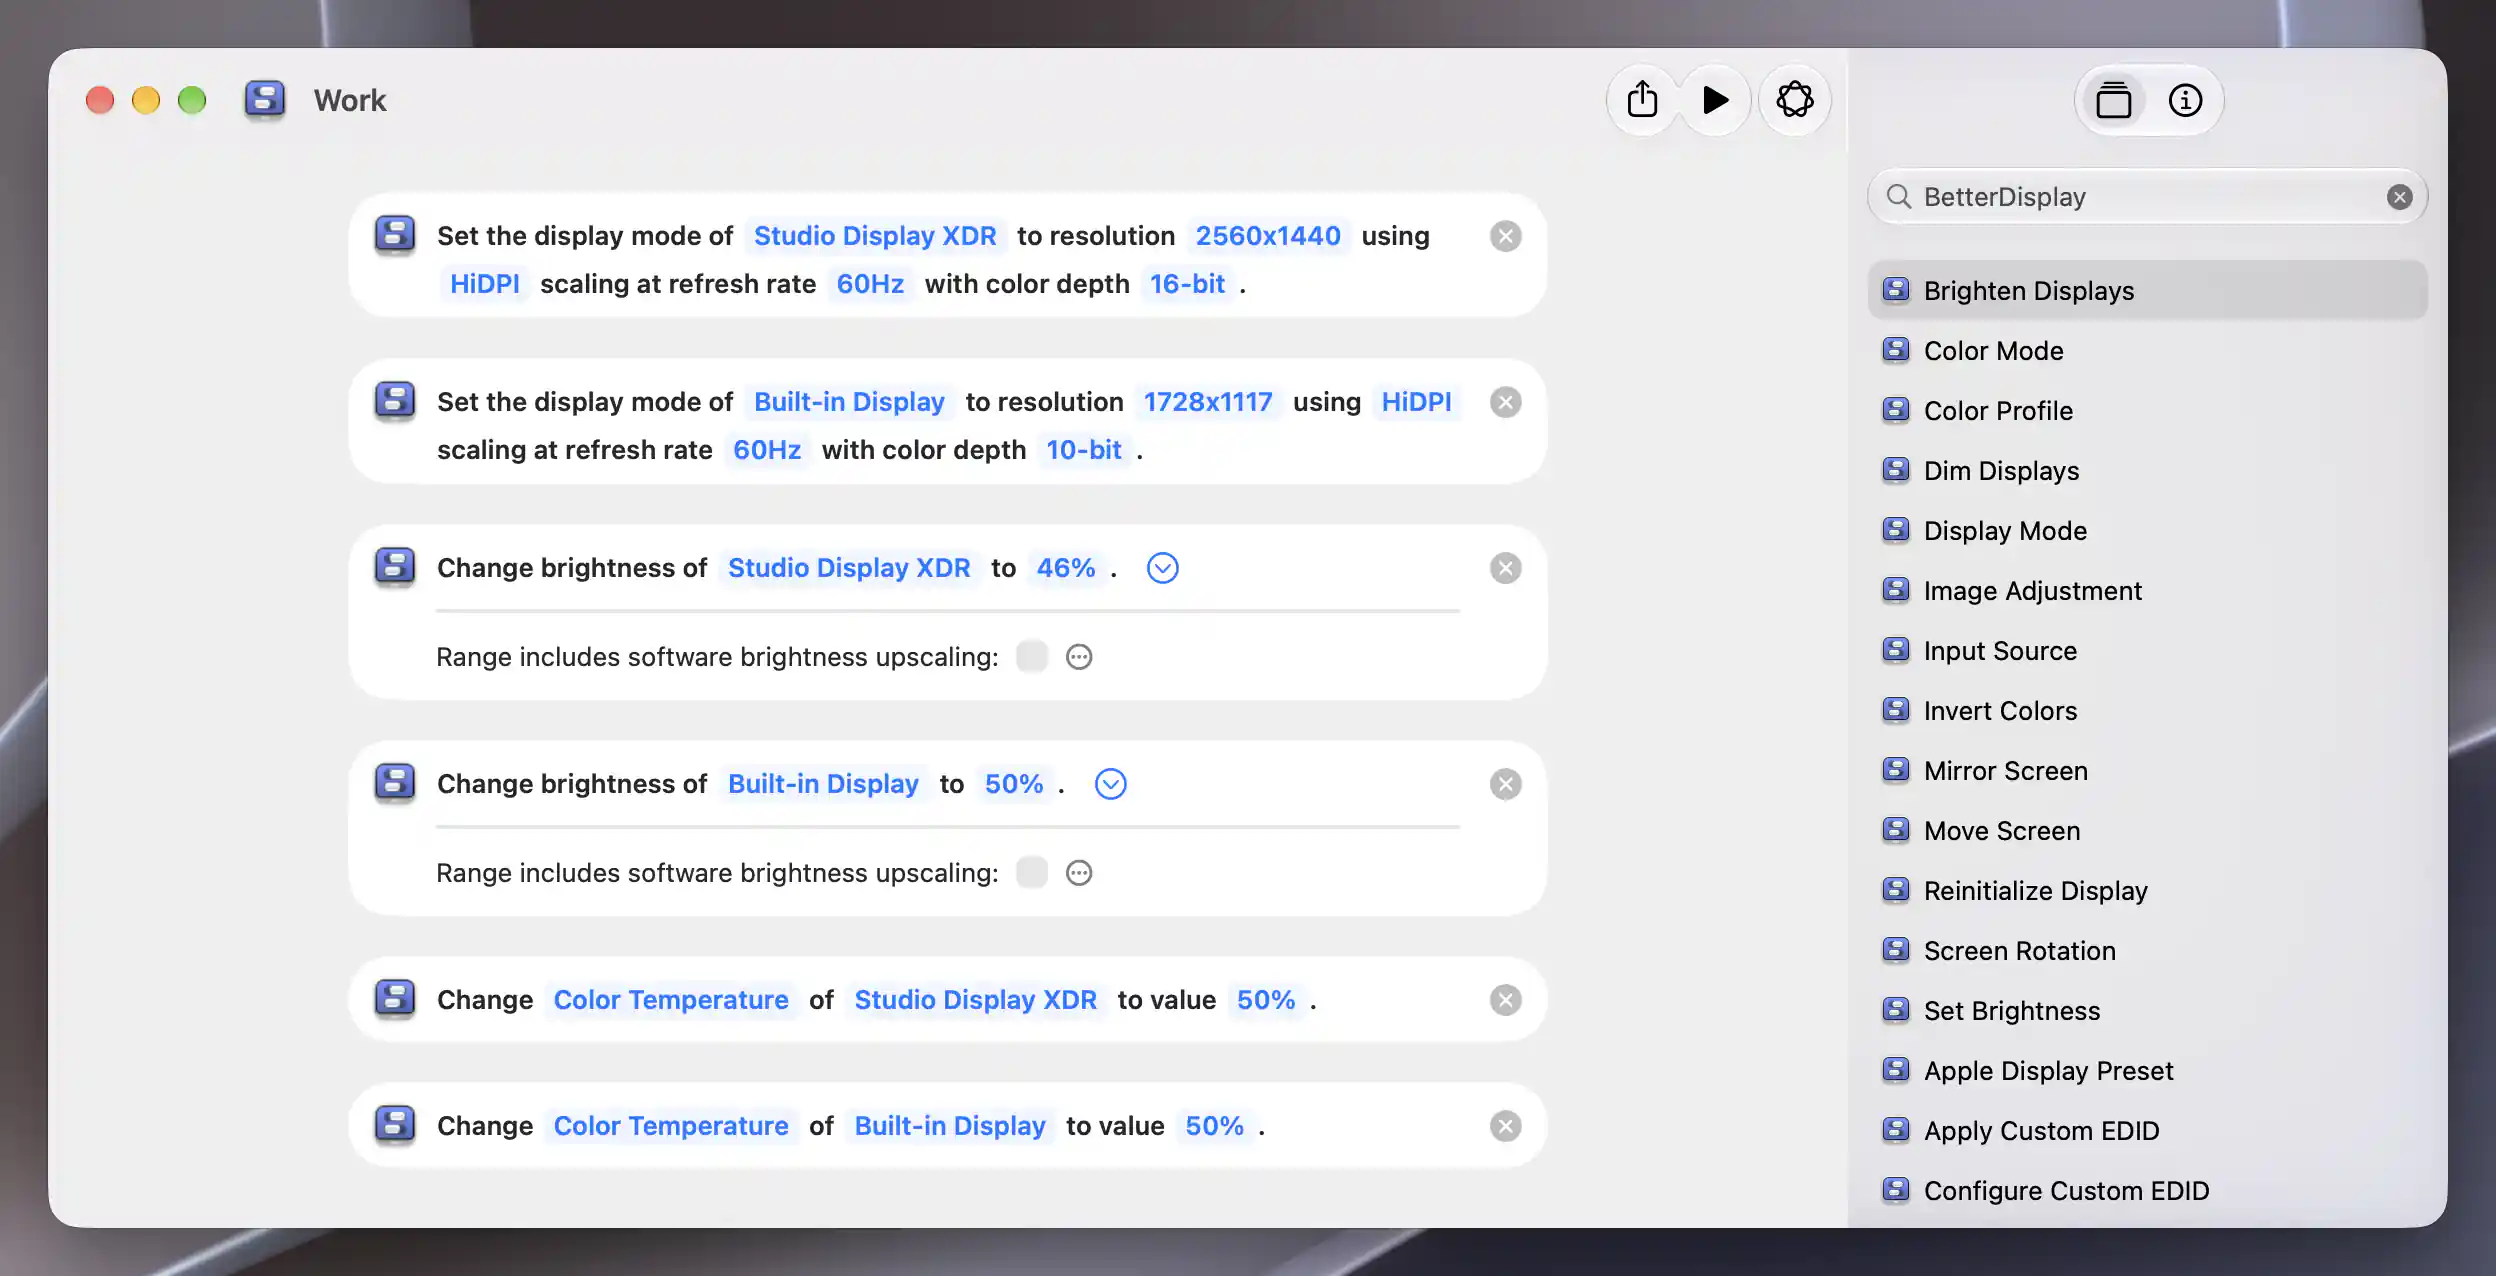
Work stores a chosen mode, brightness and neutral color temperature for each display.
- Duplicate Work and name the copy Evening. Set its mode actions to the Evening combinations; use brightness 25% (
0.25) for Desk Display and 20% (0.2) for Side Display. Set both Color Temperature values to 65% (0.65). - Run Evening and check that both displays are dimmer and warmer, with the chosen larger-text desktops. Adjust these example brightness and warmth values to suit your room, then keep the resulting values explicit in each action.
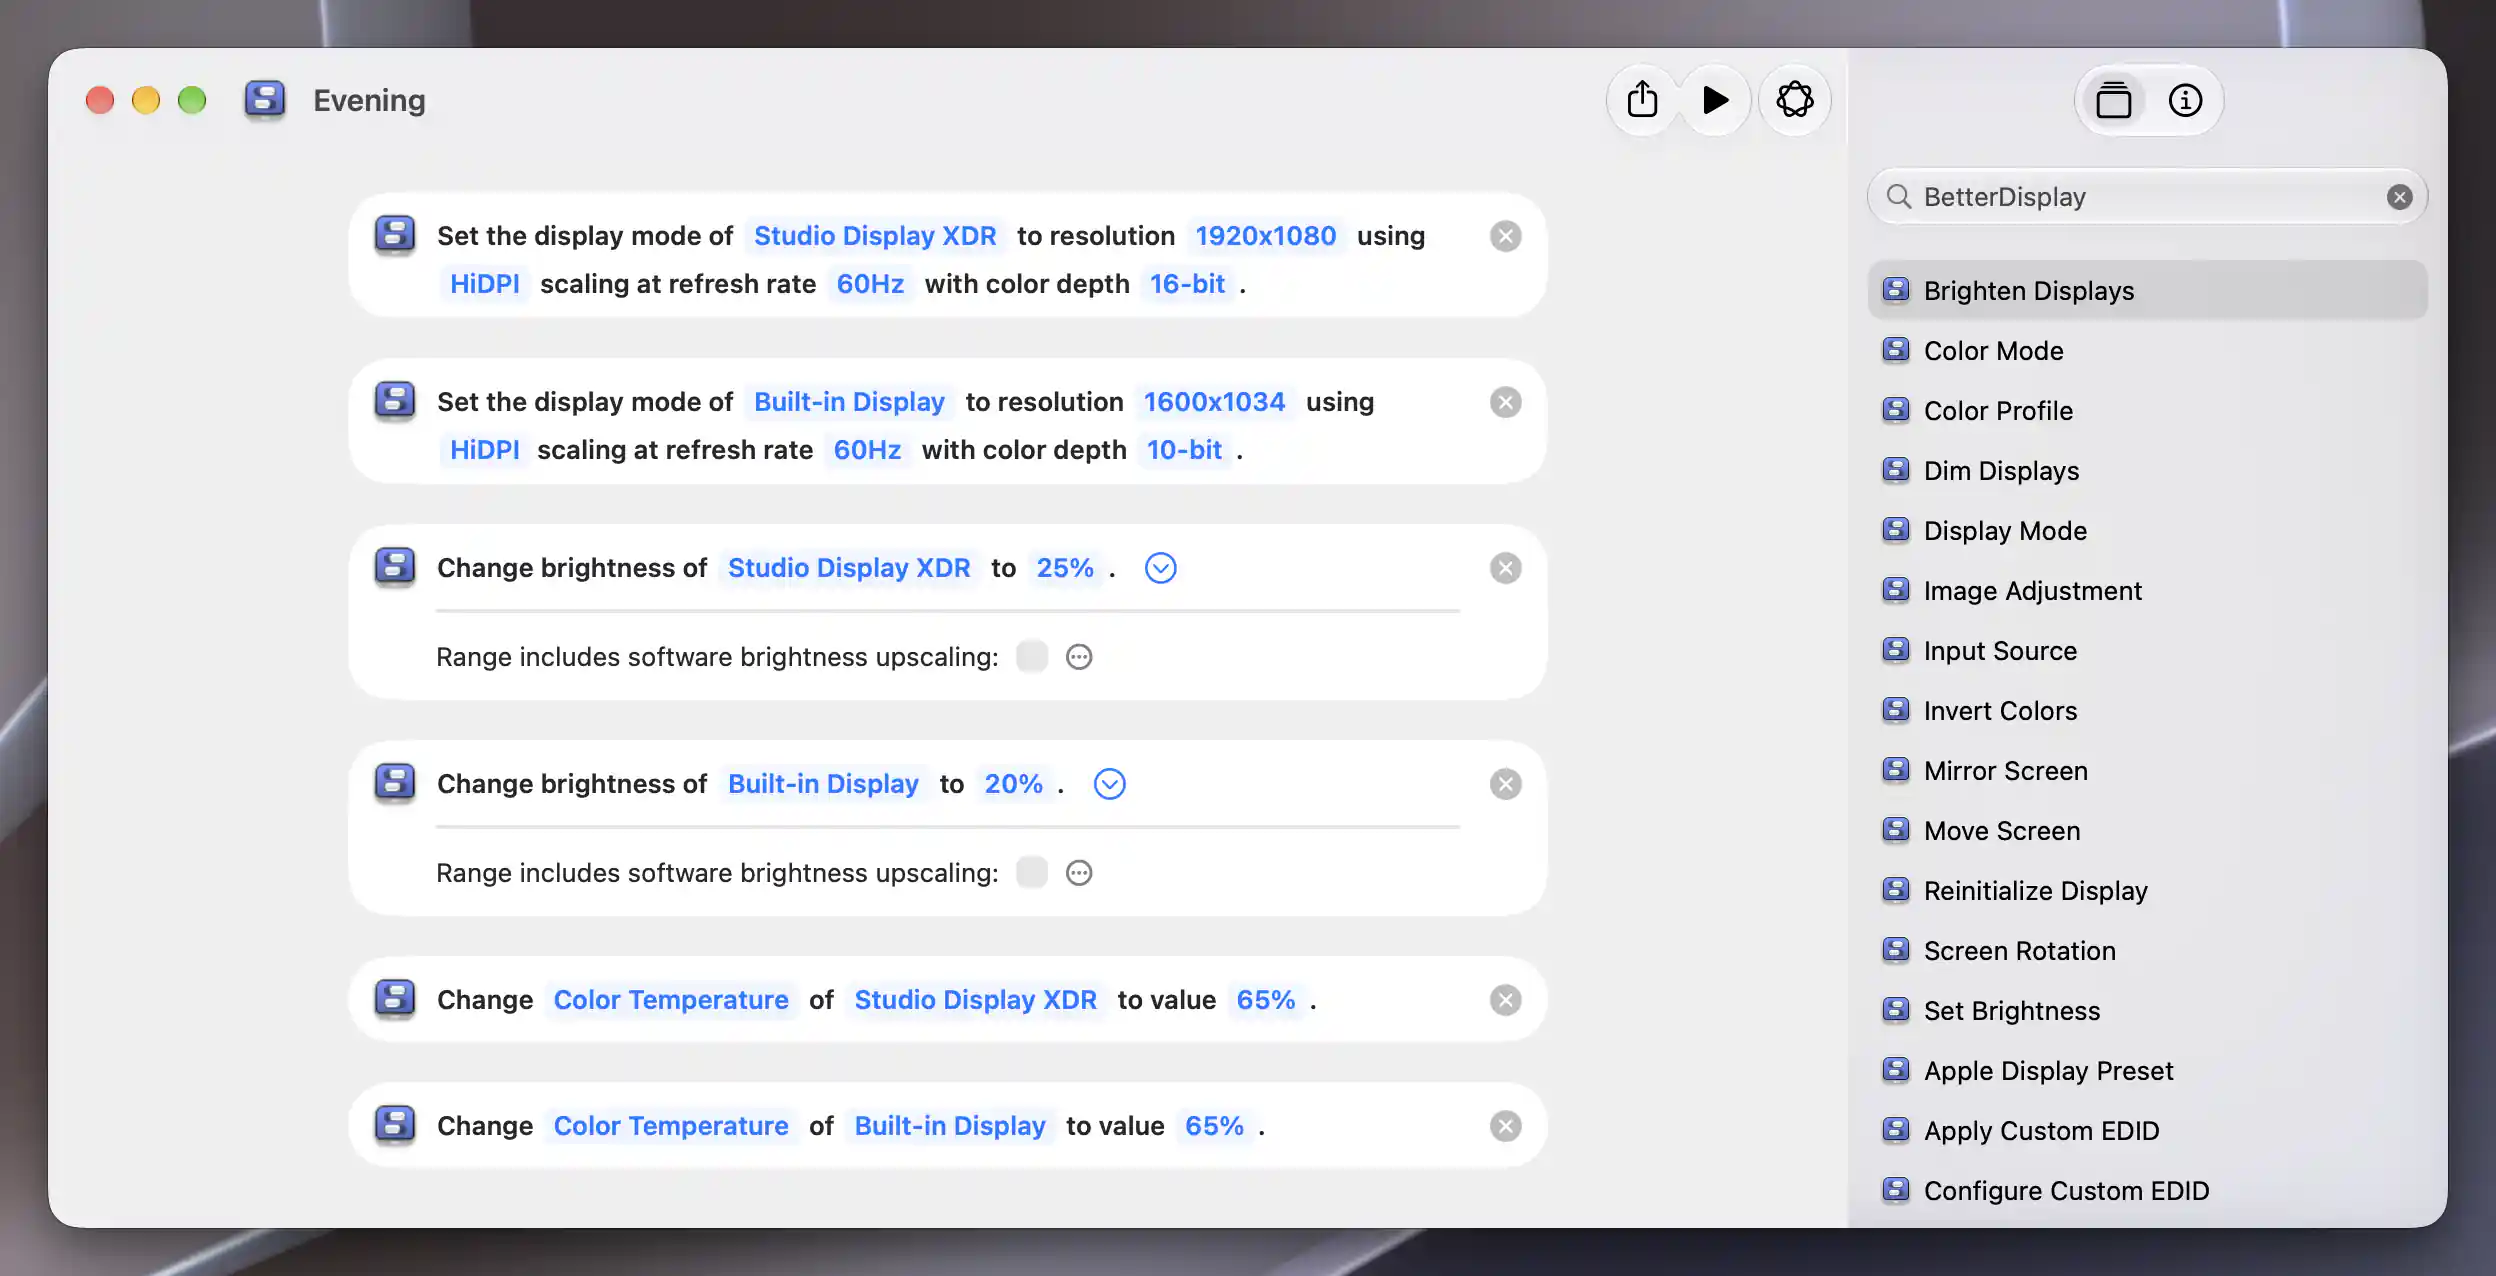
Evening stores lower resolution, dimmer brightness and warmer color temperature requests.
Use actions that set values, rather than Image Adjustment Offset, Dim Displays or Brighten Displays, which change the current value again each time. If you add an action with an on/off choice, select explicit On or Off rather than leaving it as a toggle. For example, Toggle Image Adjustments set to On resumes the saved adjustments; record the original suspension state if you add it.
Assign a key combination
- Open Work in Shortcuts and click the Shortcut Details button. Under Details, choose Add Keyboard Shortcut and press an unused combination, for example Control–Option–Command–W.
- Repeat for Evening with Control–Option–Command–E and Restore with Control–Option–Command–R. Choose different combinations if these conflict with your apps or system shortcuts.
- Try each combination while another app is active, keeping BetterDisplay running. Wait for one preset to finish and the displays to settle before starting the next.
Apple's keyboard-trigger instructions describe this setup and reserved-key restrictions. These assignments belong to Shortcuts; they are separate from BetterDisplay's Keyboard settings.
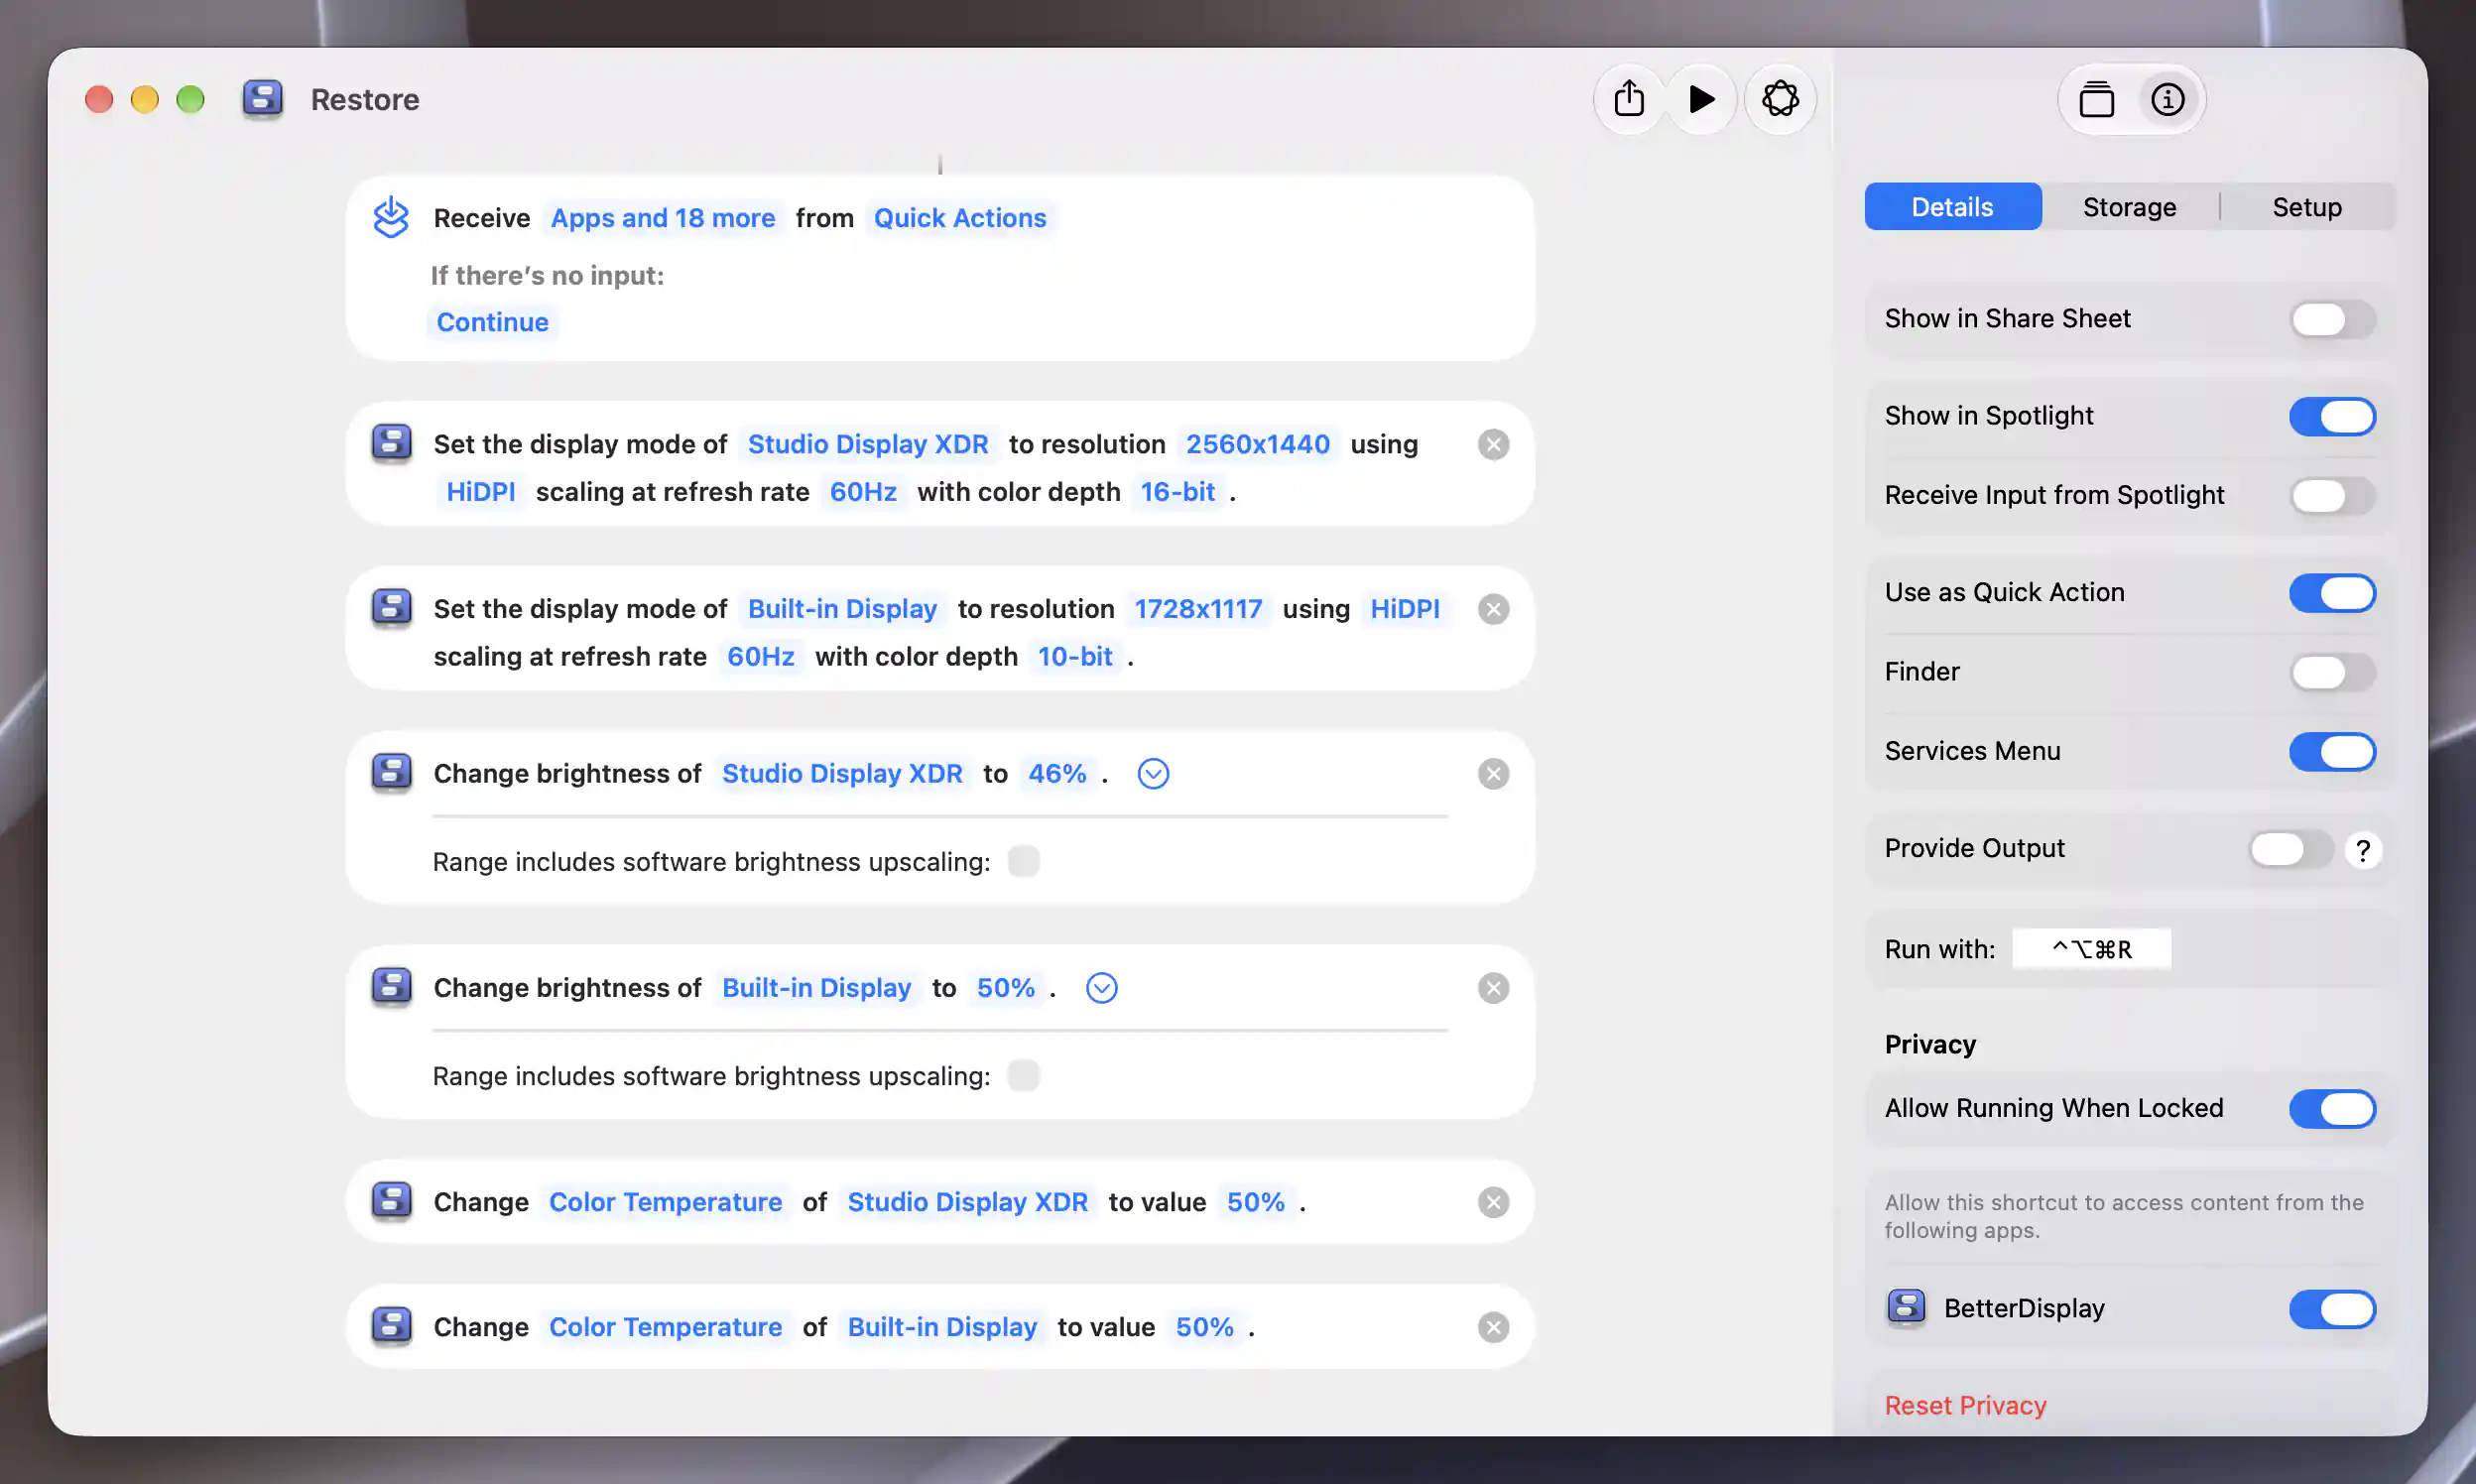
Restore has its own saved values and keyboard combination.
Check the result
- Run Work, wait, and check Display Mode, brightness and Image Adjustments > Color Temperature separately on both displays. Run Work a second time: values should stay the same.
- Run Evening twice, allowing each run to settle. Confirm its modes and separate brightness values, and the warmer image. With the example values, the temperature menu should show 30% on both monitors, not 65%.
- Run Restore twice and compare with your original notes. Check other displays too if any synchronization or group policies remained active.
A completed shortcut is not proof of every physical change. Check the resulting display state rather than relying only on an action's Boolean result: a mode already in place can require no change, and an accepted adjustment or queued mode request can still need time to appear. The preset does not lock out subsequent keyboard adjustments, automatic brightness or other apps.
Troubleshooting
An action does nothing, or the wrong display changes
Open the shortcut and reselect the intended display in the affected action. A saved target can be disconnected, or a recreated display record can require a new selection; the action does not automatically substitute your other monitor. Keep both targets connected for this two-display recipe. A run can leave a partial setup, so reconnect the missing monitor and run Restore before retesting.
To isolate a failure, duplicate the shortcut as a temporary test and leave only the affected action. Run it against one connected display and check its result in BetterDisplay. Then test that display's mode, brightness and temperature actions individually before recombining them. Delete the test copy afterward. See the Shortcuts action reference for parameters and requirements.
The requested mode does not appear
Check the complete combination in Display Mode on the present connection. BetterDisplay can choose a nearest available mode when the requested one is unavailable. Use a listed, tested combination and allow the change to settle before checking appearance. Review UI Scale Matching and Layout Protection if another monitor's mode or position also changes.
Brightness is too high or keeps changing
Check the range checkbox in every brightness action, including Restore. Compare the active brightness method, upscaling and HDR settings with your notes. If the second display's action changes the first display again, review synchronization; holding Shift during a Shortcuts run is not a substitute for disabling the applicable rules. If values drift afterward, review system automatic brightness and BetterDisplay's automatic-brightness setup.
The warm tint is missing
Confirm Color Temperature is available for that display, software adjustments are enabled and Suspend Image Adjustments is off. Check the Pro availability below, then review the active processing method and other color-changing apps. If the display cannot supply this adjustment, omit the two temperature actions from all three shortcuts and keep the mode-and-brightness preset; changing a shortcut value cannot add controller support.
The key combination does not run the shortcut
Run it directly in Shortcuts first. If that works, inspect Shortcut Details and choose a different unused key combination; macOS reserves some shortcuts. If it also fails in the editor, diagnose its individual BetterDisplay actions before changing the trigger.
Undo, stop or remove
- To return to normal, connect both displays and run your tested Restore shortcut. If it cannot run, restore the recorded mode, brightness and temperature separately in each display's App Menu.
- Restore any original processing-method, software-adjustment, suspension, automatic-brightness or upscaling settings you changed during preparation. Restore the recorded synchronization entries and group policies. After restoring the normal modes, check Configuration Protection and restore any original protected resolution and refresh-rate targets that the preset changed.
- To remove a keyboard assignment, open the shortcut's Details, click its Run with field and press Delete. To discard a preset, select it in All Shortcuts and choose Edit > Delete, then Delete Shortcut. Remove temporary test copies too.
Stopping a running shortcut does not undo actions already applied; a mode request already queued can still take effect. Wait for it to settle, then restore. Deleting the shortcut removes its recipe, not the settings it applied. Avoid Reset Image Adjustments as a general undo: it also resets unrelated saved adjustments.
Related pages
- Does BetterDisplay support presets? — How named shortcuts act as presets.
- Restore saved brightness levels on several monitors — A simpler brightness-only workflow.
- macOS Shortcuts — Available actions and parameters.
- CLI examples — Extend a workflow beyond dedicated actions.
- Automatic desk connection actions and scheduled day and evening brightness — Related workflows for connection events or time-based triggers.
Additional information
This section explains licensing and platform requirements for the preset's actions.
Features requiring Pro license
Shortcuts integration, ordinary mode selection and basic brightness adjustments do not have a separate Pro requirement. The Color Temperature actions require Pro or an active Pro trial; omit them for a mode-and-brightness workflow without that feature. Brightness upscaling, advanced group synchronization, Configuration Protection, Layout Protection and UI Scale Matching retain their own Pro requirements when used. See Free and Pro features for availability.
Platform compatibility
The mode, brightness and color-temperature workflow can be used on both Apple silicon and Intel Macs running macOS 26.3 or later, subject to the connected display's modes and usable controllers. Color Temperature needs a compatible software-processing method. DDC brightness depends on the monitor, connection and configured controller; the recipe also works with supported Apple hardware brightness or software dimming. The actions apply to this Mac's displays, even if the shortcut definition is synchronized through iCloud.